T
C
I
I
T
C
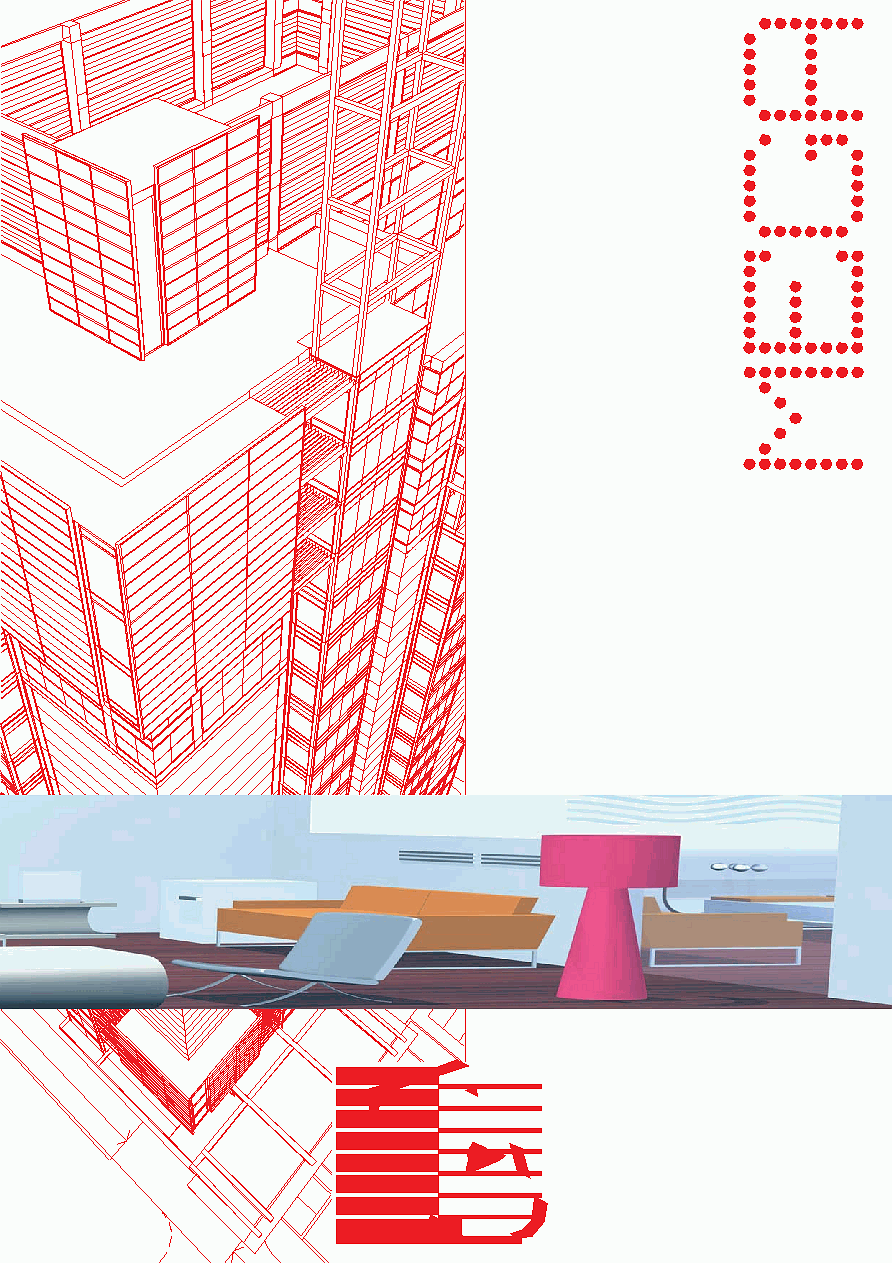
Building Management System
for Hotels,
Nurseries,
Hospitals,
Schools,
Corporate Buildings
Distributed by
Agent for the area:
I.T.C. s.r.l.
Zona Industriale P.I.P. - Località Sambucheto - 62019 Recanati (MC) - Italy
tel.: +39 071987003 / +39 071987054 / +39 071987058 - fax: +39 071987055
www.itcaudio.it - itc@ itcaudio.it
T
C
I
I
T
C

1
MEGA
M
ME
EG
GA
A
is a distributed intelligence system
used to manage hotel functions automati-
cally to improve client comfort and save on
heating and electricity costs.
Control units located in different rooms com-
municate with the PC-based central SUPER
VISION station. Being independently intelligent,
control units can manage processes without
communicating with the central station.
The PC application is easy to use and con-
trols the following functions:
·
·A
Aiirr c
co
on
nd
diittiio
on
niin
ng
g/
/h
he
ea
attiin
ng
g
of Rooms,
Bathrooms and Common Areas.
·
·S
Sa
affe
ettyy:: the system detects bathroom
alarms, flood and intrusion alarms. Light and
sockets are deactivated when the room is
empty.
·
·A
Ac
cc
ce
es
ss
s c
co
on
nttrro
oll to rooms and common
areas for Clients and Staff by means of CHIP
CARD or TRANSPONDER readers, with
access recording in a database.
·
·R
Ro
oo
om
m s
stta
attu
us
s:: free, in use, to clean
·
·E
En
ne
errg
gyy s
sa
av
viin
ng
g:: air conditioning/heating
and electricity depend on the client's pre-
sence in the room. External lights of com-
mon areas, pumps and different actuators
can also be controlled.
·
· A
Ad
dm
miin
niis
sttrra
attiio
on
n:: the system can be inter-
faced with the most common front-office
applications.
D
Diia
ag
gn
no
os
sttiic
cs
s::
system anomalies are
promptly detected.
2- "LCC/LCZ" CHIP CARD READER
2
T
C
I
I
T
C
I.T.C. s.r.l.
MEGA
SYSTEM COMPONENTS
Automation system for hotels, nursing-homes, hospitals, buildings, offices, etc. require the
installation of the following components in each room:
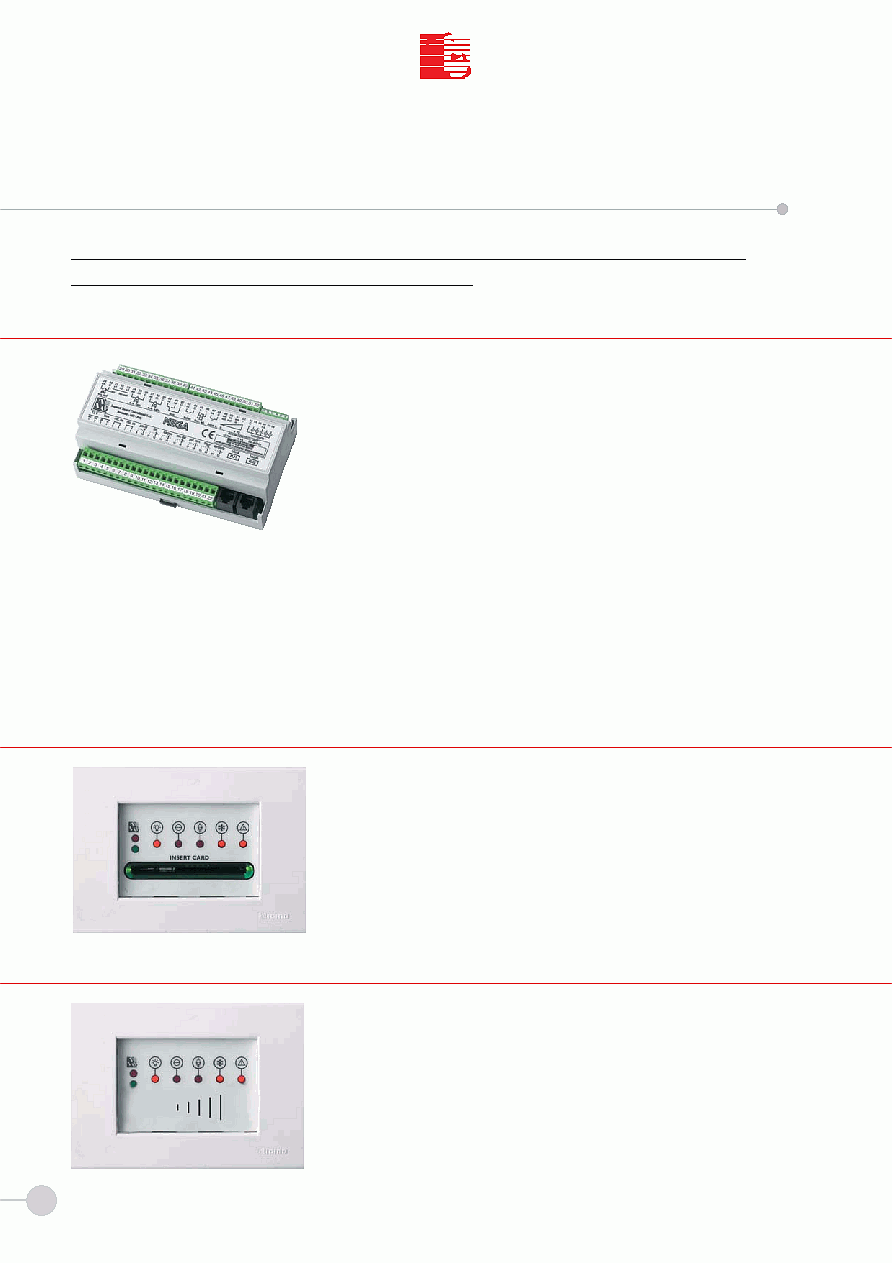
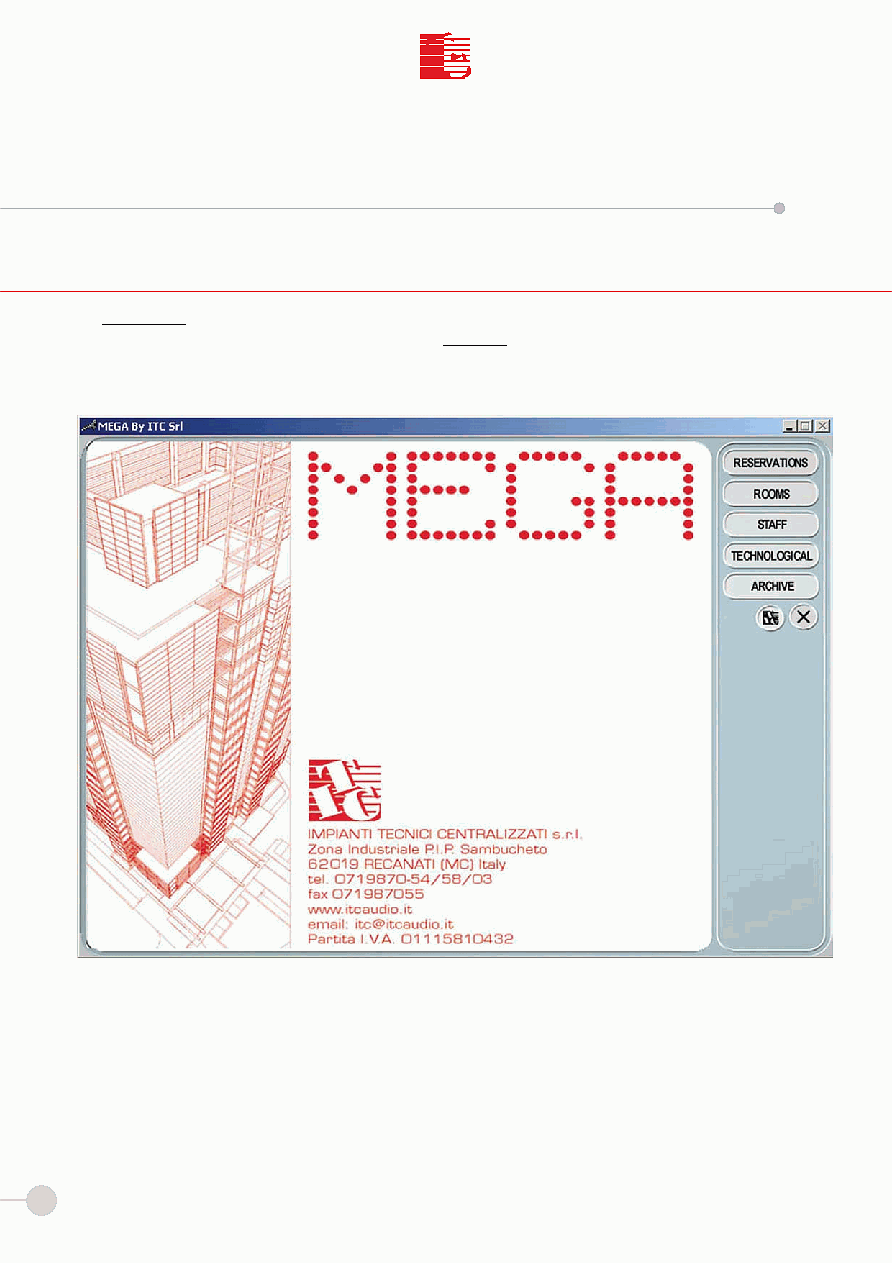
The MEGA control unit is housed in 9-module box for DIN bar and equipped with
analogue and digital inputs for connection of the following devices: chip card reader,
bell, room activation panel, bathroom temperature sensor, room temperature sen-
sor, room temperature panel, door open contact, window open contact, frigobar
open contact, bathroom alarm for help call, flood sensor, "do not disturb" button,
door open button from bed headboard.
It is provided with relay outputs with clean contacts for 230Vac 4(2)A loads to control:
courtesy light - room electricity teleruptor - ON/OFF towel warmer electrovalve 3
speed fan-coil.
ON/OFF fan-coil electrovalve or ON/OFF radiator electrovalve (modulating motorized
or linear motorized electrovalve) controlled with 0-10Vdc continuous voltage.
AUX output for electric shutters, water electrovalve, balcony light or bell.
The unit is also provided with 5 SCR outputs for out-of-door signaling (client in room,
do not disturb, room to clean, frigobar open, help call/flood) and one 12Vdc output,
max 1,2 Ampere for electrical door lock. Data transmission through UTP CAT. 5 2-
wire bus cable, RS 485 standard. 12Vac 30VA power supply. Dimensions (lxhxd):
158x110x72 mm.
It provides access to rooms and common areas in different mode for clients, direc-
tor, service staff, maintenance operators, etc. It is provided with illuminated inser-
tion slot for ISO 7816 chip cards and two LED's for card validity. The room version
is also provided with 5 LED's to display "client in room", "do not disturb", "room to
clean", "frigobar open", "help call/flood" messages.
It is housed in 3-compartment box connected to the control unit by means of 6-wire
cable with 6/6 telephone plug.
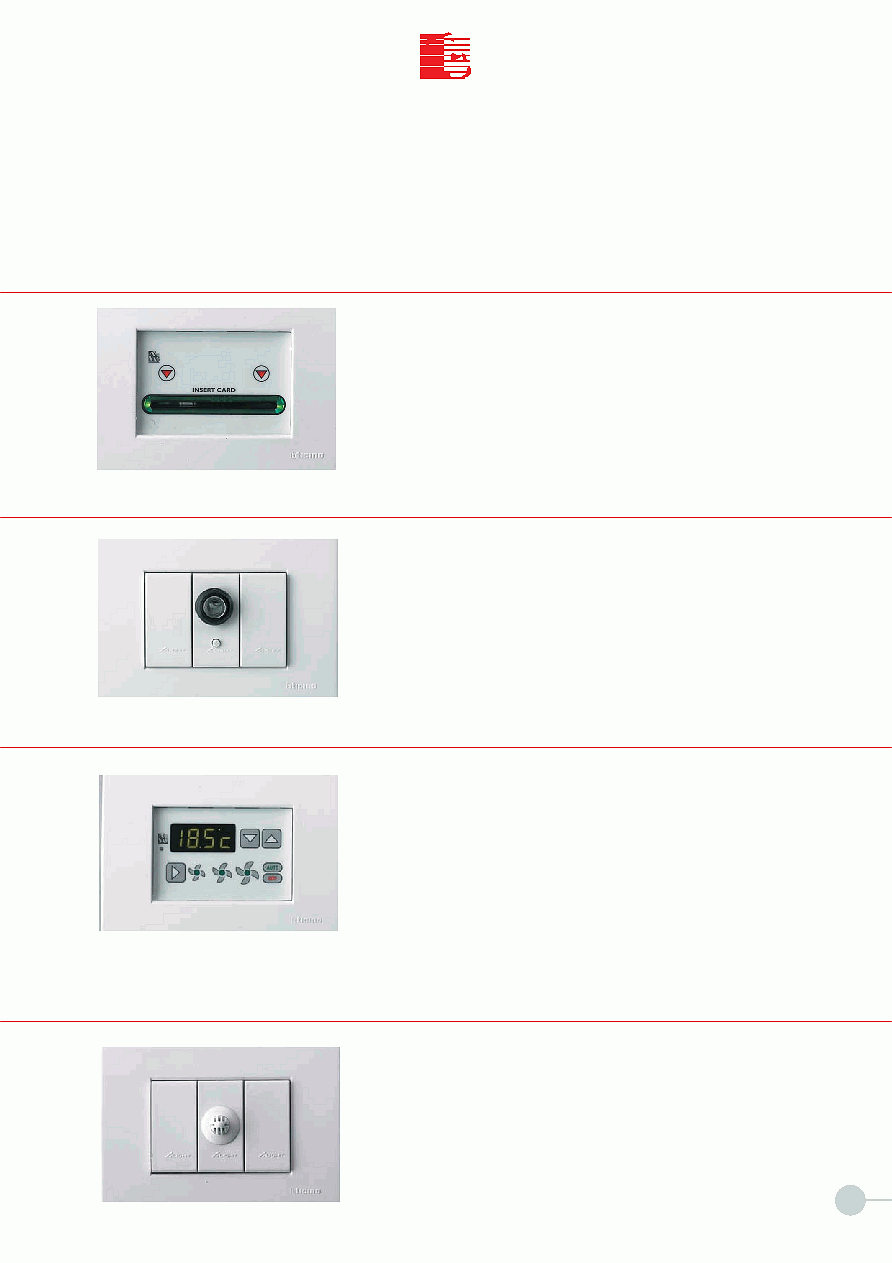
It provides access to rooms and common areas with ISO 7816 transponder card
in different mode for clients, service staff, and maintenance operators. Maximum
reading distance is 5 cm. It is provided with two LED's for card validity. The room
version is also provided with 5 LED's to display "client in room", "do not disturb",
"room to clean", "frigobar open", "help call/flood" messages. It is housed in 3-com-
partment box and connected to the control unit by means of 6-wire cable with 6/6
telephone plug.
3- "LTC/LTZ" TRANSPONDER CARD READER"
1- "MEGA" ROOM CONTROL UNIT
3
T
C
I
I
T
C
I.T.C. s.r.l.
MEGA
It detects the presence of clients or staff in the room and activates room ser-
vices. It is provided with illuminated slot for ISO 7816 cards and two LED's for
easier insertion. It is housed in 3-compartment box and connected to the chip
card or transponder reader by means of 6-wire cable with 6/6 telephone plug.
4- "ATT-S" ROOM ACTIVATION PANEL
It detects the presence of clients or staff in the room and activates room ser-
vices. It is illuminated for easier insertion. It is housed in one compartment of
the box and is connected to the control unit by means of 6-wire cable with
6/6 telephone plug. If the "CLIMA" panel is not installed, the staff can use the
button to send "clean room" and "full frigobar" messages to the reception. In
this case another 6-wire cable with 6/6 telephone plug must be used for con-
nection to the control unit.
5- "ATT-J" ROOM ACTIVATION JACK
It is used by the client to change the temperature, select the fan-coil speed,
set the automatic or manual operation mode, turn off the air conditioning. It is
provided with 4-digit display to view time, fan speed, window status, help call.
Luminous symbols give additional information on the operation mode. The
panel can be used by the staff to reset alarms (help call/flood) locally and send
"clean room" and "full frigobar" messages to the reception. The panel is hou-
sed in 3-compartment box and connected by means of 6-wired cable with 6/6
telephone plug. In the radiator version (CLIMA-R), the fan speed symbol is
replaced by one ON/OFF LED. It must not be installed under the "STI" sensor.
6- "CLIMA-F/CLIMA-R" TEMPERATURE PANEL
It measures the temperature in the room where it is installed. It is com-
posed of an NTC sensor and housed in an ordinary electrical socket. It
must be installed at minimum height of 1.5 m in a dedicated box away
from heat or air sources.
7- "STI" TEMPERATURE SENSOR
4
T
C
I
I
T
C
I.T.C. s.r.l.
MEGA
Jack for presence detection.
Used in combination with "ATT-J" room activator, it allows the system to distingui-
sh between clients and staff and activate room services. 30 different codes availa-
ble for staff.
8- "S-CL/S-PE" JACK
The MEGA-T control unit is housed in 9-module box for DIN bar. It is provided with
8 analogue inputs and 4 digital inputs for connection of the following devices:
"STI" temperature sensors - NA or NC alarm/anomaly contacts switches
buttons - bathroom alarms for help call - flood sensors - counters.
It is also provided with inputs for "CLIMA" panel (max 1) and chip card or tran-
sponder card readers for common areas (max 4). It is provided with 8 relay out-
puts with clean contacts for 230 Vac 4(2)A loads and 1 output with 0-10Vdc
continuous voltage to control modulating linear electrovalves.
Data transmission through UTP CAT. 5 2-wire bus cable, RS 485 standard. 12Vac
15VA power supply. Dimensions (lxhxd): 158x110x72 mm.
9- "MEGA-T" TECHNOLOGICAL CONTROL UNIT
Characterized by easy use and friendly graphic interface, it provides full manage-
ment of rooms and common areas in terms of accesses, temperature control,
electric utilities, alarms, signalling, etc. Possibility of technological controls by
means of dedicated software modules. Database used to store and print events,
such as alarms, signaling, anomalies, accesses, etc..
It can manage additional stations and be interfaced with the most common front-
office applications.
11- "SWG" SUPERVISION AND CONTROL SOFTWARE
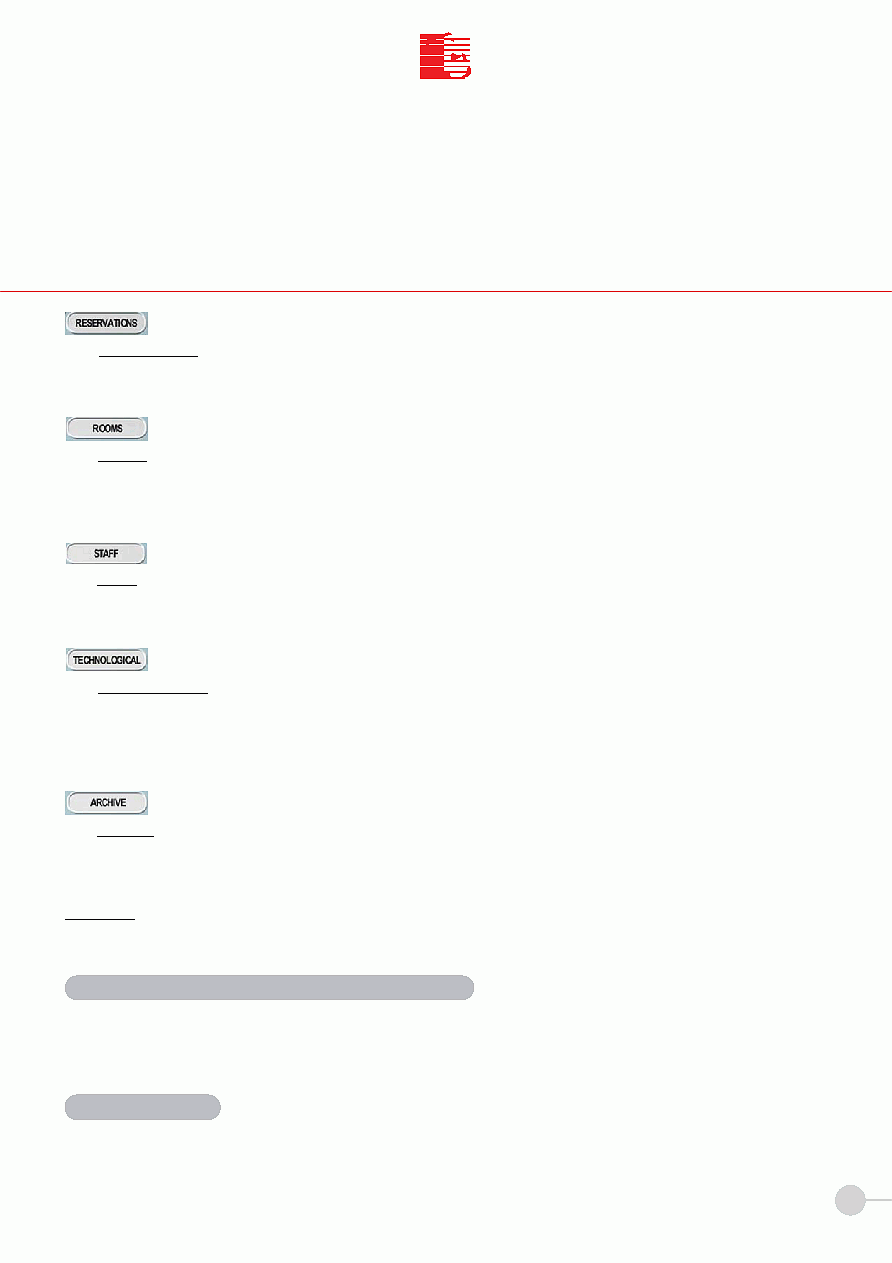
ISO 7816 2K chip card. ISO 7816 transponder tag.
10- "SC/ST" CHIP CARD/TRANSPONDER CARD

5
T
C
I
I
T
C
I.T.C. s.r.l.
The system was developed to monitor, control and record that is to say manage - multiple functions from the same work
station.
The system can manage accesses, air conditioning, heating and electricity in different areas; it can also manage staff ope-
rations, technological and security installations, etc.
The system can be customized according to specific requirements.
The system is currently configured to
check the status of rooms (client or staff in the room), lights, tem-
peratures (both in room and bathroom) and electricity to ensure energy saving and monitor tech-
nological anomalies.
The system is structured on the concept of "distributed intelligence" and includes two levels of intelligence: the
first level
consists in a Personal Computer with management software on board; the
second level is composed of modular units
with microprocessor connected to the Personal Computer by means of a cable. The units are located in the room electri-
cal boards.
Each unit can manage its specific area independently. The PC communicates with the units and supervises the system in
automatic mode, interacting with the user: it detects malfunctioning, anomalous or dangerous situations. For this reason
the PC must be always on and cannot be used to run other programs, except with prior written consent from ITC.
In case of PC anomalies, the basic functions of the system are guaranteed to avoid trouble for clients in the rooms.
The PC with management software must be equipped with color monitor, mouse, and keyboard.
1.1 OVERVIEW
MEGA
SECTION I
OVERVIEW
The software package described in this manual is exclusively supplied under user's license and can only be used in com-
pliance with the license terms and conditions.
The software and this manual cannot be reproduced or duplicated, either as a whole or in part, without the written con-
sent from
ITC.
ITC is not selling its property rights for the software and shall maintain full rights on all software products manufac-
tured by it.
ITC shall not be responsible for incorrect use of the software or consequences of possible malfunctioning or errors con-
tained in this manual.
The management software is presented as a single program. However, it is composed of independent modules that are
coordinated through the main menu that acts as system manager. Special attention was given to the user interface to
ensure total easiness of use.
1.2 USER'S LICENSE
1 . 3 S O F T W A R E P H I L O S O P H Y
6
T
C
I
I
T
C
I.T.C. s.r.l.
The
main menu is displayed after installation.
The main menu is used to access the different sections or
modules of the software.
The main menu window is shown in the figure below:
The command window (top right) contains a group of buttons that are used to access the program in a different way.
To select the module place the cursor on the corresponding button and left click with the mouse.
2.1 MAIN MENU
MEGA
SECTION II
7
T
C
I
I
T
C
I.T.C. s.r.l.
MEGA
The ARCHIVE module is used to access the submenu that displays the historical archives of: Alarms,
Indications, Anomalies, Clients (access control), Staff (access control), Cleaning (room status),
and Frigobar.
WARNING: when you close the program, the PC stops controlling the system. I.T.C. shall not be responsible for malfunc-
tioning caused by loss of control on the system.
This control is performed by the software; the system detects all indications and displays a window with the exact location
automatically. This information can be reset or iconized. Apart from recording all events, the system can print them or save
them on hard disk or other memory units.
The time and date must be set in Windows Control Panel.
The following modules can be accessed:
The RESERVATIONS module is used to reserve the hotel rooms according to different modes. The
reservation function is very useful to precondition the room before and during the client's stay.
The ROOMS module is used to view the general situation of the rooms divided by floor and display
the different functions (window status, measured temperature, fan coil or radiator status, elec-
tricity, client or staff in room, etc.) with the commands located on the right side of the monitor.
The STAFF module is used to encode and assign chip cards or transponder cards to the staff, sear-
ch for staff in the rooms.
The TECHNOLOGICAL module is used to monitor, time and check utilities of common areas (restau-
rants, kitchens, corridors, boiler rooms, power stations, etc.) and technological installations in
general. In addition to Summer/Winter selection, the module is used to save temperature profi-
les and configure peripheral control units.
INDICATIONS of ALARMS and ANOMALIES:
TIME and DATE:
8
T
C
I
I
T
C
I.T.C. s.r.l.
The
RESERVATIONS module is used to reserve the hotel rooms according to different modes. The reservation function
is very useful to precondition the room before and during the client's stay.
How to access the RESERVATIONS module: in the main menu, place the cursor on the RESERVATIONS button
and left click with the mouse. The following window is displayed.
This window contains a group of buttons that indicate the floor or part of the floor that can be accessed by selecting the
corresponding button.
Place the cursor on the desired floor and left click with the mouse to access the floor window.
This window contains a group of icons that indicate the numbers or names of the rooms that can be selected.
In the graphic version the floor window shows the plan of the floor or part of the floor you have selected.
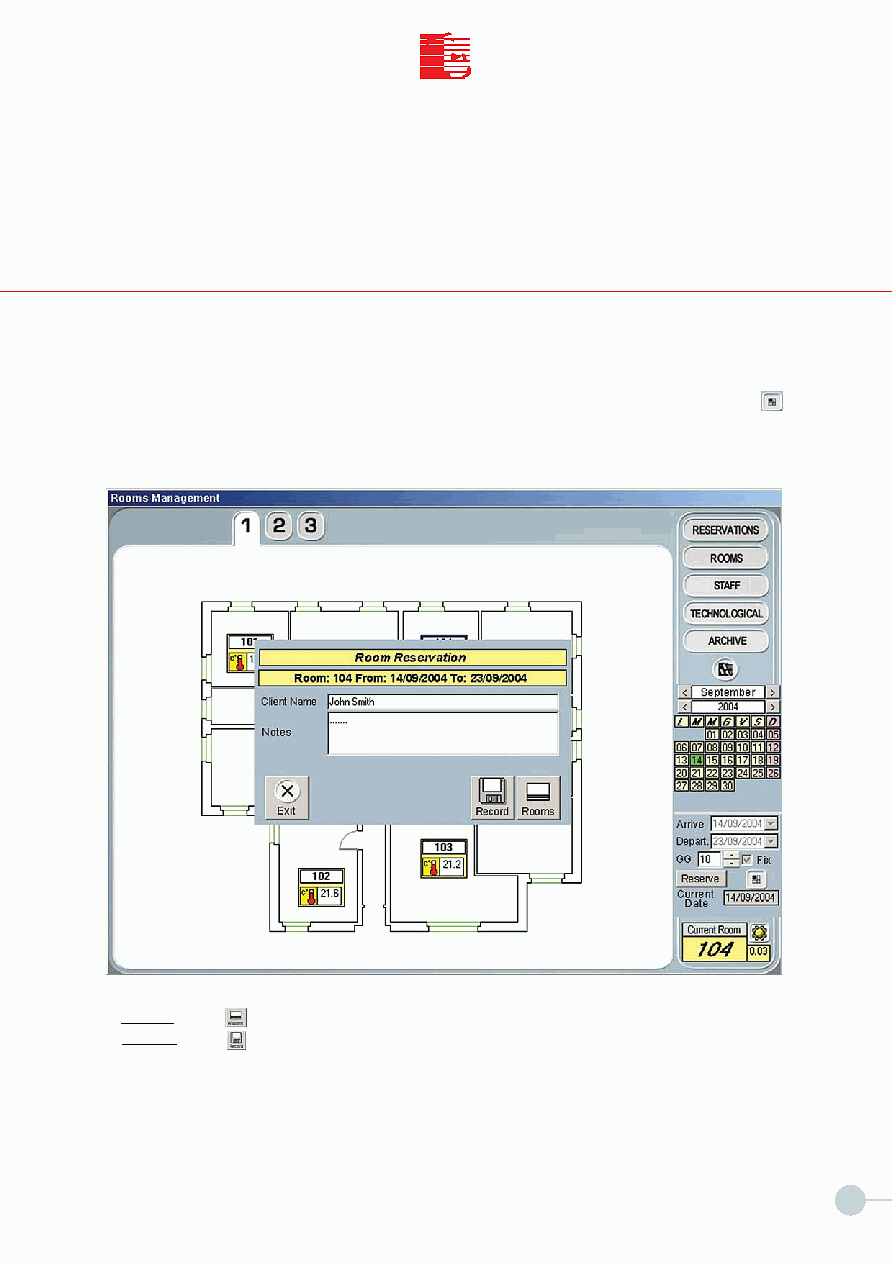
A calendar with today's date is displayed under the main menu (red circle in Pict. 2).
3.1 RESERVATIONS
Pict. 2
MEGA
SECTION III
Multiple selection
9
T
C
I
I
T
C
I.T.C. s.r.l.
MEGA
Left click with the mouse on the day to reserve; to select month and year use the arrows on the left (back) and right (next)
of the current month and year.
The "arrival" and "departure" fields change according to your entries.
Now you can select the room (i.e. room 104) or a group of rooms. To select a group of rooms use the multiple selection
button. To display this button (multiple selection button) left click with the mouse on the button "select a room"
next to the "Reserve" button. Now select the rooms you want to book and press the "Reserve" button.
The system automatically displays the window used to insert the name to the rooms to reserve and/or enter some notes
on the rooms (Pict. 3)
3.2 DAILY RESERVATION
Pict. 3
Click the
Rooms button to reserve the room and to encode a chip card as shown on page 24 section 7.3 Pict. 18.
Click the
Record button to reserve the room directly. The chip card for the room can be encoded at a later stage.
The color of the icon's border changes according to the associated function, as shown below :
Yellow: standard mode
Blue: room selected
Red: room reserved
10
T
C
I
I
T
C
I.T.C. s.r.l.
MEGA
Left click with the mouse on the day to reserve; to select month and year use the arrows on the left (back) and right (next)
of the current month and year.
The "arrival" and "departure" fields change according to your entries. Three reservation modes are available:
Solution 1
The fields
Arrival Date and Departure Date (Pict. 4) are used to set the desired period. Left click with the mouse the room
or group of rooms and press the
RESERVE button.
The system automatically displays the window used to give a name to the rooms to reserve and/or enter some notes on
the rooms (Pict. 3).
In case of multiple selection, the window contains only the
Record button to reserve the room. The chip card for each
room in the group can be encoded at a later stage (see page 26 section 7.3).
In case of one-room reservation, the window contains the
Record button and the Rooms button that is used to enco-
de the chip card immediately.
Solution 2
Setting the DAYS (Period variation):
Set the period to reserve with the arrows next to the number of days. The arrival date remains unchanged and the depar-
ture date is updated by adding the number of days you have set.
Left click with the mouse on the room or group of rooms to reserve (with the
multiple selection button) and press
the
RESERVE button.
The system automatically displays the window used to give a name to the rooms to reserve and/or enter some notes on
the rooms (Pict. 3).
In case of multiple selection, the window contains only the
Record button to reserve the room. The chip card for each
room in the group can be encoded at a later stage (see page 24 section 7.3).
In case of one-room reservation, the window contains the
Record button and the Rooms button that is used to enco-
de the chip card immediately.
3.3 PERIOD RESERVATION
Pict. 4
Pict. 5
NOTE: Use the arrows (Pict. 5) to increase or decrease the number of reserved days and update the period at any time,
leaving the arrival date unchanged.
11
T
C
I
I
T
C
I.T.C. s.r.l.
MEGA
Solution 3
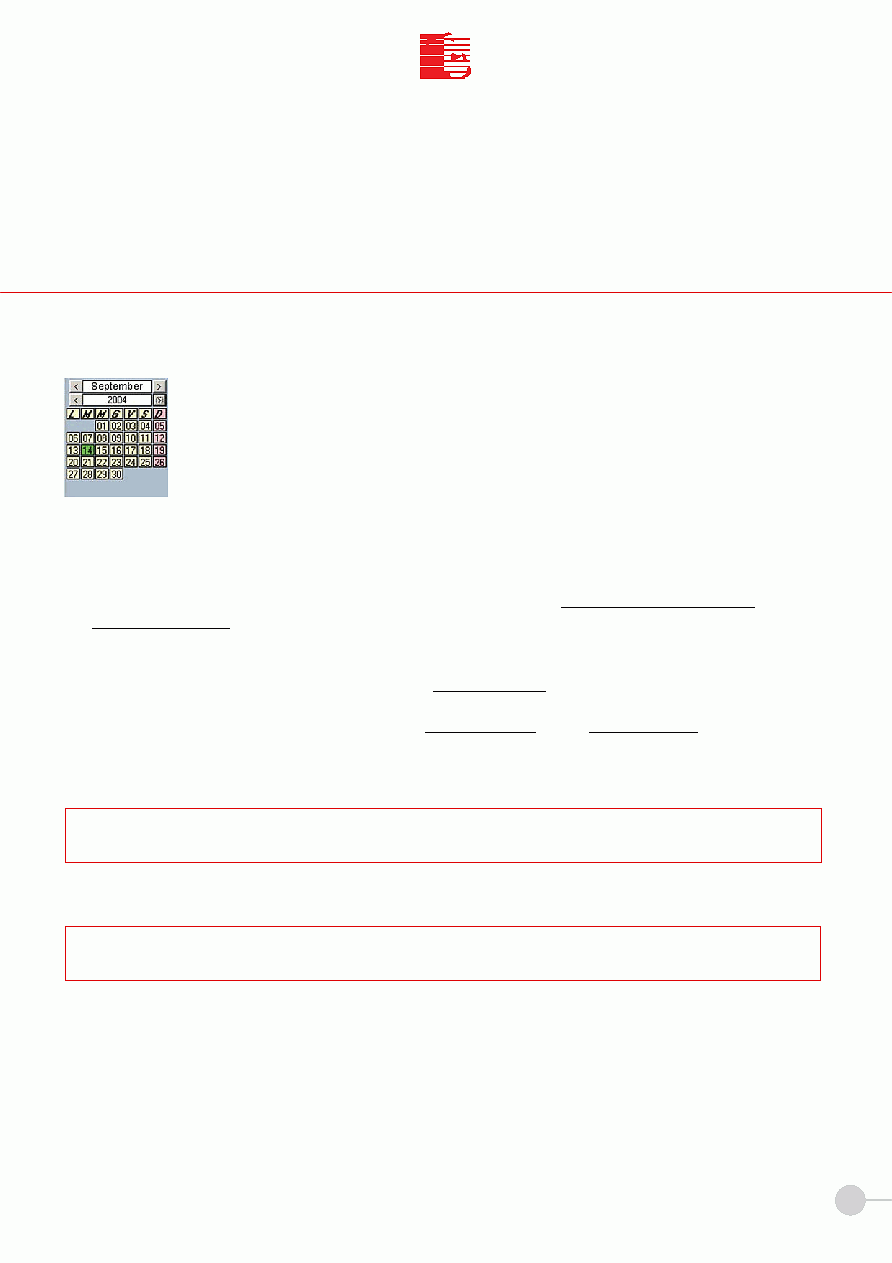
Setting the DAYS (arrival date variation):
Set the period to reserve with the arrows next to the number of days. The Fix option is used to block this function (7 days
in the example). The arrival date remains unchanged and the departure date is updated by adding the number of days you
have set.
Left click with the mouse on the room or group of rooms to reserve (with the
multiple selection button) and press
the
RESERVE button.
The system automatically displays the window used to give a name to the rooms to reserve and/or enter some notes on
the rooms (Pict. 3).
In case of multiple selection, the window contains only the
Record button to reserve the room. The chip card for each
room in the group can be encoded at a later stage (see page 24 section 7.3).
In case of one-room reservation, the window contains the
Record button and the Rooms button that is used to enco-
de the chip card immediately.
Pict. 6
NOTE: Use the arrows to increase or decrease the number of reserved days and update the period at any time, leaving
the arrival date unchanged.
NOTE: Click any day of the calendar in Pict. 6 to change the arrival date and automatically change the departure date (this
parameter is calculated by adding the number of days to the arrival date).
12
T
C
I
I
T
C
I.T.C. s.r.l.
Pict. 7
The Reservations module can be used to create a comfort profile for the client in the room. This temperature value is
included between the MAINTENANCE profile (empty room with no reservation) and the ROOM TEMPERATURE profile
(client in the room).
To set this value you must set a parameter in the SEASON sub-module (see red circle in Pict. 7) of the technological
modul. This parameter is known as
SAVING VALUE and is subtracted in WINTER and added in SUMMER to the ROOM
TEMPERATURE profile
(described on page 22 section 7.1) to set an average comfort temperature for the room and
ALWAYS GUARANTEE
ENERGY SAVING.
3.5 How to cancel the Reservation
In the main menu place the cursor on the
RESERVATIONS button and left click with the mouse to select the RESER-
VATIONS module.
This window contains a group of buttons that indicate the floor or part of the floor that can be accessed by selecting the
corresponding button.
Place the cursor on the desired floor and left click with the mouse to access the floor window.
This window contains a group of icons that indicate the numbers or names of the rooms that can be accessed by selecting
the corresponding button.
Reserved rooms are framed in red. To cancel the reservation double click the desired room: select the
CANCEL button
to cancel the reservation.
MEGA
3.4 TEMPERATURE SETTING
13
T
C
I
I
T
C
I.T.C. s.r.l.
Pict. 8
MEGA
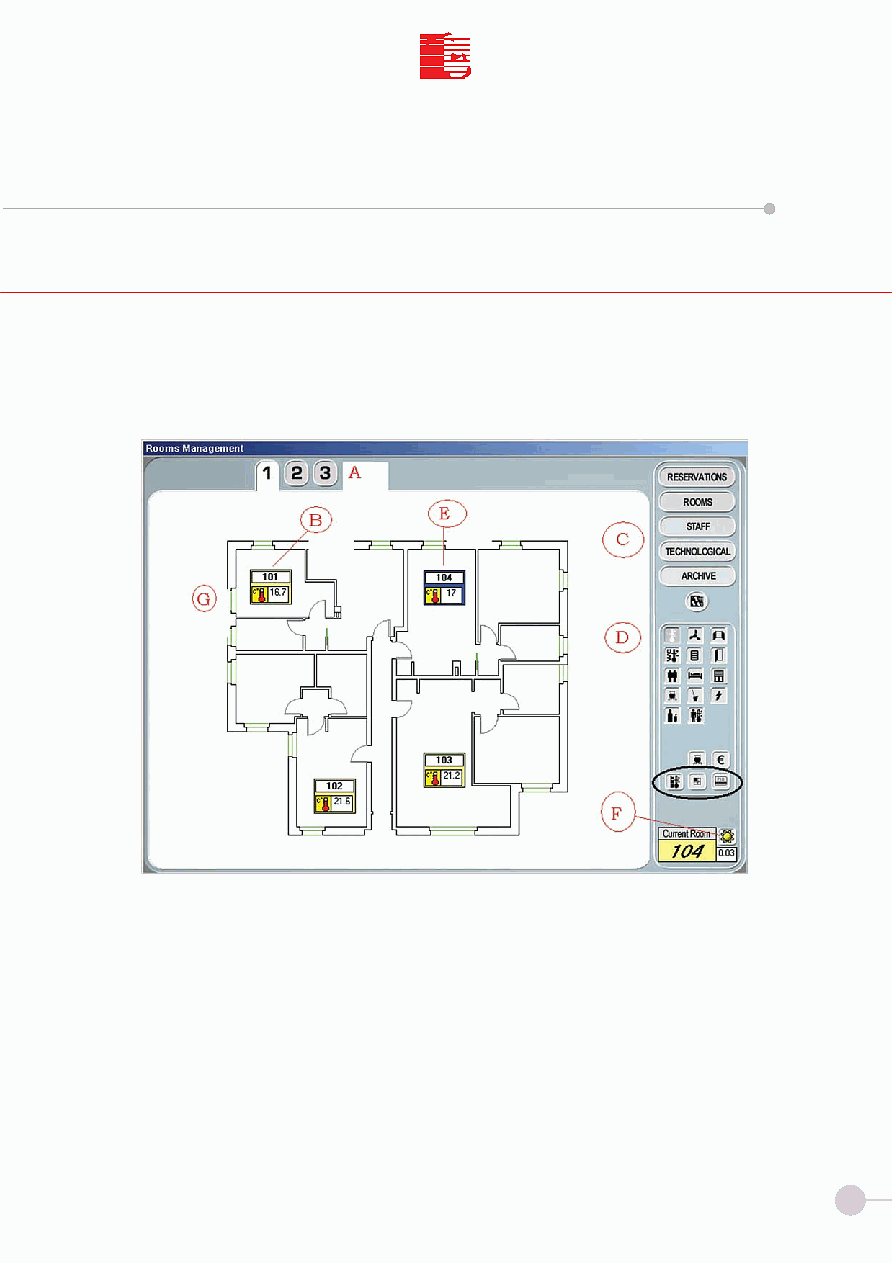
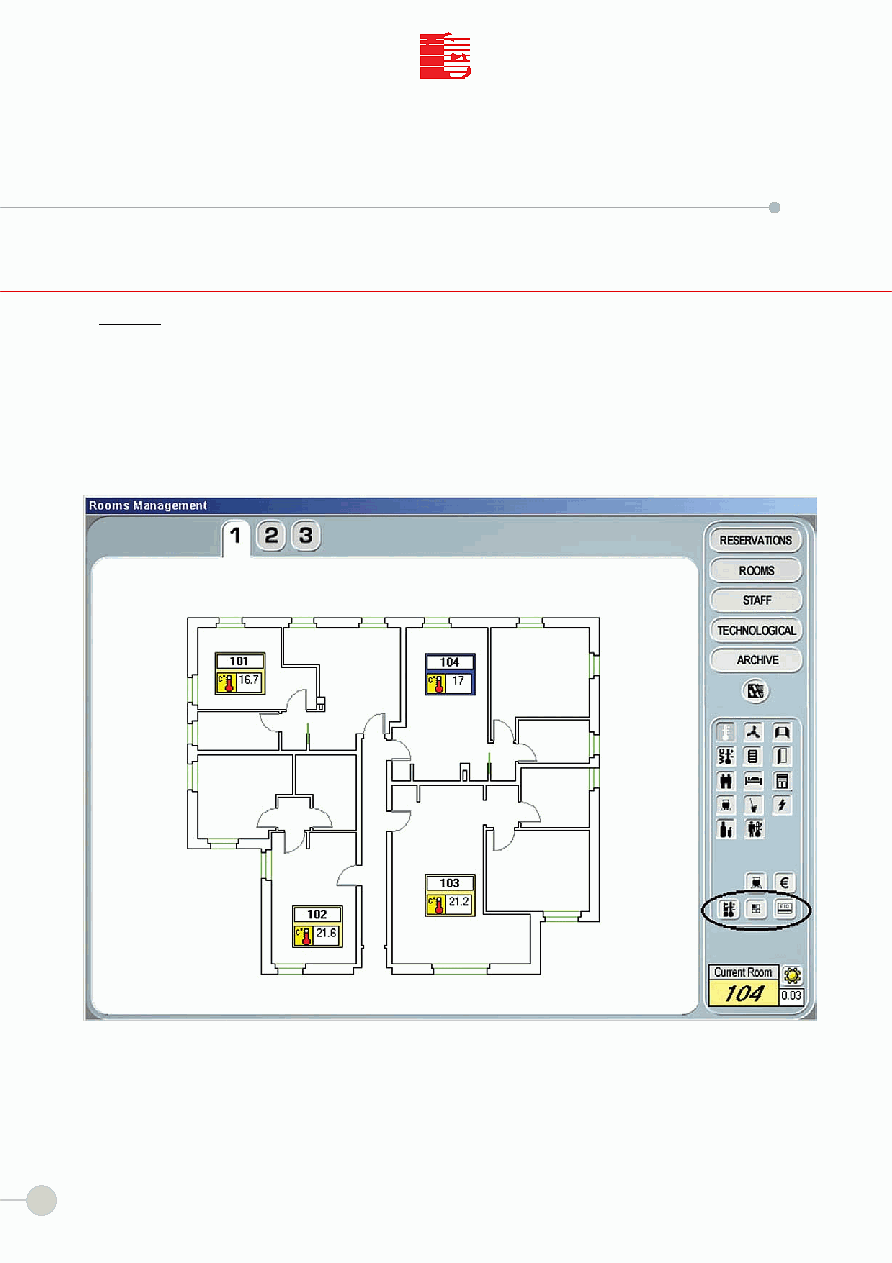
The ROOMS module is used to get information on the room: electrical and electronic utilities, accesses to the room, air
conditioning and heating, etc.
a) Floors
b) Not selected room. The Rooms that are not selected are shown in yellow. To change the settings you must select the
room first. Use the upper section of the
D functions MODULE to display the status of all rooms.
c) Main command module. This section is always active and is used to access the software functions without going back
to the main menu.
d) Functions module. This section is used to get the general situation of all active functions of the installation.
e) Selected Room. To select the room to display left click the icon with the mouse. In section d (functions module, lower
section) select the temperature profile (1st button) or the chip card (3rd button). The 2nd button is used to make multi-
ple selections. Or double left click with the mouse to access the room (see Pict. 9 next page).
f) Season. This function is used to display the selected season.
g) Plans. The floor plan allows the operator to display the general situation and manage the functions of the rooms on that floor.
4.1 ROOMS
SECTION IV
14
T
C
I
I
T
C
I.T.C. s.r.l.
In the main menu place the cursor on the
ROOMS button and left click with the mouse to select the ROOMS module.
This window contains a group of buttons that indicate the floor or part of the floor that can be accessed by selecting the
corresponding button. Press the
EXIT button to go back to the main menu. Place the cursor on the desired floor and left
click with the mouse to access the floor window. This window contains a group of icons that indicate the numbers or
names of the rooms that can be accessed by selecting the corresponding button. In the graphic version the floor window
shows the plan of the floor or part of the floor you have selected. To access the room place the cursor on the room in the
plan and DOUBLE left click with the mouse. The window shown in Pict. 9 is displayed.
This window shows the status of the functions managed by the installation. Temperature control changes according to the
presence of the
client and according to the parameters set during the reservation in order to optimize the energy con-
sumption-heating ratio. The presence of the client in the room is detected through the insertion of the chip card in the slot.
The room temperature is measured by the sensors and values are displayed by pressing the buttons
Room
Temperature and Bathroom Temperature. The measured values are used by the system to adjust air conditio-
ning/heating with fan coils and/or radiators. Values are updated in real time to check if the room temperature corre-
sponds to settings. You can manage energy saving and change the temperature values accordingly. To optimize energy
consumption the system considers the window status (open/closed). If the window is open, the room temperature (mea-
sured temperature) will not correspond to the temperature you have set. The
room to clean function is an automatic
function that is related to the client's presence during the night. The software checks if the room is used during the night
and the next morning indicates that the rooms need to be cleaned. The information is shown both on the PC monitor and
with a LED on the synoptic panel of the chip card unit outside the door. The indication "Room to clean" can be deactivated
by the staff by pressing a button on the temperature panel or jack connector (
art. ATT-J) and informing the receptioni-
st that the room is ready.
The system can be used to check the Staff operations. The staff can be identified using the menu item "
Staff" and then
"
Search" (see page 16 section 5.3). When the staff is in the room, the air conditioning/heating functions are set
in the maintenance mode and the connected systems adjust to this temperature value.
The
main command module is always shown on top right. To go back to the main menu press the
EXIT button.
The graphic image of the room can be customized on demand.
4.2 HOW TO ACCESS THE ROOM
4.3 THE ROOM WINDOW
MEGA
Pict. 9
15
T
C
I
I
T
C
I.T.C. s.r.l.
MEGA
The
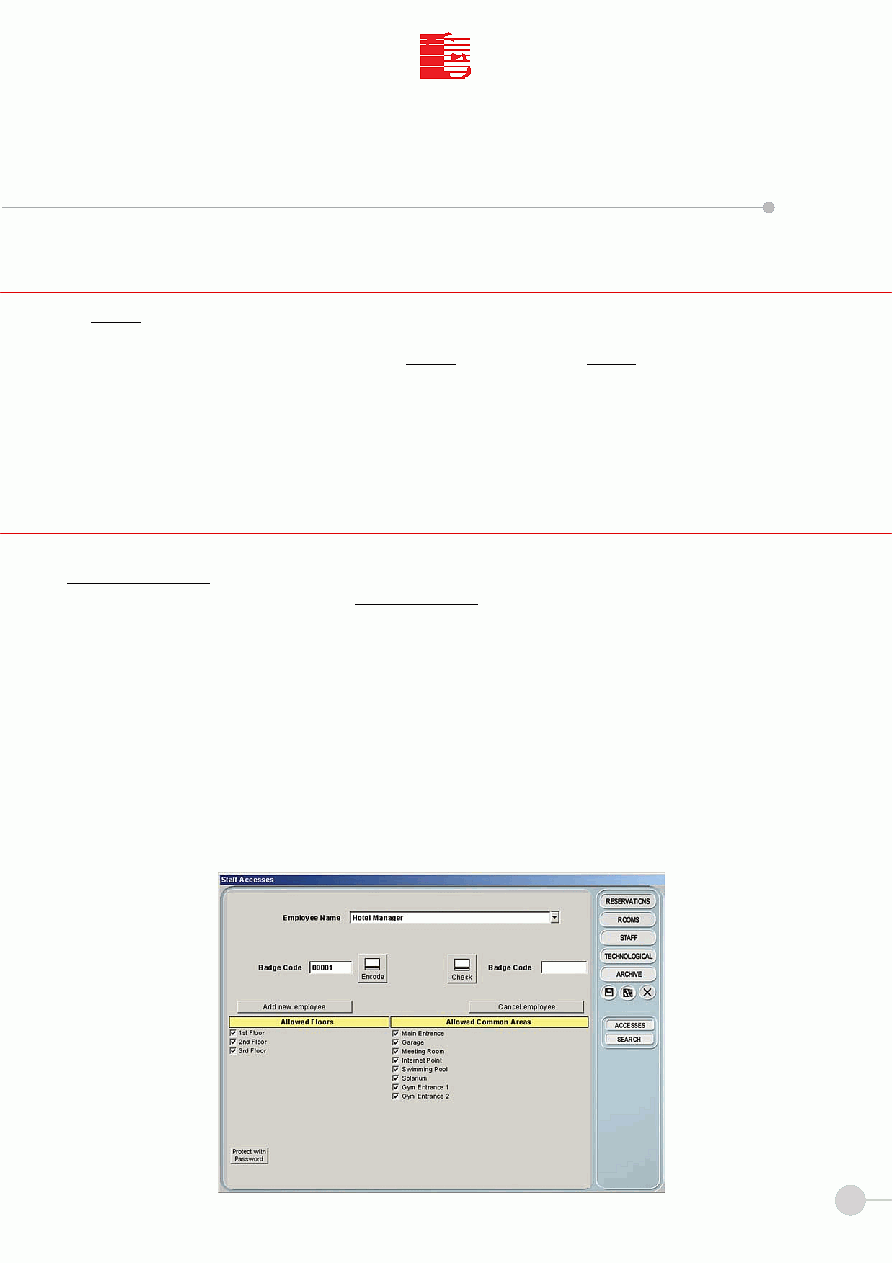
STAFF module is used to manage the staff in the rooms. This function is used to assign a chip card to each employee
and activate access to specific areas. You can make a detailed search on the staff presence.
In the main command module place the cursor on the
STAFF button to select the STAFF module and left click with the
mouse. The
Staff accesses is displayed instead of the main menu. This window is shown in Pict. 11 and is divided in two
parts: the
first part
Search lists the chip cards activated for the staff with the owner's name for easier identification.
The
second part
Accesses is used to create the staff cards and assign their areas of operation (Pict. 10).
5.1 STAFF
SECTION V
Pict. 10
To activate the staff chip cards you must insert an empty card (or a used card) in the encoder (art. COD) and press the
Add new employee button. The software prompts a number in the Badge Code field.
The name of the card owner is entered in the
Employee Name field.
The areas assigned to the employee are located in the lower part of the window. The page shows an example of configura-
tion and the functions can be configured as desired.
Now click the
Encode button to write the code into the card and then the Check button to check if the chip card code is
correct; press the button identified by a
floppy disk (on the right side of the window next to the ITC icon) to send the code
to the room control unit memory.
If the
Check operation is not successful, check that the chip card encoder is connected correctly, check that the card is
inserted correctly and the operations are performed correctly (
it is recommended to exit the window and access it again
to perform the before mentioned operations). If the system does not encode the card, change the card and repeat the ope-
rations.
5.2 HOW TO ACTIVATE CHIP CARDS
16
T
C
I
I
T
C
I.T.C. s.r.l.
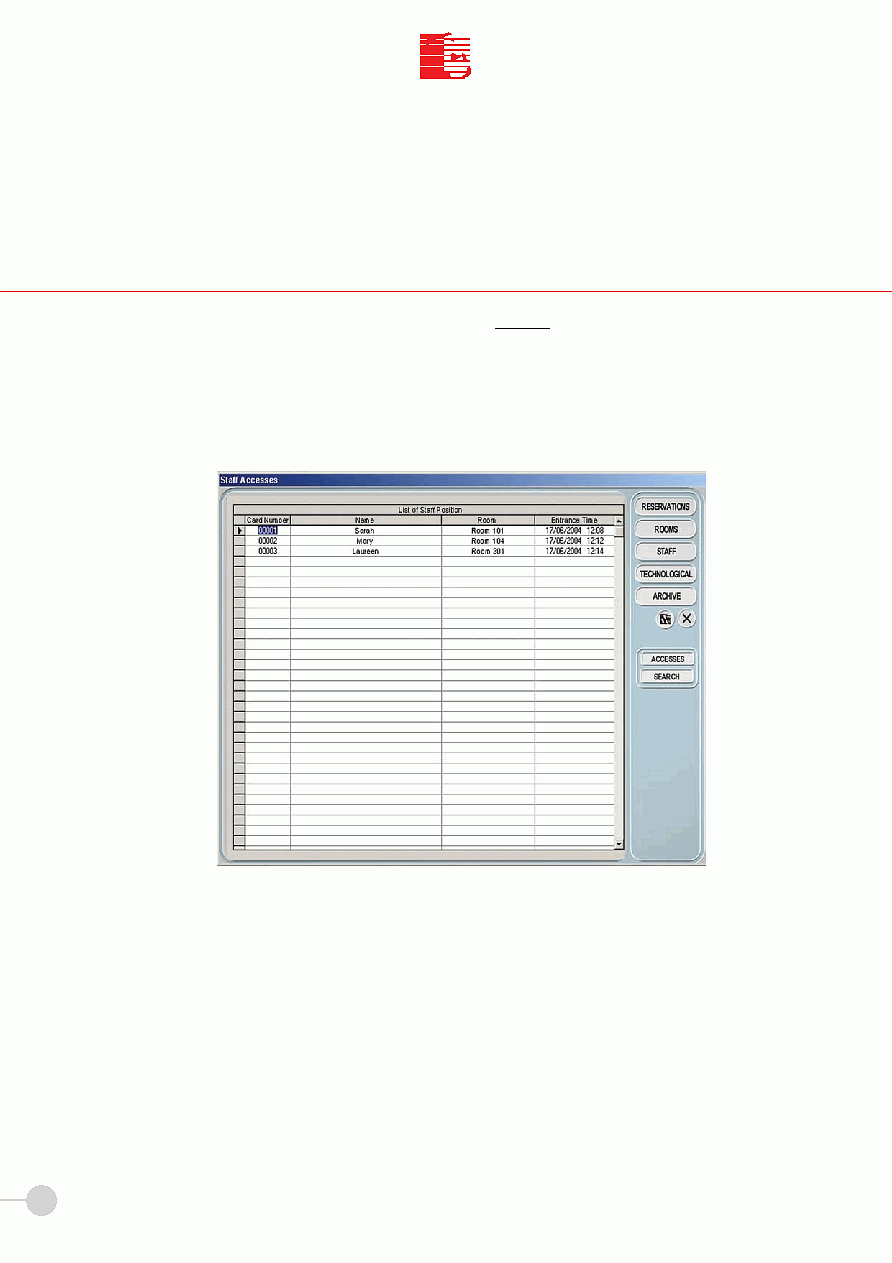
To view the presence of staff in the rooms with access time click the
Search button (on the right side). The system displays
the following window automatically (pict. 11) with the
List of staff position divided into four columns (Card No. Name
Room Entrance Time).
This functions allows to save time when giving instructions to the staff and keep the general situation always under control.
MEGA
5.3 STAFF SEARCH
Pict. 11
17
T
C
I
I
T
C
I.T.C. s.r.l.
MEGA
The
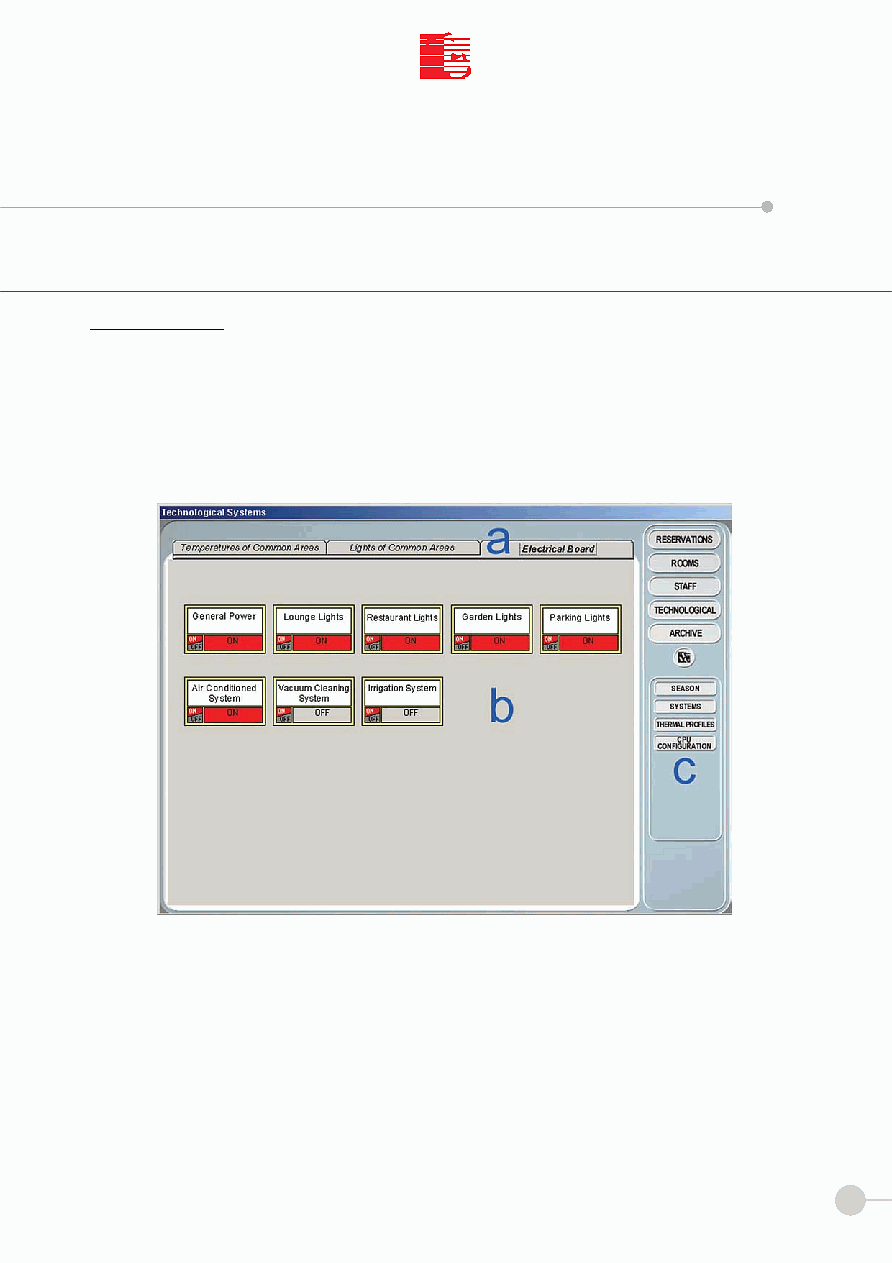
TECHNOLOGICAL module gives access to a sub-module that is used to manage the status of the installation. Pict.
12 shows an example of the multiple functions offered by the technological system. The window changes according to the
structure where the system is installed.
The functions are managed with the menu items contained in Section C.
a) Technological sections.
b) Functions of a technological section.
c) Management module of all system functions. The list includes: SEASON, SYSTEMS, TEMPERATURE PROFILES, CPU
CONFIGURATION.
6.1 TECHNOLOGICAL
SECTION VI
Pict. 12
18
T
C
I
I
T
C
I.T.C. s.r.l.
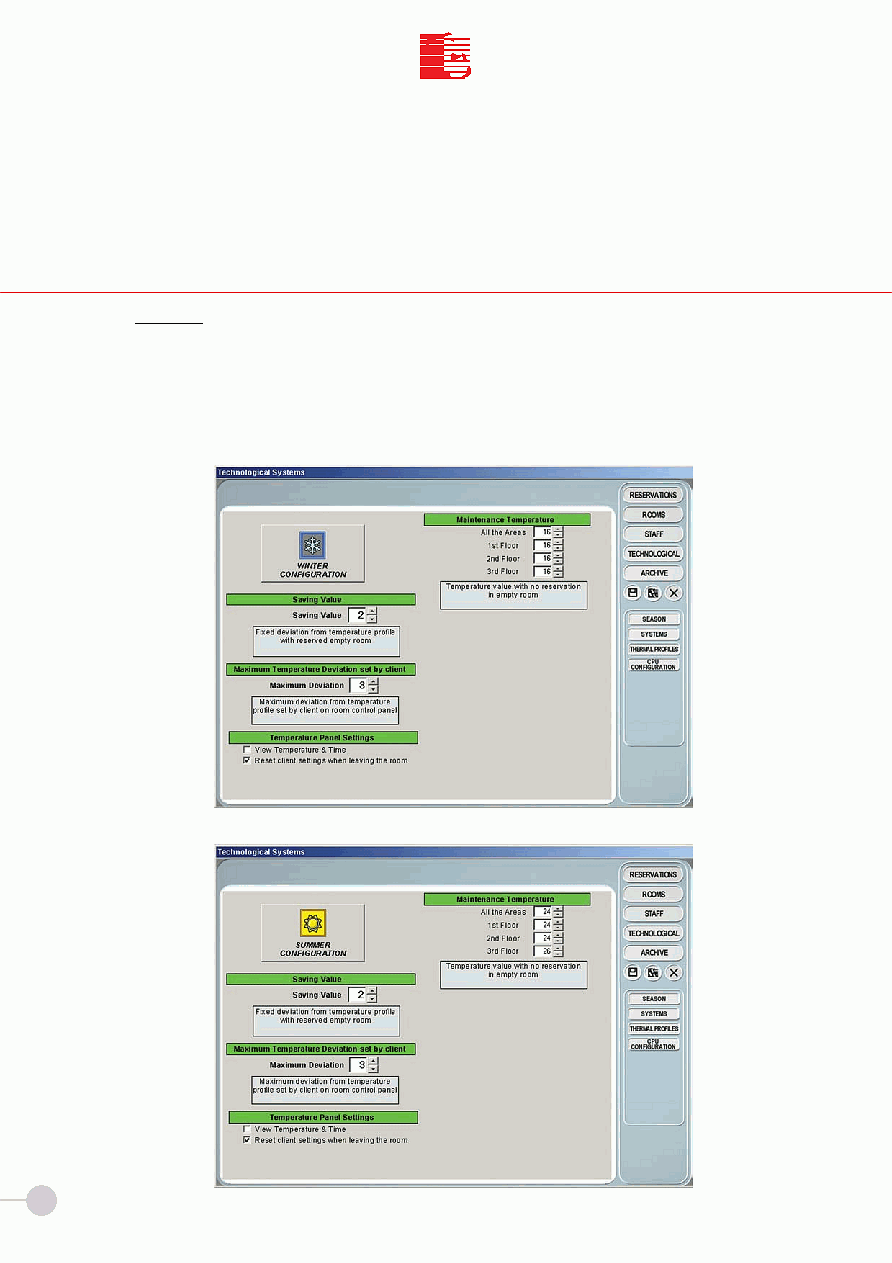
Press the
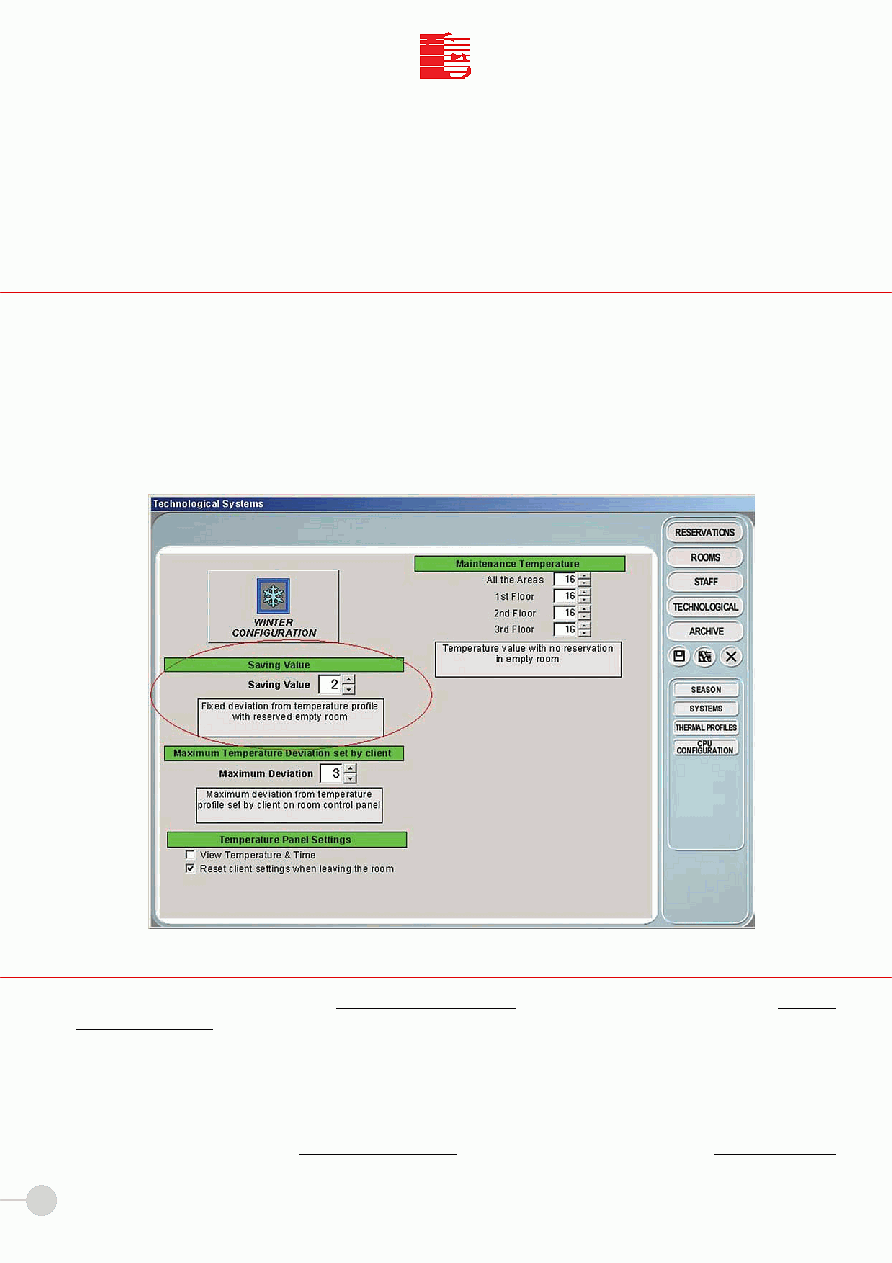
SEASON button to access the window that shows the active configuration with saving value, maximum tem-
perature deviation set by client in room, temperature panel settings and maintenance temperature .
As shown in Pict. 13 a/b, the module used to select the season between SUMMER/WINTER can be divided into five sec-
tions. The first section is the button on top left that indicates the current
CONFIGURATION (Summer or Winter).
To select the season, place the cursor on the button and left click with the mouse. The settings of the previous season
are saved in the memory.
6.2 SEASON
MEGA
Pict. 13a
Pict. 13b

19
T
C
I
I
T
C
I.T.C. s.r.l.
The second section is used to set the
SAVING VALUE that affects the temperature set in the room. This value is
added (in SUMMER) or subtracted (in WINTER) to/from the temperature value set in the temperature profile.
For example, in winter configuration mode and with
Saving Value
2, THE RESERVED ROOMS WITHOUT
CLIENT WILL FOLLOW THE TEMPERATURE PROFILE OF THE ROOM WITH A DIFFERENCE of two
degrees in order to guarantee energy saving and provide a comfortable room to the client.
The third section is used to set the
MAXIMUM TEMPERATURE DEVIATION SET BY THE CLIENT. This para-
meter is used to control the temperature set by the client in the room. The number set with the arrows is the maximum
or minimum deviation that can be set by the client using the thermostat in the room with respect to the temperature
value set by the operator.
For example, both in winter and summer configuration mode, with the
value set to
3 and a comfort temperature
profile set to 22°C, the maximum temperature variation that the client can set in the room is + or 3°C, i.e. the
client can set a temperature value ranging from
19°C to 25°C.
The fourth section is used for
TEMPERATURE PANEL SETTINGS. You can display the time and temperature value
and deactivate the reset of the temperature value set by the client when leaving the room.
The fifth section is used to set the
MAINTENANCE TEMPERATURE. This value is the room temperature value
used when rooms are neither reserved or used. The value can be set for each floor individually by the operator.
Once settings are completed, press the
RECORD button.
Press the
EXIT button to go back to previous window at any time.
WARNING: Settings are lost if you go back to the previous window without pressing the RECORD button.
MEGA
T
C
I
I
T
C
I.T.C. s.r.l.
20
Press the
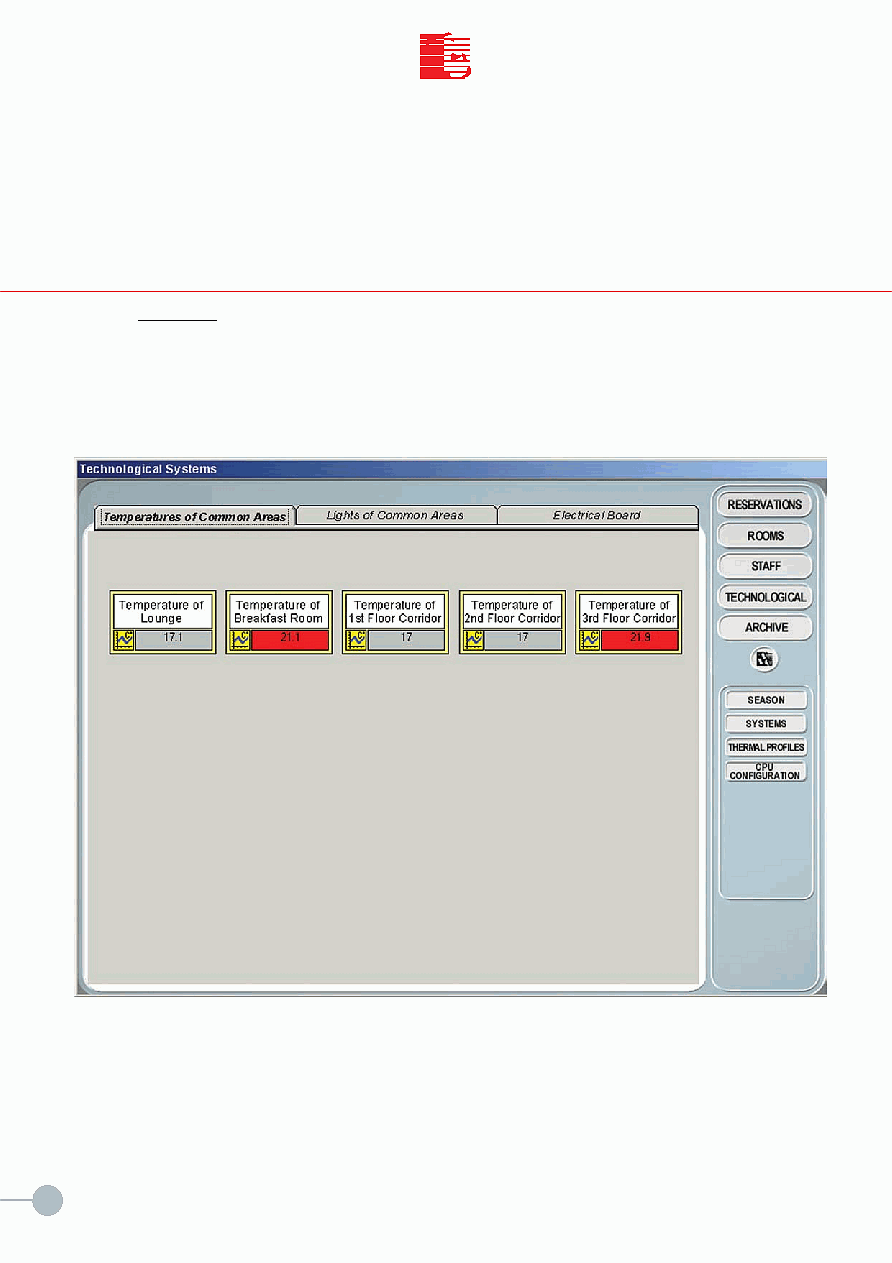
SYSTEMS button to access the window with the Technological Sections and display the general situation
of the installations connected to the system. The example of Pict. 14 shows the following sections: "
Temperatures
of Common Areas" "Lights of Common Areas" and "Electrical Board".
The operator can display the status of the installations and change it according to his own requirements.
6.3 SYSTEMS
MEGA
Pict. 14
21
T
C
I
I
T
C
I.T.C. s.r.l.
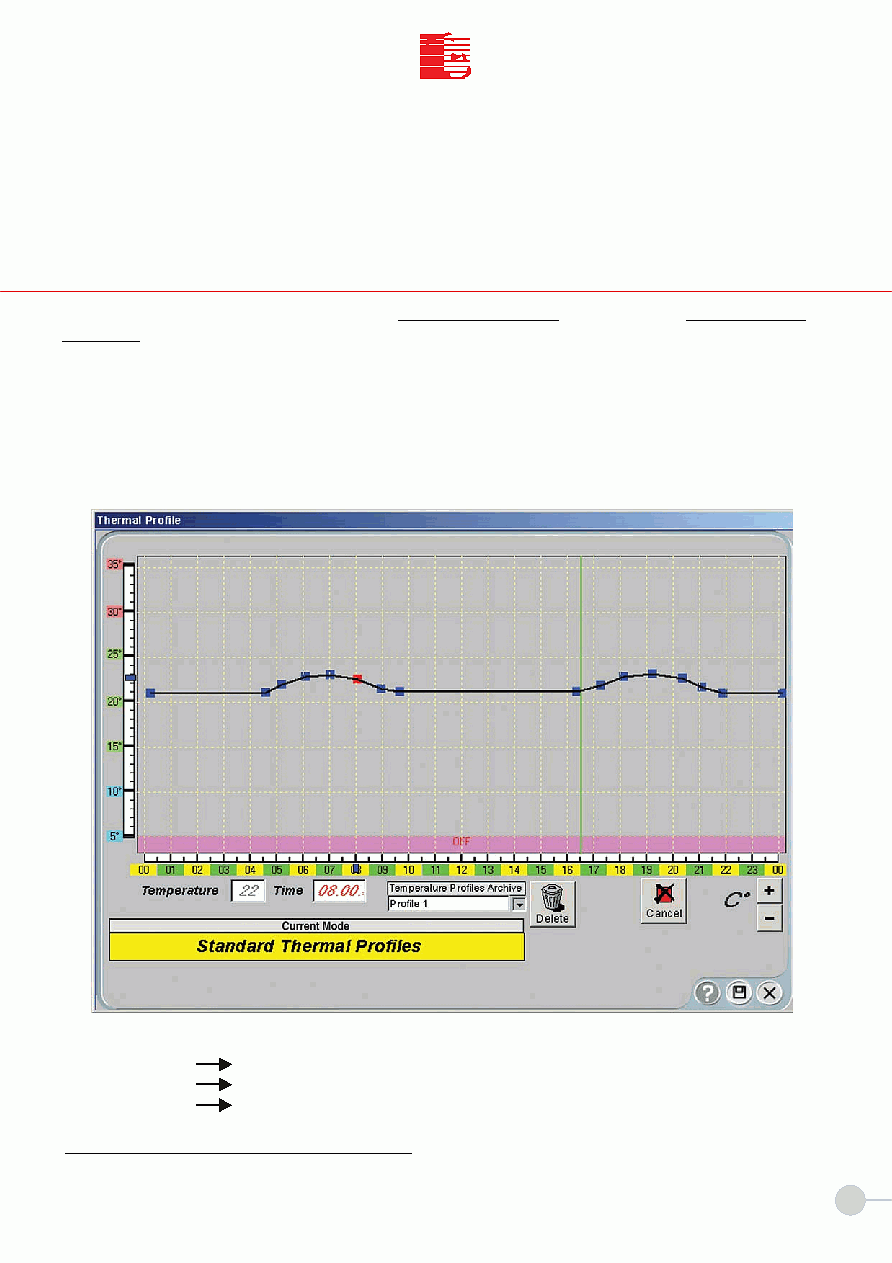
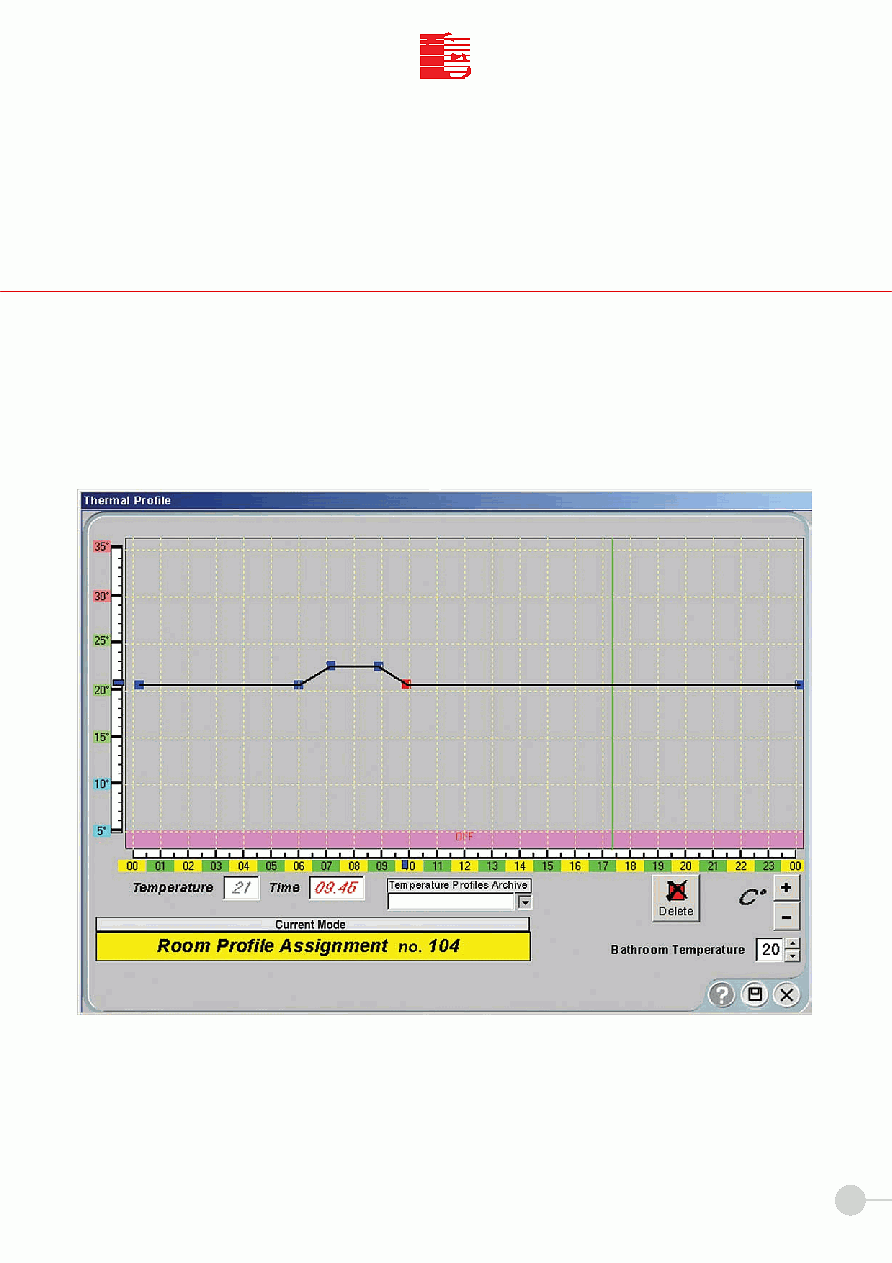
In the main command module place the cursor on the
THERMAL PROFILES button to select the TEMPERATURE
PROFILES module and left click with the mouse. The window shown in Pict. 15 is displayed.
The window shows a Temperature/Time chart that can be changed with the cursor. To set a temperature value at a
specific time of the day, place the cursor where the desired temperature and time values cross and left click with the
mouse. The RED square indicates the temperature value that is being set. Once the temperature value is set and the
operator moves to the next setting the RED square changes into BLUE. When the temperature profile is set, give the
profile a name and press the RECORD button to save the profile itself.
Pict. 15 shows an example of the temperature profile chart.
Delete button
Cancel button
+/- ° C button
6.4 THERMAL PROFILES
MEGA
Pict. 15
NOTE: The vertical green line shows the current time.
Deletes the temperature profile from the memory.
Cancels the last temperature value.
Moves the curve up or down by one or more degrees
22
T
C
I
I
T
C
I.T.C. s.r.l.
The
ROOMS module gives access to the sub-module that is used to manage the room functions centrally. The modu-
le is used to display the status of electrical and electronic utilities, air conditioning/heating, guest/staff presence in the
room, etc. The module is also used to assign
THERMAL PROFILES and program CHIP CARDS for access (Pict.
16 circled area).
7.1 ASSIGNMENTS
SECTION VII
MEGA
Pict. 16
23
T
C
I
I
T
C
I.T.C. s.r.l.
The first button on the left side of the circled area of Pict. 16 is used to assign the temperature profile to one or more
rooms. To select the rooms press the second button in the circled area and click on the rooms you want to assign the tem-
perature profile to (see Pict. 17). Select the desidered profile from the archive and then press the
RECORD button (floppy
disk) to assign the temperature profile to the rooms you have selected.
The temperature profile can be changed before assigning it to the room.
Press the
EXIT button to go back to the previous window at any time.
7.2 HOW TO ASSIGN THE TEMPERATURE PROFILE
MEGA
Pict. 17
24
T
C
I
I
T
C
I.T.C. s.r.l.
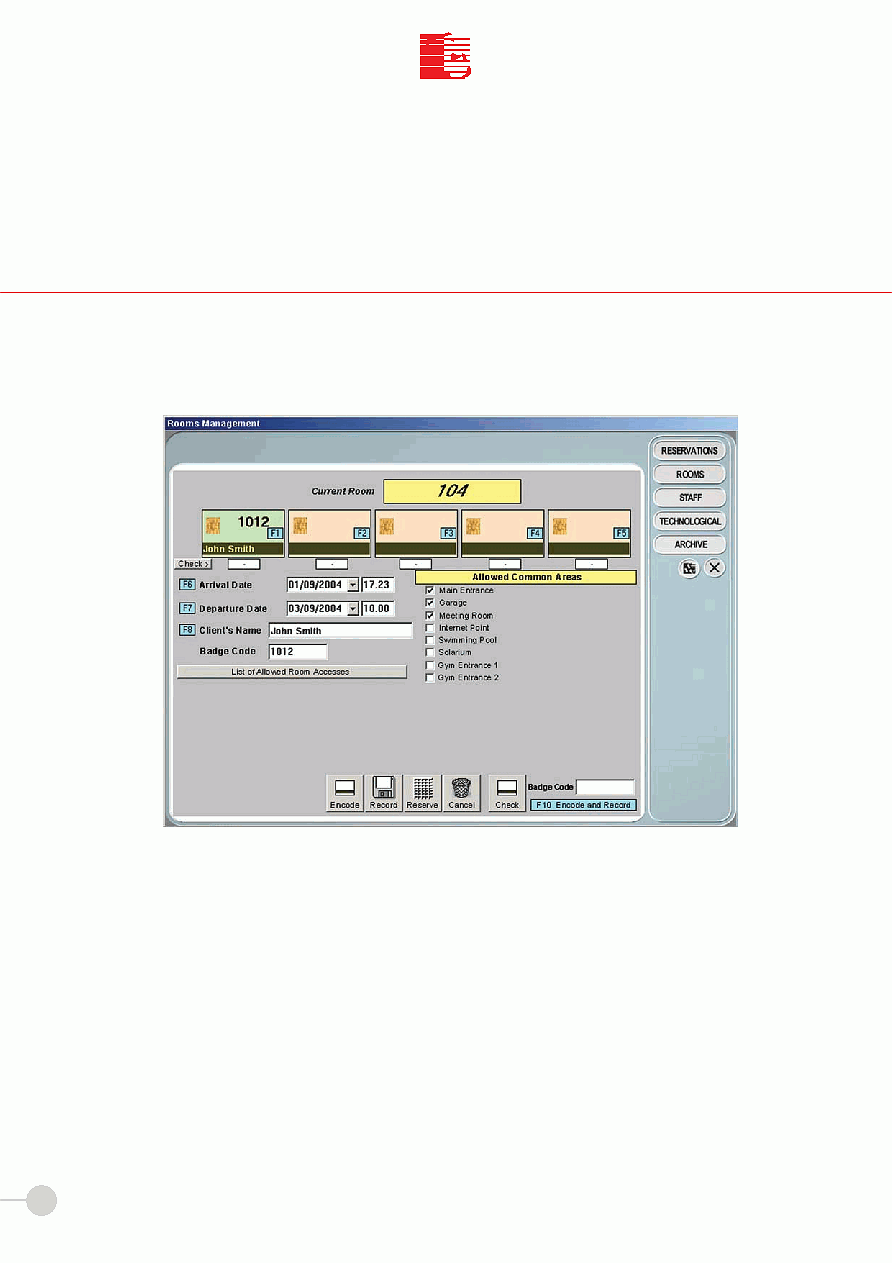
The third button on the right side of the circled area of Pict. 16 is used to display the window that is used to program
the chip card to access the room (Pict. 18).
Insert an empty card into the encoder (art. COD). Enter the
Arrival Date and the Departure Date in the corre-
sponding fields (use the arrow to choose the date from the calendar). The time next to the dates is set by the program:
the arrival date is the current time upon registration, the departure date is set during the system configuration, but
you can change them. You can also enter the
Client's Name.
You must activate the chip card to access the common areas by checking the box for each desired area.
Once settings are completed, click the
Encode and then the Record button to save the chip card settings.
Press
Check to check if programming is correct. If the chip card is programmed correctly, the
Badge Code field
shows the progressive number automatically assigned by the system. The number ranges from
01001 to 09999.
You can activate max. 5 client cards for each room.
If programming is not correct, check that the chip card coder is connected correctly. In case of problems, repeat the
operations illustrated above. If problems persist, it is recommended to change the card.
Press the
EXIT button to go back to the previous window at any time.
7.3 HOW TO ASSIGN THE CHIP CARDS
Pict. 18
MEGA
25
T
C
I
I
T
C
I.T.C. s.r.l.
Pict. 19
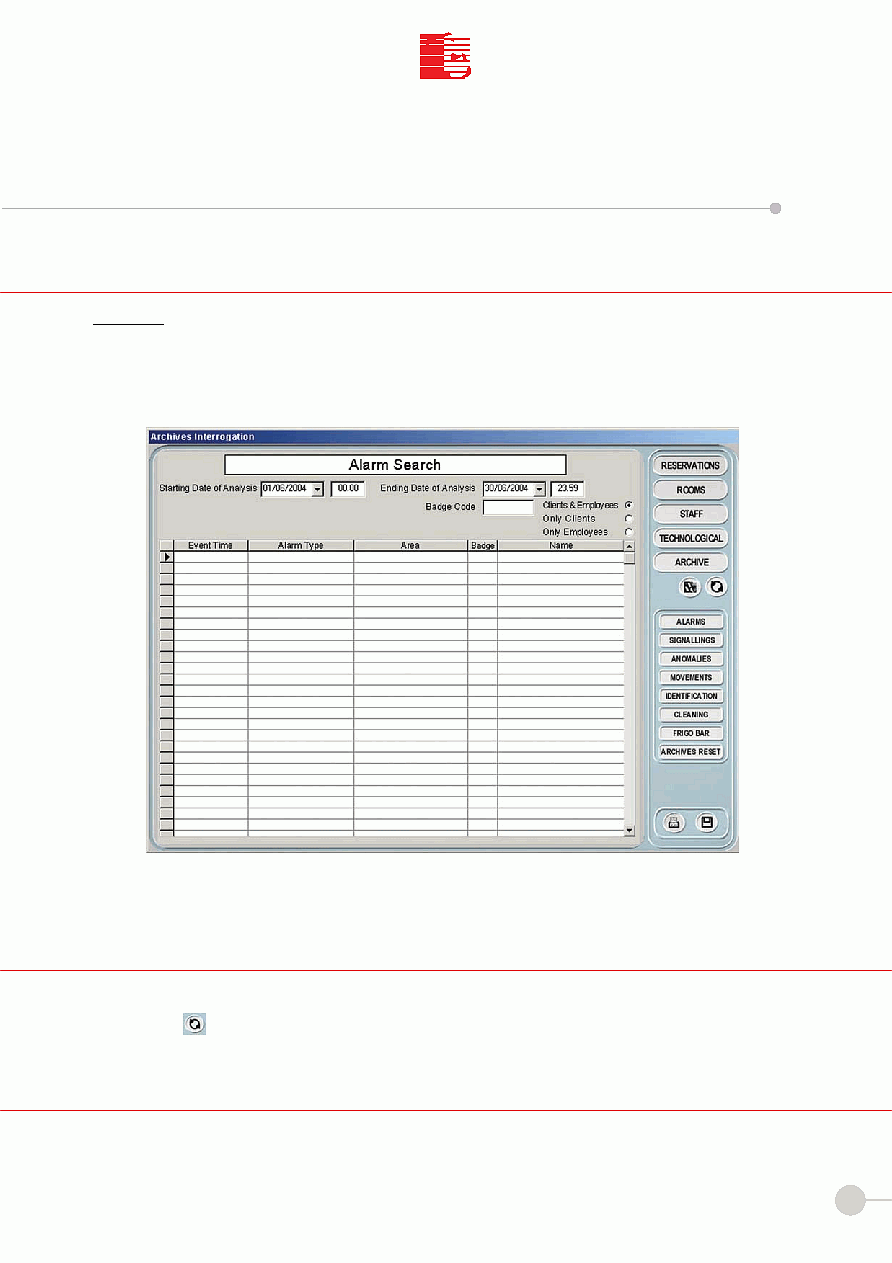
The
ARCHIVE module gives access to the sub-module that is used to view the historical archive of events, such as
ALARMS, SIGNALLINGS, ANOMALIES, MOVEMENTS, IDENTIFICATION ... Pict. 19 is an example of the multiple functions of
the system.
Press the SIGNALLINGS button to display the list of recorded indications.
8.1 ARCHIVE
SECTION VIII
MEGA
8.3 SIGNALINGS
Press the
ALARMS button to display the window with the list of recorded alarms. The list can be updated by pressing the
UPDATE button.
The list can be limited by setting the time interval in the corresponding fields
("starting date of analysis" and "ending date
of analysis").
8.2 ALARMS
26
T
C
I
I
T
C
I.T.C. s.r.l.
8.4 ANOMALIES
MEGA
Press the
ANOMALIES button to display the list of recorded anomalies.
8.5 MOVEMENTS
Press the
MOVEMENTS button to display the list of guests and staff accesses.
8.7 CLEANING
Press the
CLEANING to display the list of the rooms to clean.
8.8 FRIGO-BAR
Press the
FRIGO BAR button to display the list of FRIGOBARS to check.
8.6 IDENTIFICATION
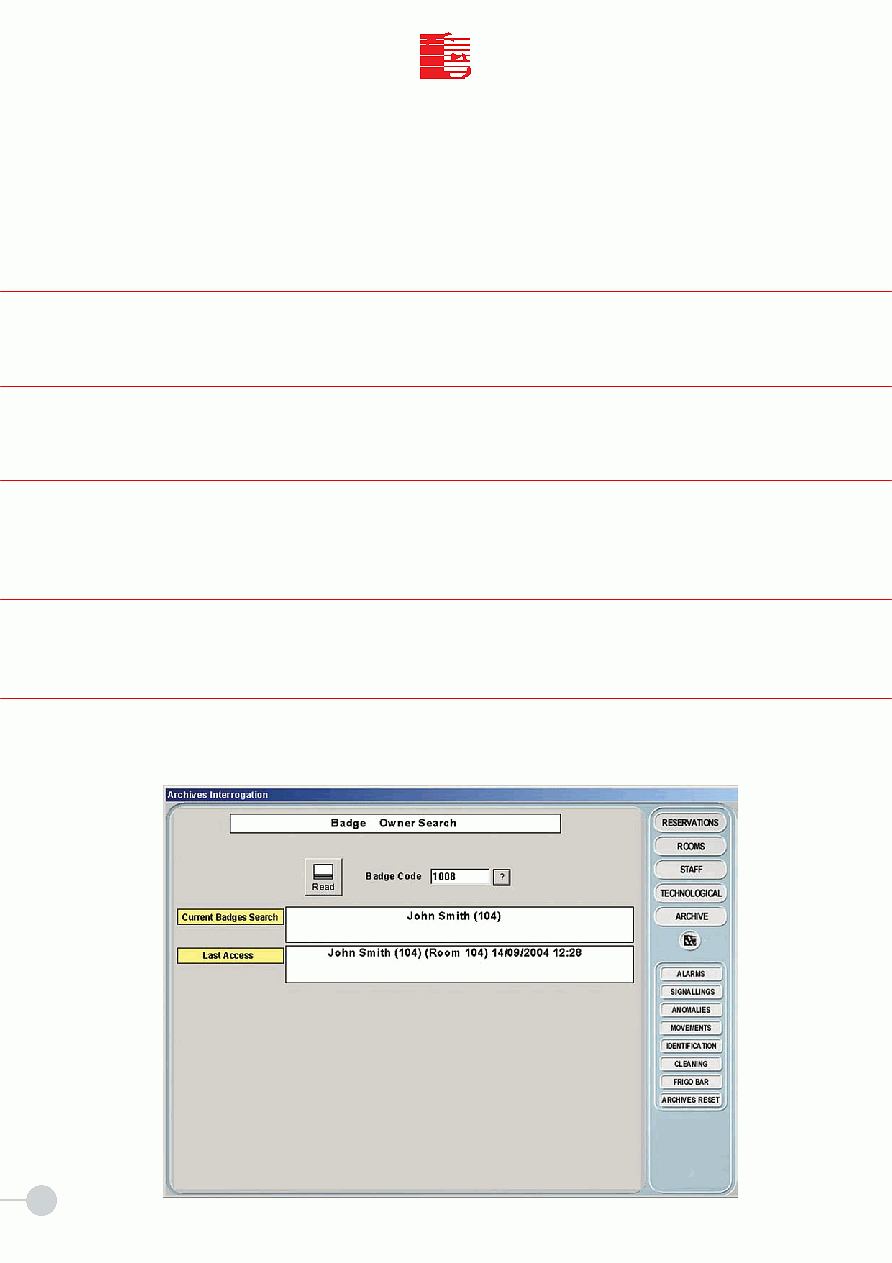
Press the
IDENTIFICATION button to display the name associated with the chip card. Enter the chip card in the slot and
press the
READ button. The system displays the room number, the owner's name and the date of last use (Pict. 20).
Pict. 20
27
T
C
I
I
T
C
I.T.C. s.r.l.
MEGA
Pict. 21
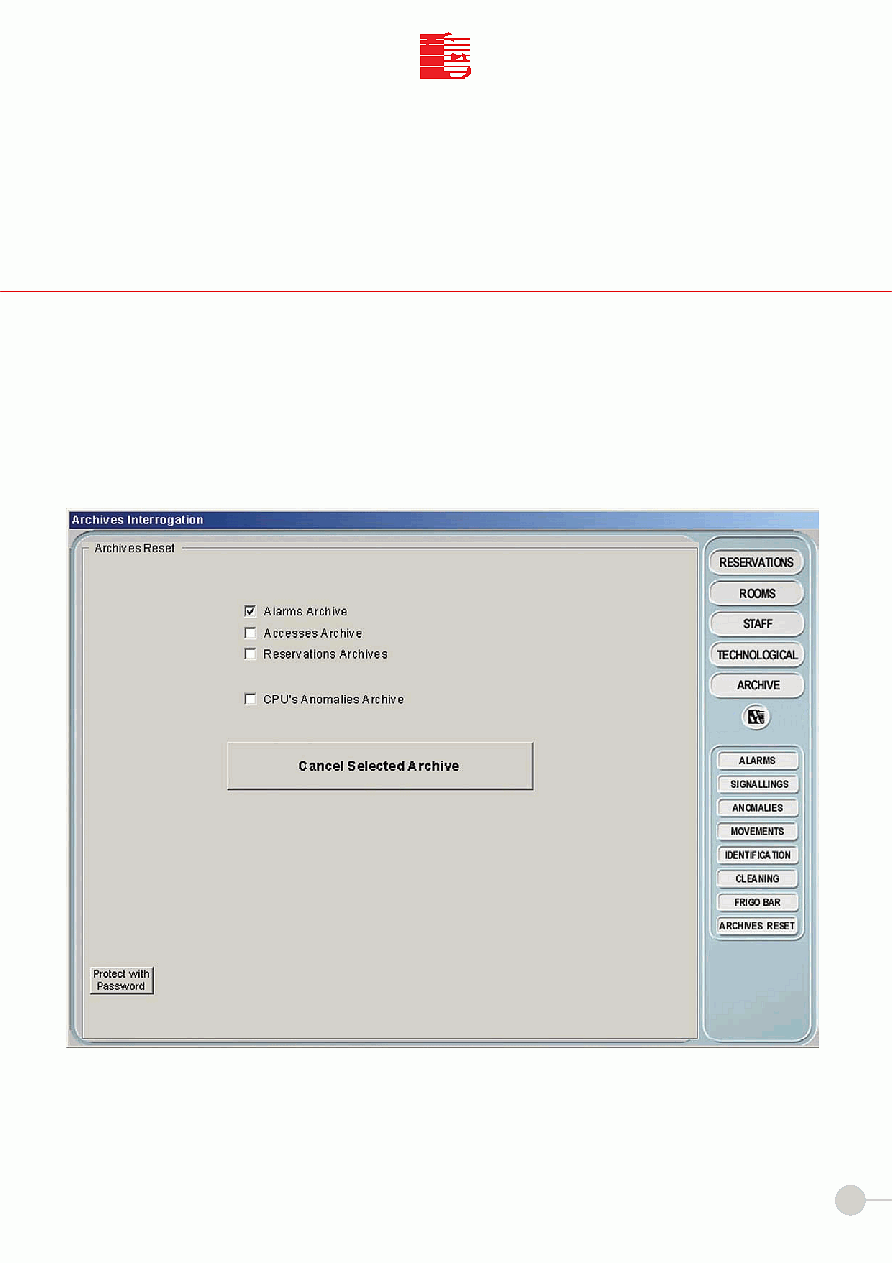
8.9 HOW TO DELETE THE ARCHIVE
Press the ARCHIVES RESET button to delete an archive.
Select the archives to delete by clicking on the corresponding boxes and press the button "
Delete selected archives"
to confirm.
The delete operation can be password-protected. Click the button PROTECT WITH PASSWORD to display the window used
to register the User Name and password.
28
T
C
I
I
T
C
I.T.C. s.r.l.
MEGA
SECTION IX
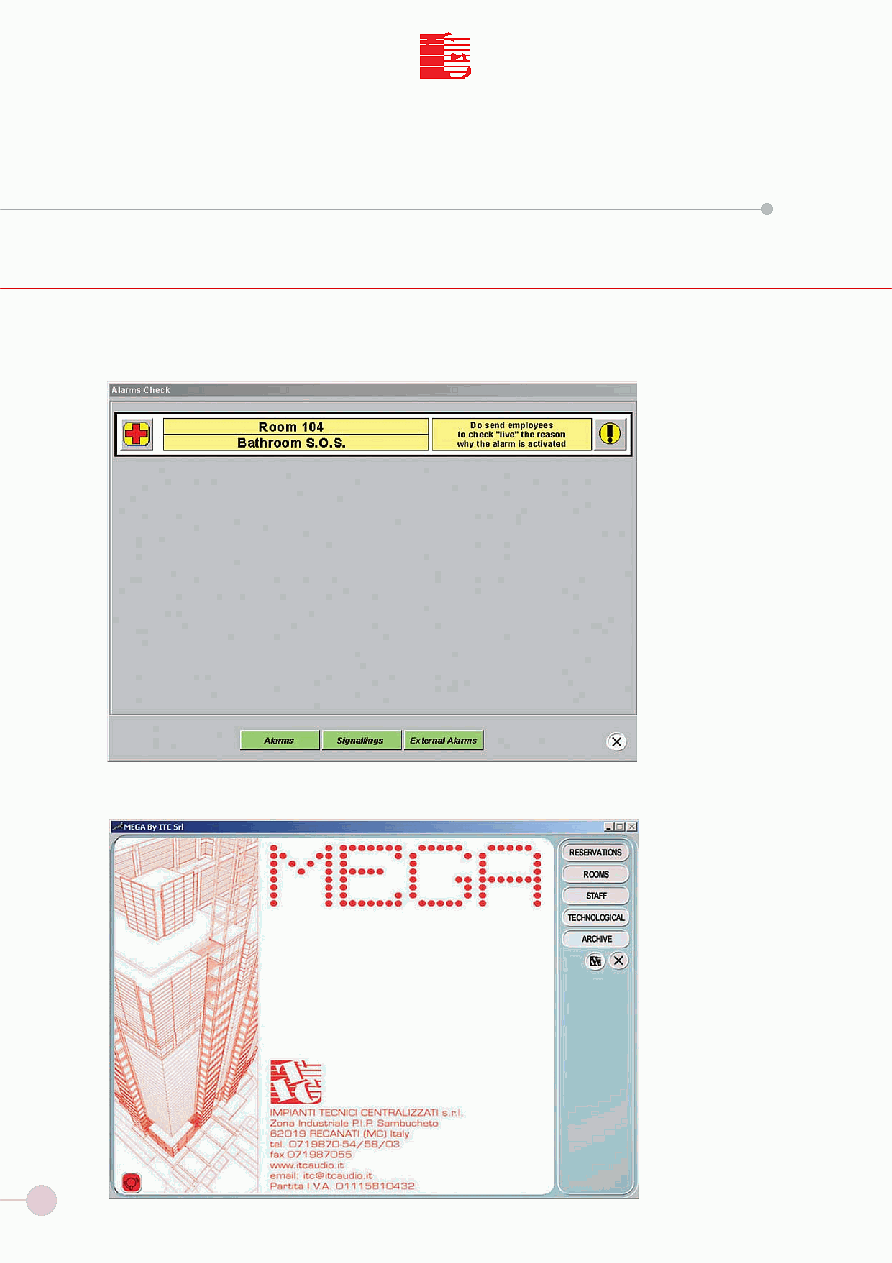
9.1 ALARMS
The system records alarms from the rooms and provides real-time messages indicating the type and origin of alarms.
Pict. 22
Pict. 23
An acoustic signal is generated to inform the operator. To reset the alarm click with the mouse on the exclamation mark .
Click the EXIT button to go
back to the main window
without resetting the
alarm. A specific icon on
the screen informs that the
alarm is in progress. Click
the icon to go back to the
alarms window of Pict. 22.
29
T
C
I
I
T
C
I.T.C. s.r.l.
2xAWG15/AWG13
220Vac dedicated line from UPS
RS232-RS485
CONVERTER
COM1
data BUS
MEGA
MEGA
MEGA
MEGA
Minimum PC specifications:
- CPU PENTIUM IV 2GHz
- 40 GB HARD DISK
- 256 MB RAM (512 MB are recommended)
- S-VGA COLOUR MONITOR
- 1 SERIAL PORT AVAILABLE
(2 serial ports are recommended)
- 1 USB PORT AVAILABLE
- 1 PARALLEL PORT
- PS/2 MOUSE AND KEYBOARD PORTS
- SOUND CARD AND SPEAKERS
- MODEM (optional)
- WINDOWS 98 2
ed./ME/2000/XP operating system
TO CHIP CARD OR
TRANSPONDER CARD
CODER
USB
MEGA
MEGA
MEGA
MEGA
MEGA
MEGA
MEGA
MEGA
MEGA
MEGA
MEGA
we recommend our cable cod. 9000-9701
1x2 UTP CAT.5 cable (one unshielded twisted pair)
CONTINUOUS ON-LINE OR
LINE-INTERACTIVE GROUP
UPS
0002
0001
0007
0006
0012
0011
PSA
0003
PSA
0008
to next control unit
0005
0004
1st FLOOR
0010
0009
2nd FLOOR
PSA
0013
0016
MEGA-T
0015
0018
0014
0017
3rd FLOOR
MEGA-T
MEGA-T
2xAWG24+shield + 2xAWG20
2xAWG24+shield
22
22
apriporta
AWG15 cables
ELECTRONIC
TRANSFORMER
NOTE:
- The "MEGA" control unit is housed in
9-module box for DIN bar.
It is powered with 12Vac transformer,
with maximum power absorption of 30VA.
Use one independant transformer for
each unit.
- Temperature sensors must be installed
in dedicated boxes at approx. 1.5m from
the ground and away from sunlight, air or
heat sources (i.e. doors, windows, etc.).
Do not install temperature sensors above
the temperature panel because of the heat
generated by the panel.
- Fan-coil and towel warmer valves must be
of ON/OFF type (electro-thermal or
motorised open/close). 220Vac valve
command are recommended.
The electro-thermal model must be of NC
type (with command not powered the
water flow must be stopped).
- The radiator valve is in alternative to
fan-coil. It is not possible to install
both components in the same room.
Radiator valve can be ON/OFF type,
modulating motorized or modulating
linear, controlled with 0-10V continuous
voltage.
- Provide a 220Vac room contactor.
Install an additional transformer for
components with different voltage.
- It is recommended to install a 1,6A
delayed fuse between the relay output
contacts and the load to protect the
unit in case of actuator failure.
FLOOD SENSOR
N.O. contact
N.C. contact
ROOM TEMPERATURE SENSOR
(IN DEDICATED BOX)
T
BATHROOM TEMPERATURE SENSOR
(IN DEDICATED BOX)
SERIAL BUS FROM
PREVIOUS CONTROL UNIT
FROM PREVIOUS
ROOM
T
2xAWG24+shield
R=100Kohm
2xAWG24+shield
BATHROOM S.O.S.
N.O. contact
R=10Kohm
2xAWG24+shield
DOOR
SWITCH
WINDOW
SWITCH
N.C. contact
2xAWG24+shield
5
ntc ba
5
Impianti Tecnici Centralizzati S.r.l.
Recanati - MC - Italy
2xAWG20
(minimum cable section)
FUSE
12 Vac
2xAWG20
1
+
2
3
4
ac
12 V
1
ac
B
A
3
2
4
bus
luce cort.
14
6
8
+
7
-
-
-
9
10 11 12 13
-
-
15
16
17
14
MEGA
bagno
6
8
7
9
10
11
12
13
ntc ca
porta
finestra
17
16
15
non dist.
19
18
-
-
20 21
19
18
20
21
frigo
TOWEL HEATER
VALVE
AWG15 cables
COM
FAN-COIL max 300 VA
220Vac from
previous unit
(DEDICATED LINE
UNDER UPS)
V3 (NO)
V1 (NC)
V2 (NO)
TERMINALS FOR 12Vac
SIGNALLING LIGHTS:
53 : common
54 : BATHROOM S.O.S.
55 : MINI-BAR OPEN
56 : DO NOT DISTURB
57 : ROOM TO CLEAN
58 : CLIENT IN ROOM
220Vac
FROM PROVIDED
PROTECTION
FAN-COIL CIRCUIT
VALVE
33
v3
33
220 Vac
30
30
RAD.
29
29
COM
fancoil
32
31
v1
v2
31 32
in.el.
46
46
34
34
EV. FAN
AUX
SALV.
36
36
35
35
42
40
37
38
39
41
37 38 39 40 41
42
+
TELER.
43
44
45
43 44 45
LUCE C.
47
47
0
50
48
49
48 49 50
AWG15 cables
CLOSE
AWG15 cables
OPEN
COM
CLOSE
OPEN
COM
ELECTRONIC RING
(not electromechanical)
220Vac
FROM PROVIDED
PROTECTION
12Vac
ROOM CONTROL UNIT
12 Vac 12 VA 50-60Hz
WARNING!
USE TOP QUALITY CLAMP FOR CRIMPING "PLUG" CONNECTORS
AND CHECK THEM BY A CABLE TESTER.
CHIP/TRANSPONDER
CARD READER
SERIAL BUS TO
NEXT CONTROL UNIT
TO NEXT ROOM
COURTESY LIGHT PUSH-BUTTON
N.O. contact
MINI-BAR SWITCH
DOOR OPENING PUSH-BUTTON
N.O. contact
AUTO
OFF
"DO NOT DISTURB"
LIGHTED PUSH-BUTTON
N.O. contact
12Vac LIGHT BULB
N.C. contact
2xAWG24+shield
2xAWG24+shield
PLUG
ROOM ACTIVATION
PANEL
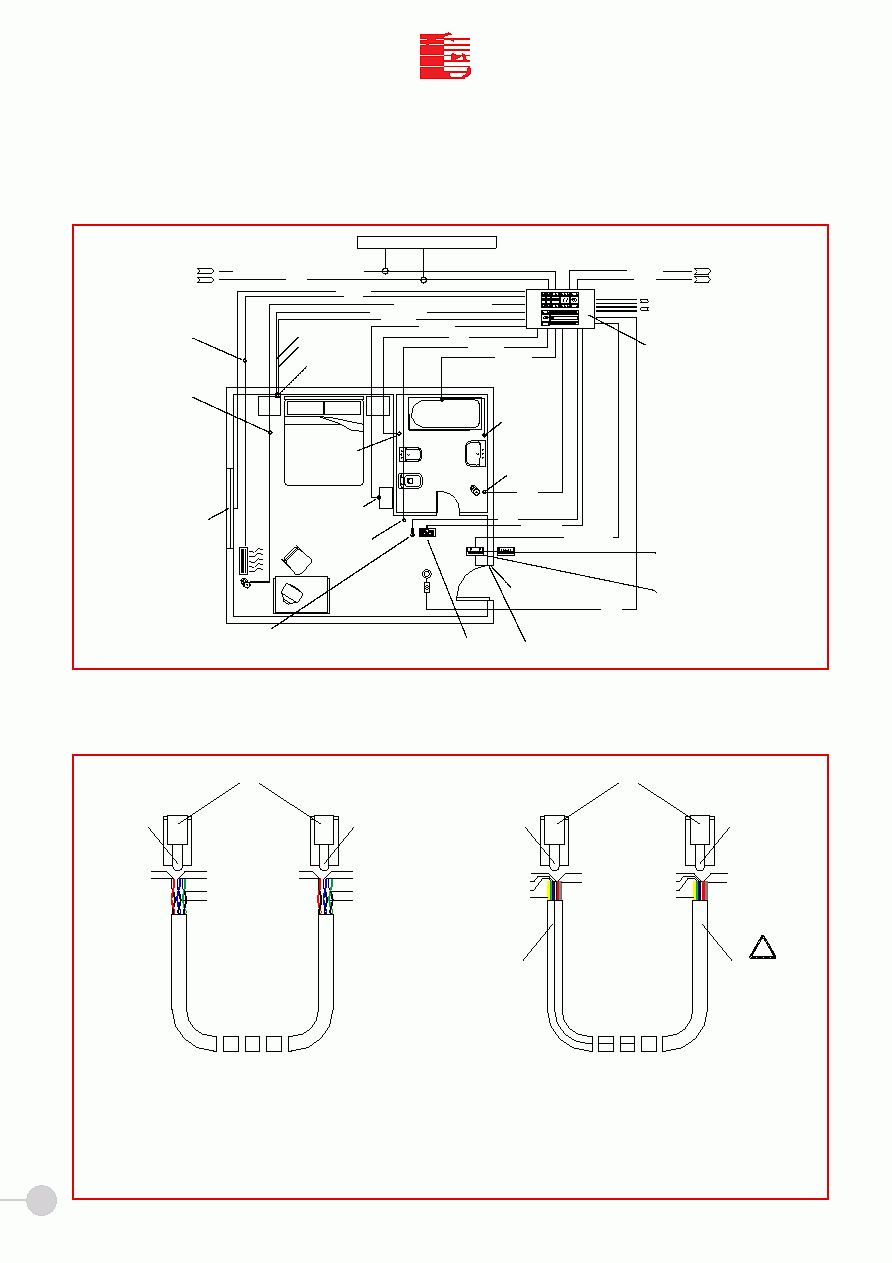
GENERAL DIAGRAM
we recommend our cable cod. 9000-9701
TEMPERATURE
PANEL
1x2 UTP CAT.5 cable (one unshielded twisted pair)
6 conductor
26 AWG flat cable
for RJ12 connectors
(max length 15 meters)
RJ1
RJ2
23
RJ1
24
RJ2
25
28
26
27
REFER SERVICING TO QUALIFIED SERVICE PERSONNEL
RISK OF ELECTRIC SHOCK
CAUTION
PLUG
PLUG
PLUG
2xAWG24
DOOR-BELL
OTHERS
MOBILE PHONE OR PC
CHARGE PLUG
2xAWG15/AWG13
to size based on distance
and number of connected units
51
51
53
+10
52
52
c
fuoriporta
54 55 56 57 58
ELECTRIC LOCK
12Vdc, max 1,2A
+
2xAWG20
220Vac
220Vac
COURTESY
LIGHT
AWG15 cables
MINI-BAR
220Vac
ROOM CONTACTOR
A2
A1
na
F'
na
N'
F
N
LIGHTS
PLUGS
EMERGENCY
LIGHT
220Vac
to next unit
(DEDICATED LINE
UNDER UPS)
ELECTRIC LINE CONTROLLED
BY ROOM CONTACTOR
ELECTRIC LINE NOT CONTROLLED
BY ROOM CONTACTOR
MEGA
BUS AND POWER CONNECTION DIAGRAM
ROOM MULTI-WIRE DIAGRAM
30
T
C
I
I
T
C
I.T.C. s.r.l.
MEGA
ROOM CABLE LAYOUT DIAGRAM
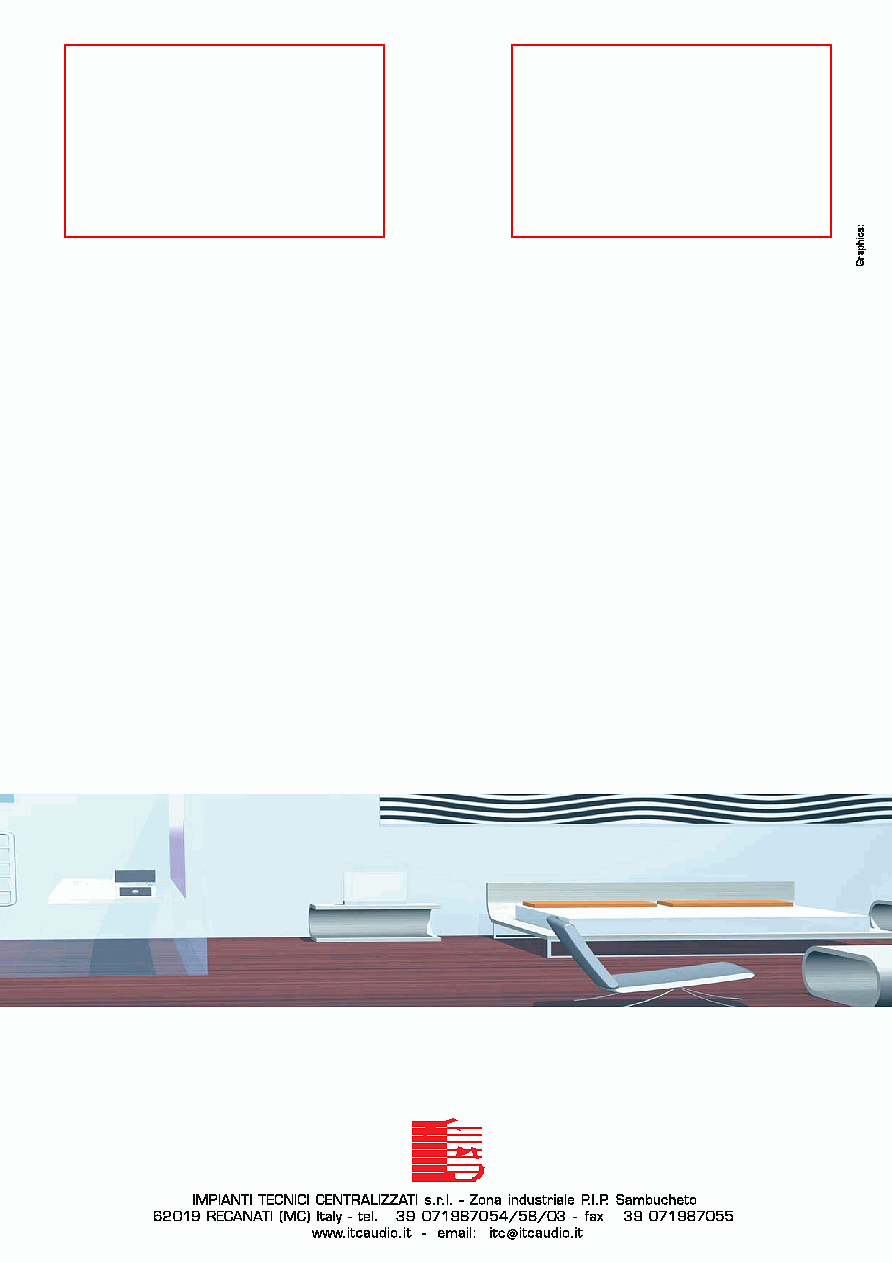
CABLE HEADINGS FOR CONNECTOR PLUGS
BAR (or MARKING)
- ONLY USE CABLES DESCRIBED IN DIAGRAM. IF IN DOUBT CONTACT ITC TECHNICAL SUPPORT.
- ONLY USE TOP QUALITY TELEPHONE "PLUG" CONNECTORS TYPE RJ12 6/6.
- USE TOP QUALITY CLAMP FOR CRIMPING. METAL CLAMPS ARE PREFERRED.
- CHECK CABLES USING A SPECIFIC TESTER.
- COLOURS DESCRIBED IN DIAGRAM ARE INDICATIVE.
3x2 UTP CAT.5 CABLE
(THREE UNSHIELDED TWISTED PAIR)
SOLID COPPER 26/24 AWG
STRAND 26/28 AWG
WARNING!
WHITE/RED
RJ12 6/6
"PLUG" CONNECTOR
RED
WHITE/RED
REED
WHITE/GREEN
GREEN
BLU
WHITE/BLU
WHITE/GREEN
WHITE/BLU
GREEN
BLU
RED
REED
!
6 CONDUCTOR
FLAT TELEPHONE CABLE
26 AWG
NO BAR (or MARKING)
BROWN
GREEN
YELLOW
BLU
WHITE
RED
REED
GREEN
YELLOW
BLU
WHITE
RJ12 6/6
"PLUG" CONNECTOR
RED
BROWN
REED
BATHROOM TEMPERATURE
SENSOR "STI"
16mm Tube
ROOM TEMPERATURE SENSOR "STI"
in 3 compartment box of which it occupies
one compartment. Minimum height 150cm
from ground, away from heat and air sources.
16mm Tube
220Vac
FAN-COIL E.V.
WINDOW CONTACT
16mm Tube
1x2 UTP CAT.5 (we recommend our cable cod. 9000-9701)
"DO NOT DISTURB"
BUTTON
HEADBOARD
DOOR OPENING
25mm Tube
25mm Tube
25mm Tube
IN
BUS
220Vac from UPS
20mm Tube
16mm Tube
DORSAL
ROOM ACTIVATION PANEL "ATT-S"
in 3 compartment box
26 AWG flat cable with 6 conductors
20mm (or 25mm) Tube
CHIP-CARD READER "LCC" or
TRANSPONDER CARD READER "LTC"
in 3 compartment box
26 AWG flat cable with 6 conductors
16mm (or 20mm) Tube
ROOM ELECTRIC BOARD WITH:
- "MEGA" ROOM CONTROL UNIT, HOUSED
IN 9-MODULES BOX FOR DIN BAR.
- 12Vac, 30VA TRANSFORMER,
TO POWER THE ROOM CONTROL UNIT;
- 220Vac CONTACTOR;
- PROVIDED PROTECTION.
2xAWG15
REGULAR ELECTRIC LINES
3xAWG15
TEMPERATURE PANEL "CLIMA"
in 3 compartment box
16mm Tube
2xAWG20
COURTESY SPOTLIGHT
with electronic transformer
16mm Tube
MINI-BAR CONTACT
16mm Tube
COURTESY LIGHT
BUTTON
16mm Tube
DOOR CONTACT
2xAWG24+shield
6 CONDUCTOR
26 AWG FLAT CABLE
(max length 15m)
+ 2xAWG20 for electric lock
ELECTRIC LOCK
12Vdc, max 1,2A
2xAWG20 cable
16mm Tube
6 CONDUCTOR
26 AWG FLAT CABLE
(max length 15m)
2xAWG15
2xAWG24+shield
2xAWG24+shield
BATHROOM PULL ALERT
in 3 compartment box
16mm Tube
2xAWG24+shield+2xAWG20
3xAWG15 (2xAWG15+2xAWG20 for linear E.V.)
2xAWG24+shield
2xAWG24+shield
4xAWG15
2xAWG20
2xAWG24+shield
220Vac
TOWEL HEATER E.V.
25mm Tube
FLOOD SENSOR
2xAWG24+shield
16mm Tube
MEGA
1x2 UTP CAT.5
2xAWG15
BUS
220Vac from UPS
OUT

31
MEGA
The
MEGA CONTROL UNIT CARD is installed in DIN BARS
and takes up 9 Modules. It is powered with 12 Vac with maximum
power absorption of 30 VA transformer. Use one independent
transformer for each unit and connect it to a dedicated electrical
line under UPS of on-line or line-interactive type.
Always turn off the power before making the electrical connections.
Temperature sensors must be installed in dedicated boxes at
approx. 1.5 m from the ground and away from sunlight, air or
heat sources (i.e. doors, windows, etc.). Do not install sensors
above the temperature panel because of the heat generated by
the panel.
Connection cables of input devices (i.e. temperature sensors,
magnetic contacts, buttons, etc.) must not exceed 20 m length.
Fan-coil and towel warmer valves must be of ON/OFF type (elec-
tro-thermal or motorized open/close). 220 Vac valve commands
are recommended. The electro-thermal model must be of NC
type (with command mounted on the valve and not powered, the
water flow must be stopped).
The radiator valve is alternative to fan-coil. Do not install both
components in the same room. The radiator valve can be of
ON/OFF type, modulating motorized or modulating linear, con-
trolled with 0-10V continuous voltage.
Provide a 220Vac room teleruptor. Install an additional transfor-
mer for components with different voltage.
PLUG connectors must be crimped with good-quality metal pliers
and checked with cable tester. Cable length must not exceed 15
m. In case of cascade connection add up the length of the single
cables without exceeding the limit.
It is recommended to install a 1.6A delayed fuse between the
relay output contacts and the load to protect the unit in case of
actuator failure.
Auxiliary relays must be used to control electrical shutters, prefe-
rably in combination with suitably dimensioned fuses. Do not con-
nect the shutter motor to the Mega unit relay directly.
It is recommendes to keep the signal's lines (BUS, inputs, etc.)
away from power lines. (minimum suggested distance 15 cm).
The minimum requirements for the PC used to
supervise the system are:
CPU: Pentium IV 2 GHz/40 GB Hard Disk/256 MB Ram/S-VGA
color monitor/2 serial ports/1 parallel port/PS/2 mouse and
keyboard ports/USB ports sound card and speakers/ modem
(optional)/Windows 98/ME/2000/XP operating system
For the correct operation of the system the PC must be always
on and preferably dedicated to I.T.C. technological manage-
ment system. The control application works with 800x600
pixel resolution.
PROBLEMS
If you need to replace a part due to failure, do not interrupt the
system operation and follow the procedure below:
a) Disconnect the power supply of the part to be replaced and
disconnect all the cables.
b) Ship the part to the address below
clearly stating IN
WRITING the problems and name of technician who
has carried out the operation.
c) ITC shall repair or replace the part as soon as possible after
the customer approves the estimate of costs.
d)
WARRANTY terms are established in the sales contract.
Warranty starts from the date on which the installation is tested
by a technician from ITC or from the local ITC Service Center.
...IMMEDIATE REPLACEMENT
The sale price is invoiced if a REPLACEMENT part is
sent before the faulty part is received. After receiving the faulty
part and checking possible defects, ITC will cancel the charged
amount and calculate the cost of repair or placement.
PLEASE CONTACT:
I.T.C. srl Impianti Tecnici Centralizzati Zona Ind.le
P.I.P. Sambucheto 62019 Recanati (MC) Italy
Tel. 071/987003 54 58 fax 071/987055
e-mail:itc@itcaudio.it
V.A.T. Number 01115810432
Hotel Management TECHNICAL DEPARTMENT
Paolo Palazzo
paolo@itcaudio.it
Michele Grioli
michele@itcaudio.it
Emanuele Somma
emanuele@itcaudio.it
Monday through Friday
Office hours:
8.30 am 12.30 pm
2.30 pm 6.30 pm
IMPORTANT NOTICE

T
C
I
I
T
C
I.T.C. s.r.l.
32
1.
MEGA SYSTEM
General INTRODUCTION
page. 1
2.
SECTION I
OVERVIEW
page. 5
3.
SECTION II
MAIN MENU
page. 6
4.
SECTION III
RESERVATIONS
page. 8
DAILY RESERVATION
page. 9
PERIOD RESERVATION
page. 10
TEMPERATURE SETTING
page. 12
HOW to CANCEL the RESERVATION
page. 12
5.
SECTION IV
ROOMS
page. 13
How to access the ROOM
page. 14
The ROOM Window
page. 14
6.
SECTION V
STAFF
page. 15
How to activate CHIP CARDS
page. 15
Staff search
page. 16
7.
SECTION VI
TECHNOLOGICAL
page. 17
SEASON
page. 18
SYSTEMS
page. 20
THERMAL PROFILES
page. 21
8.
SECTION VII
ASSIGNMENTS
page. 22
How to assign theTemperature profile
page. 23
How to assign the CHIP CARDS
page. 24
9.
SECTION VIII
ARCHIVE
page. 25
How to delete the Archive
page. 27
10.
SECTION IX
ALARMS
page. 28
TECHNICAL SCHEMES
page. 29/30
IMPORTANT NOTICE
page. 31
CONTACT US
page. 31
MEGA
I N D E X

I.T.C. s.r.l.
Zona Industriale P.I.P. - Località Sambucheto - 62019 Recanati (MC) - Italy
tel.: +39 071987003 / +39 071987054 / +39 071987058 - fax: +39 071987055
www.itcaudio.it - itc@ itcaudio.it
T
C
I
I
T
C
SOLODESIGN -
Stampa: BIEFFE Recanati
09-04/2000/39000-3090
T
C
I
I
T
C
Distributed by
Distributed by
Agent for the area:
Agent for the area:
+
+