1
D
D
i
i
g
g
i
i
t
t
a
a
l
l
S
S
u
u
r
r
v
v
e
e
i
i
l
l
l
l
a
a
n
n
c
c
e
e
S
S
y
y
s
s
t
t
e
e
m
m
USER MANUAL

2
TABLE OF CONTENTS
1. INTRODUCTION-------------------------------------------------------------------------- 4
2. COMPUTER REQUIREMENT AND MAXIMUM RECORDING FRAMES--6
3. INSTALLATION----------------------------------------------------------------------------8
3.1 installation steps
3.2 windows setup
3.3 Skyview ready use setup
4. MAIN SCREEN----------------------------------------------------------------------------12
4.1 status display section
4.2 function control section
4.3 screen split section
5. SCREEN SAVER--------------------------------------------------------------------------15
6. PAN/ TILT/ ZOOM MODE---------------------------------------------------------------15
7. PLAYBACK MODE FOR SZT- SERIES --------------------------------------------17
7.1 playback icons
7.2 playback slide bar
7.3 searching & playback by date/time
7.4 save file
7.5 Playback Digital Zoom
7.6 playback smart search (object search)
8. PLAYBACK MODE FOR MP4 SERIES(Hardware Compression)---------23
8.1 MP4 playback
8.2 MP4 playback slide bar
8.3 MP4 save file
8.4 MP4 print
9. SKYVIEW ALL SERIES CONFIGURATION SETTING MODE---------------25
9.1 system settings
9.2 user settings
9.3 camera settings
9.4 sequence settings
9.5 motion detection settings
9.6 sensor settings
9.7 other settings
10. REMOTE SURVEILLANCE (IE BROWSER/ PDA/RX APPLICATION)----33
10.1 recording server setting
10.2 IE browser remote connections
10.3 PDA remote connections
10.4 RX remote connection
11.
RECORDED VIDEO BACKUP------------------------------------------------------------------40
12. SKYVIEW Important Notes
----------------------------------------------------
42

3
Preface
Thank you for choosing Skyview Digital Surveillance System and related products. This manual
provides detailed instructions for operating and setup procedures. So you can get more familiar
with the special features and warnings associated with this equipment. Once the installation is
completed, keep this manual for future reference.
FCC Compliance Statement
This product has been tested and found to comply with limits for a Class B digital device, pursuant
to part 15 of the FCC rules. These limits are designed to provide reasonable protection against
harmful interference in residential installations. This equipment may radiate radio frequency energy,
and if not installed and used in accordance with the instructions, may cause harmful interface to
radio communications. However, there is no guarantee that interface will not occur in a particular
installation. If this equipment does cause interference to radio or television equipment reception,
which can be determined by turning the equipment off and on, the user is encouraged to try to
correct the interference by one or more of the following measures:
Reorient or relocate the receiving antenna.
Move the equipment that might interfere with the receiver away from the system.
Plug the equipment into an outlet on a circuit different from that to which the
receiver is connected.
Consult the dealer or the experienced radio/television technician for additional
suggestions.
Windows 98SE/2000/XP is registered trademarks of Microsoft Corporation.
Other product names mentioned herein are used for identification purposes only and may be
trademarks and/or registered trademarks of their respective companies.

4
1. Introduction
Skyview products are a digital video recording system for use in security and surveillance
applications. It is an advanced surveillance system that combines the functions for a recorder and
multiplexer into one unit. Skyview system has all the rich features of a powerful digital video
management system and more. These include:
a.
Combination of unique quality of versatile Mpeg4 compression.
Fully functional remote control software.
b. Video loss alarm.
c.
Smart search (object search). / Digital playback zooms.
d. Motion Pop Up. When more than one motion has been detected,
pop-up in 1/4/8/16 splits screen. ( Auto pop up )
e. Remote. Full remote access; View up to 24 different IP on one
screen simultaneously.
Perform historical file search and save recorded files ( avi.bmp.jpg )
with audio and video.
f. PTZ control (pan, tilt, zoom). Support DYNAC D7720 and LILIN
PIH-7000/7600 Serial SpeedDome.
g. Alarm I/O. 8 groups of I/O ( I/O module required, to be purchased
separately.)
h. Snapshot. Snapshot and save files via Internet using IE Browser.
i. Post/pre-alarm recording.
j. Up to 30 users definable access levels.
k. Record, playback, search and transmit simultaneously.
l. Easy-to-operate graphic interface.
m. Playback. 16 channels playback with selectable data and time to
play simultaneously.
n. Search display. 1,4,9,10,13 and 17 split search screen.
o. Auto Backup. To back up 24 hours recording data automatically
everyday to avoid data loss.
p. Digital Water Mark.
q. Screensaver. Screensaver during recording ( multi-tasking ) with
password protection.
r
.
Watch dog
s. PDA remote view

5
Advanced features, a standard requirement for today's DVR.
Smooth playback of recorded files and events, detail and movement
is easily discerned.
All camera playback and live view is on a single screen. Users can
see the video image from different cameras at different angles
simultaneously.
Monitor more than 24 locations at the same time.
Perform all functions of the host computer from the remote
computer.
Auto CD-burn (Record to CD) video images
Backed up video can be played back by selectable date and time in
other computers simultaneously
Intelligent Slide bar to search historical video up to 16 cameras
simultaneously
Alarms indication of hard disk failure or corrupt files
Playback historical recordings immediately on screen
Snapshot and Simultaneous recording via IE Browser
Backup the oldest recordings and playback on a remote computer
when host hard disk is full and starting circular recording for the
first in file. (Optional)
Control lights and other electrical devices from remote computer.
(Optional)

6
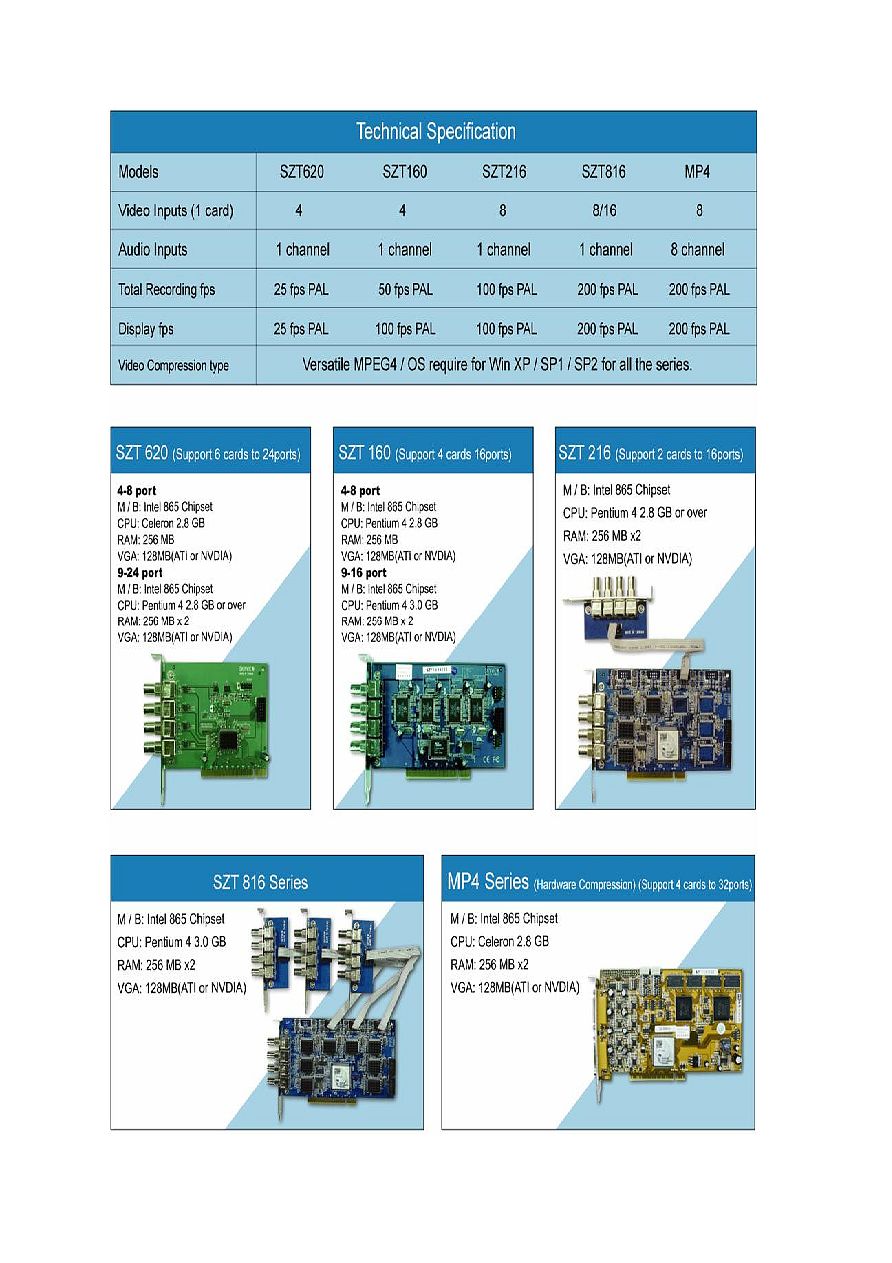
2. Computer Requirement and Maximum Recording Frames
** PLEASE READ PAGE 7 ~ 11 IN DETAILS AND FOLLOW THE INSTALLATION AND
OPERATION METHOD.
WITH SMART AND UNIQUE SKYVIEW RECORDING METHOD (MIX RECORDING):
a) Recording mode: "MIX" recording, always record at 1 fps when there is no object
movement for keeping all recording images, when there is movement, event recording
frame rate is adjustable.
b) How to set Mix Recording method (default settings):
Normal recording: 1 fps
Event recording: frame setting is adjustable according to the hardware specification
and CPU used (default 7 fps)
SZT-Series: 3 TCP/IP gates for remote connections: 1350 / 1351 / 1357 and 80
.
P.S. a) DO NOT use all in one motherboard.
b) Intel 865 chipset motherboard uses dual channel memory technology; we suggest use of
2 x 256 MB RAM to increase performance of the DVR system.
c) Suggest use normal recording when the camera is a P/T/Z dome or when the camera is
located on a busy street.
d) Motherboard: Gigabyte/Asus motherboard
Compression Quality 10 : 640x240 Resolution pixels
Compression Quality 9 : Between 640x240 ~ 320x240 Resolution pixels
Compression Quality 8 : 320x240 Resolution pixels
No select or change resolution for SZT series.
Below are the different test hard disk size results, actual hard disk size will be
based on your environment.
Compression Quality
Recording
Frame Per
Second
Compression
Quality 7
Size (KB)
Compression
Quality 8
Size (KB)
Compression
Quality 9
Size (KB)
Compression
Quality 10
Size (KB)
1
12
17
20
24
3
7
9
13
16
5
5
7
11
13
7
4
5
9
11
10
3
4
6
8
15
2
3
4
6
Note
: All Series default at Compression Quality 9.
Suggest adjust compression Quality at 8 or 9. If set Compression
Quality 10, HD will add storage.
7
8
3. Installation :
In order to make the Skyview surveillance system more stable, please install
an extra cooling fan to cool down the chipset of capture cards.
3.1 Installation Steps : DO NOT use all in one motherboard.
a) Have a clean PC ready for installation (formatted hard drive)
b) Partition a new or formatted hard disk into C: and D: drive. Suggestion: partition 5Gb for C drive
(operating system), other drive used to store recording files.
c) Install Operating system and other PC peripheral drivers.
d) Windows setup as per topic 3.2 Windows setup, and turn off power.
e)Insert Skyview capture card(s) into PCI slot(s).
f)Install Skyview capture card drivers.
g)Install Skyview software.
h)Choice video format (NTSC or PAL). According to the location of your country.
i)Simple default setup as per topic 3.3 Skyview ready to use setup (default username:
administrator, password: 1234).
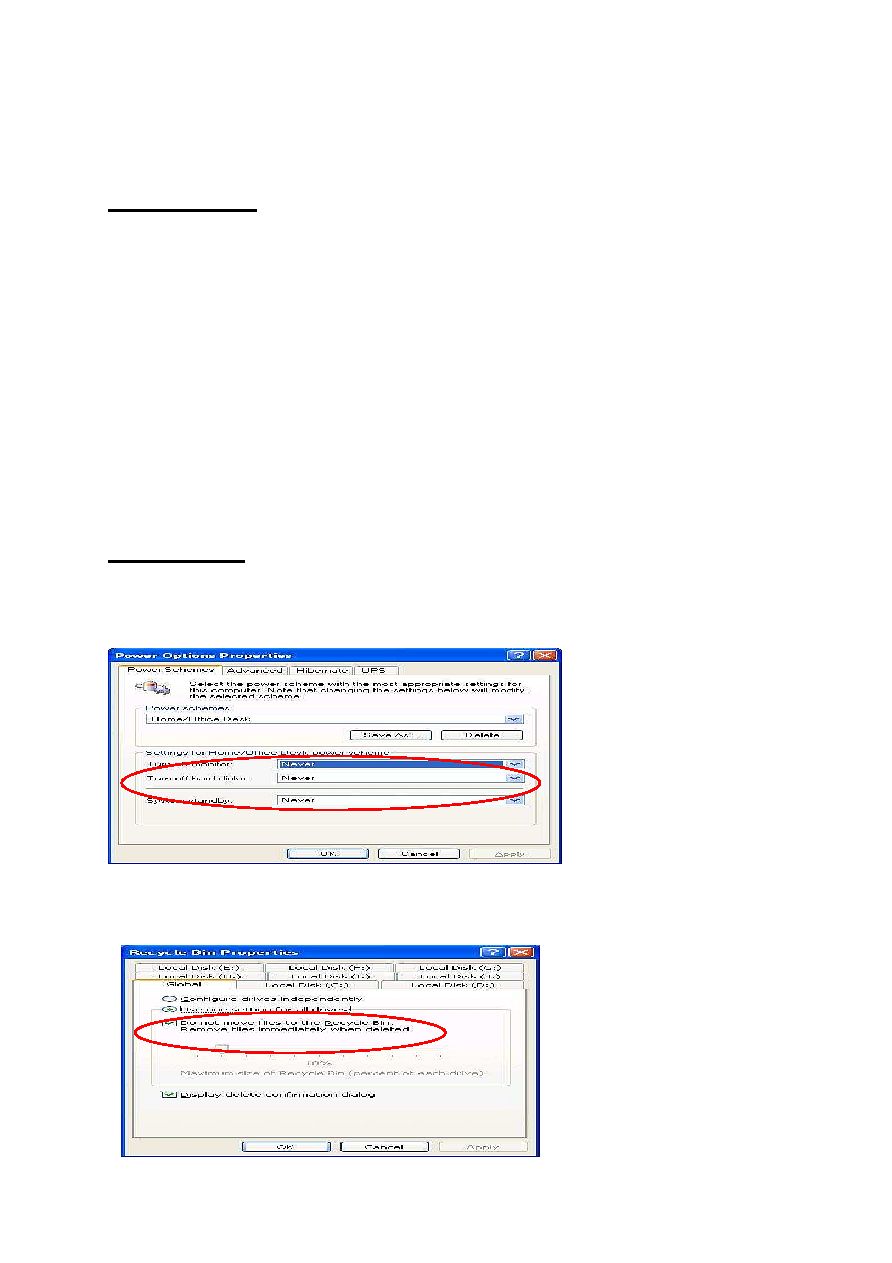
3.2 Windows Setup
Windows 2000 > install DirectX 8.1 from the Skyview software CD provided.
a) Set screen saver option to NONE in Display Properties.
b) Setup the power options properties as below
c) Set screen resolution to 1024x768 and color quality to 16 bits in Display properties
d) Set "Do not move files to the recycle bin. Remove files immediately when deleted" in Recycle
bin properties, select this option, so the files are recorded in First in First out sequence.
9
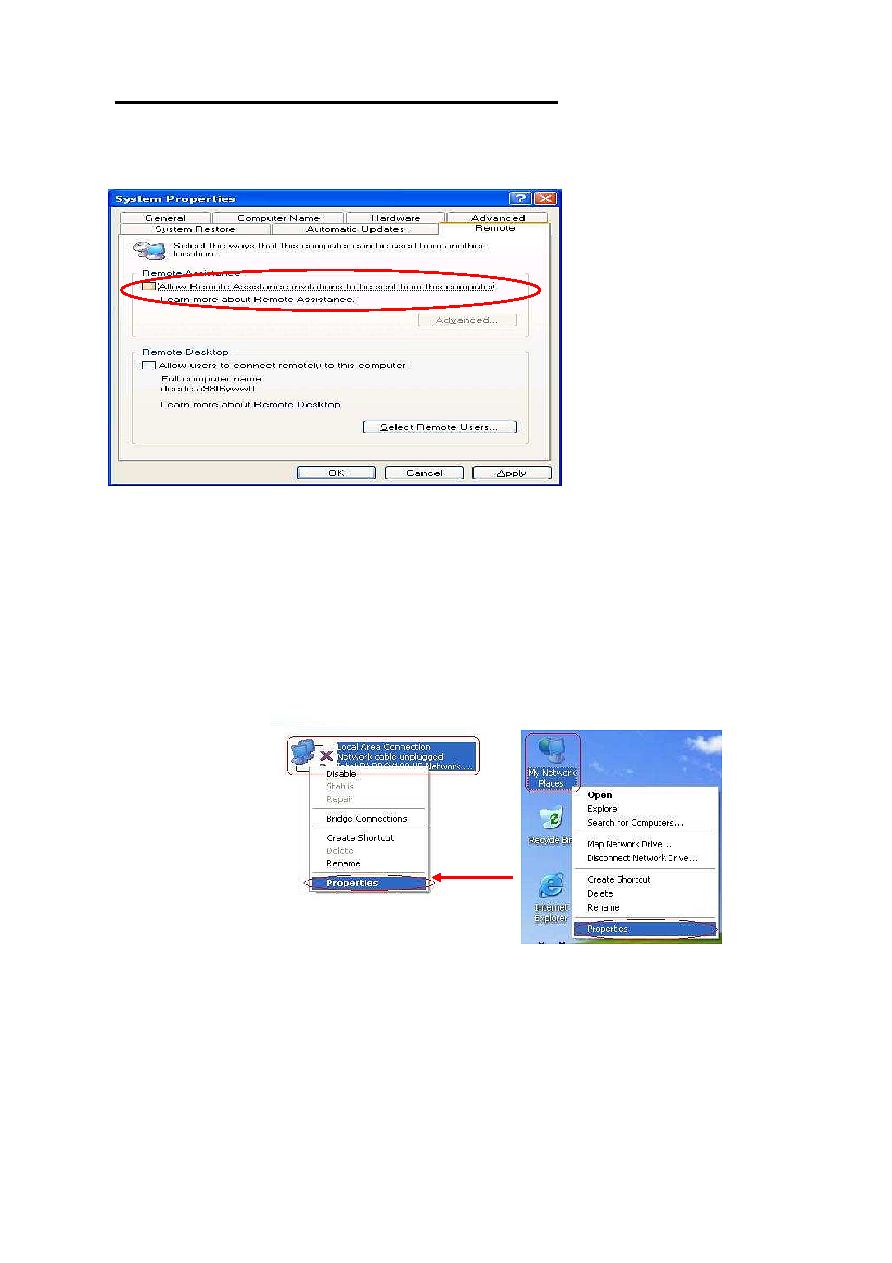
Windows Setup How to Prevent System from Virus Affection
a) STOP the messenger function; please go to [control Panel] [System management tool]
[Service] and stop the [Messenger] function.
b) In System properties / Remote; remove tick from "Allow remote assistance invitations..."
c) In System properties / Automatic Updates; remove tick from "keep my computer up to date..."
d) In System properties / System Restore; Select "Turn off System Restore on all drives"
e) Windows TCP/IP port Setup:
**Surveillance system will not be easily attacked by viruses with the TCP/IP setup.
1) Right click on "My Network" and select "Properties".
2) Right click on the "Network connection" image and
select "Properties"
3) Select "Internet Protocol (TCP/IP) and click "Properties"
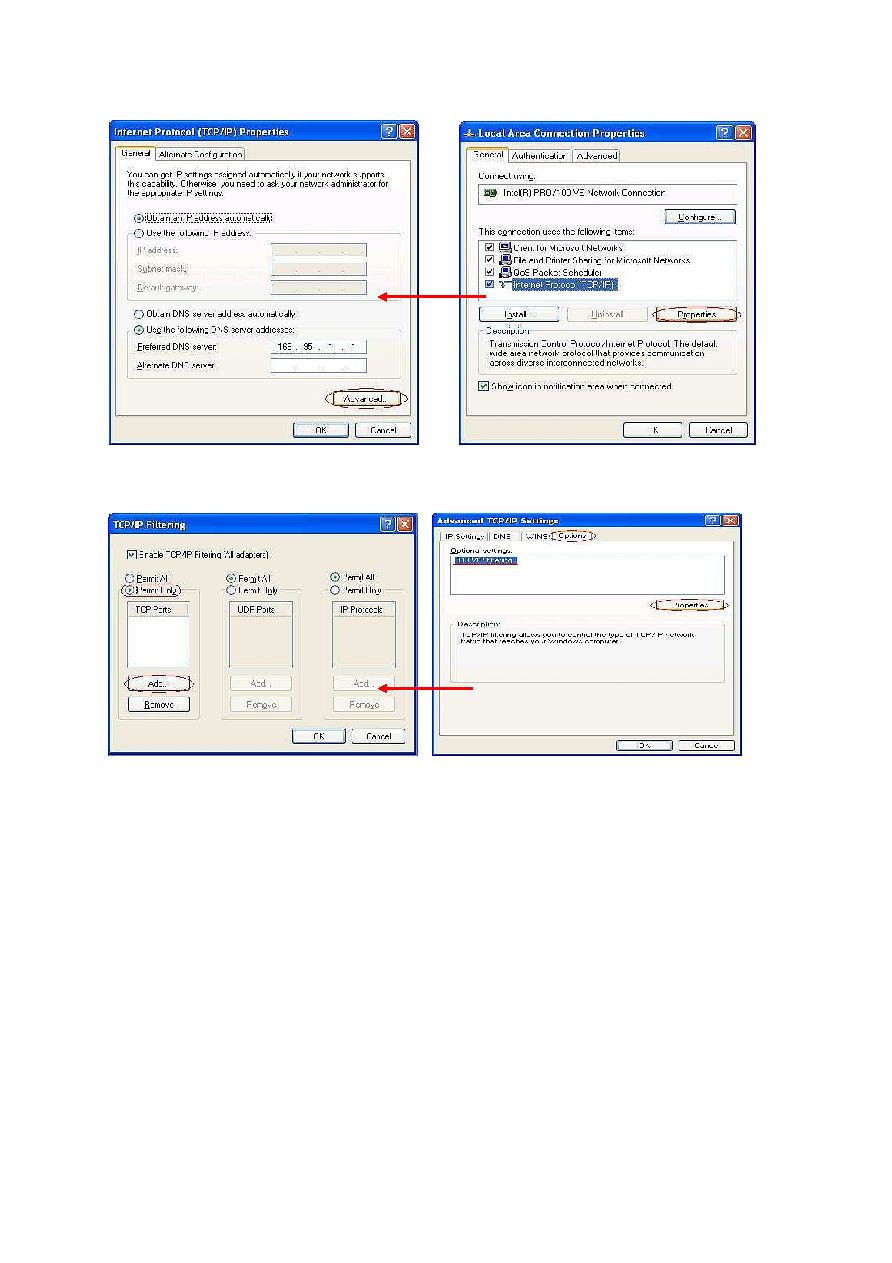
10
4) Click "Advanced" in "General"
5) In "Advanced TCP/IP Settings" dialogue box, select "Options" > "TCP/IP filtering">
"Properties"
6) Select "Permit Only", and click "Add..." to add ports
Please open the below ports for remote connection...
-
SZT Series port number 1350, 1351, 1357, 80 need to be opened in router through IE or RX.
(Port 25 for receiving mails and Port 1352 for event center)
-
MS Plus port number 1350-1372, 80 need to be opened in router through IE or RX.
-
MPEG4 port number 32768, 32769, 32770, 32784, 32785, 32786, 32787, 32788, 80 needs to
be opened in router through IE or RX.
-
You could add other ports for other purposes (DO NOT suggest open port 80 as it is the
port that often affected by viruses) suggested ports: 8000, 8080...
7) Click "OK" and restart your PC to apply settings.
11
3.3 Skyview Ready Use Setup
After the installation of Skyview TX software, the system is ready to use with below setups.
a) Click "Save Password" to enable auto-login when re-start computer.
b) In setup of the first hard drives, please partition into C and D drive, as C drive: for operating
system and other peripheral drivers, D: for recording data, recommended sizes assigned to each
drive C: 5Gb;
all the drive set 1000 MB or above for buffer to increase performance, so that
circulated recording method can be performed more effectively
.
c) Mask the area for motion for motion detection per camera and check "Enable". Then click on the
"Duplicate" icon to enable the motion detection for all the cameras.
After the ready use setup, the Skyview DVR system is now ready to record and use.
12
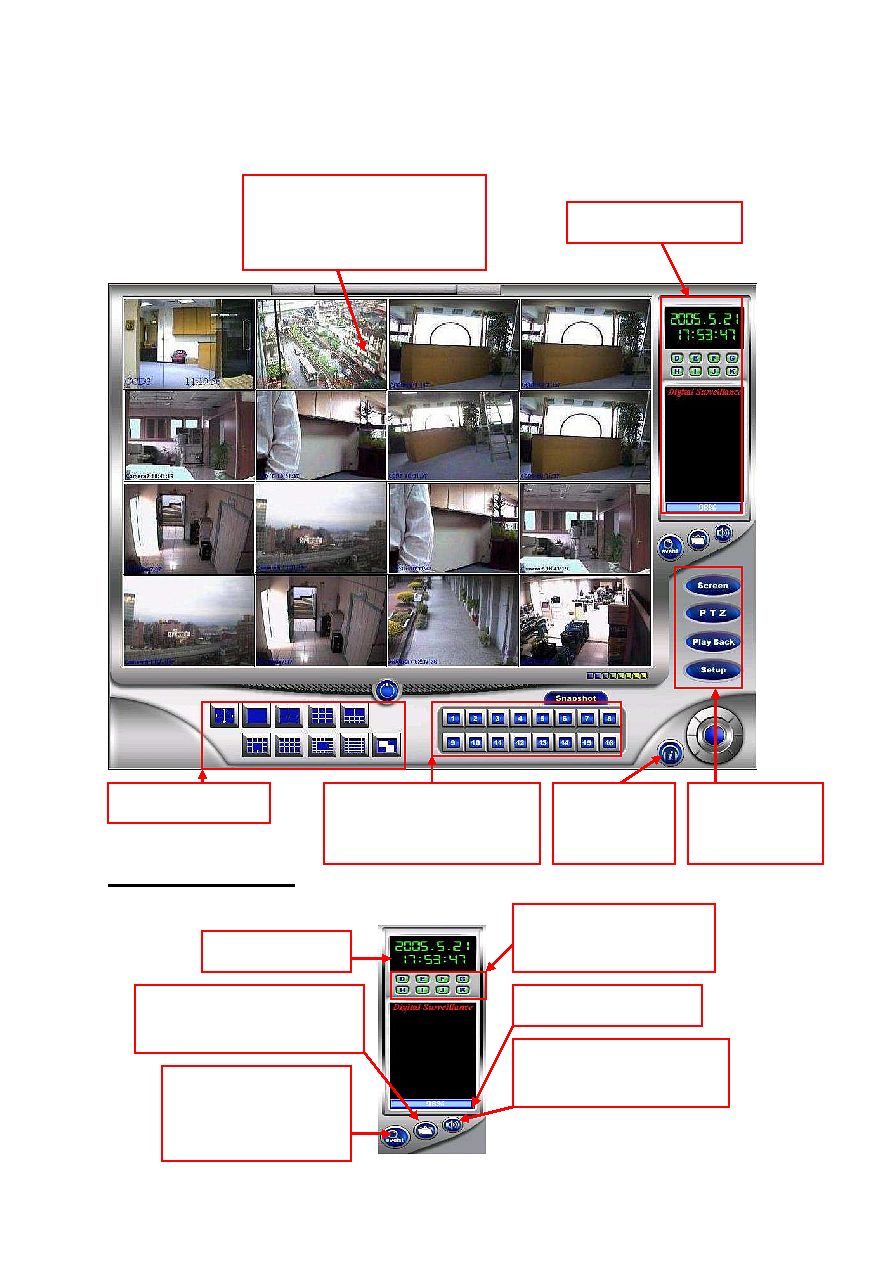
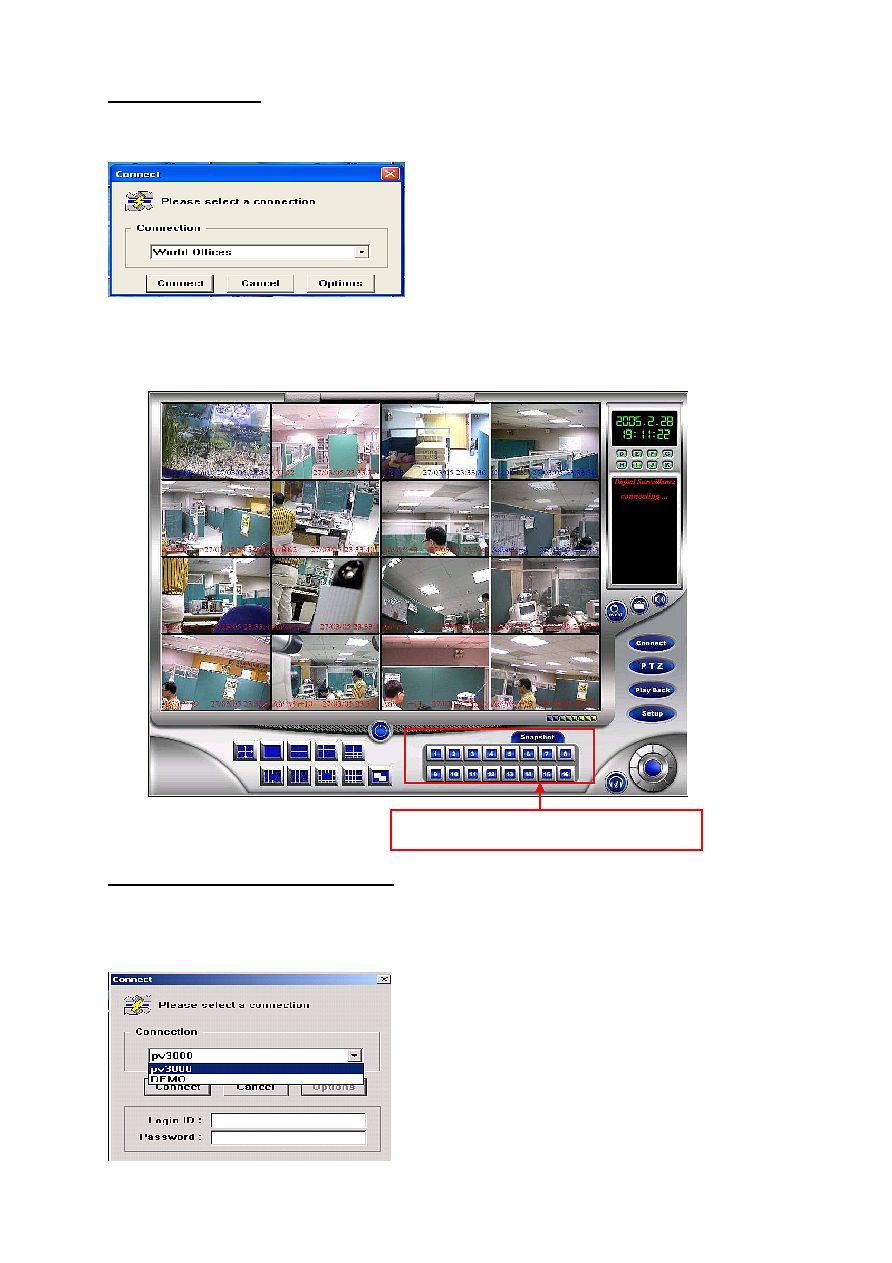
4. Main Screen
The main screen below will show after the start-up process (
default username: administrator,
password: 1234
)
Click on to
record voice of
a place.
4.1 Status Display Section
Function control
section
Status display section
Screen split section
Image display section:
Right click on the image display
section to select a different page.
Current date/time
Used hard disk capacity
Don't double click "Event
Search", click here to
search video by events
Alarm off: Click here to stop
alarm due to video loss
Click on the required camera
for snapshot
Video Backup:simply recording
video backup process
Alarms indicate hard disk
location damage
13
4.1.1
Alarm Off Function
a) SZT-Series: when video loss, it will trigger the alarm, please login user name and password to
turn off the alarm.
** Used Hard Disk Capacity: Red block indicates the used hard disk capacity and blue block
indicates the available hard disk capacity. When it shows 0%, it means it is starting to delete the
oldest recording file and start to circulate recordings.
4.1.2 Event Playback-Triggered Event
**3 Event Type for Event Search:
a) System event: Record of system user log in / out time, video loss time, time of set up...etc
b) Motion detect: Select any CCD ID and click on "Search" for the triggered event list.
c) Sensor detect: Lists of time and Sensor ID or event triggered
** Require to setup motion detection to enable this function.
** Default list 500 events. If require more events, please contact your local Skyview supplier.
** Default event recording time is 15 seconds (3 seconds pre-recording and 12 seconds
Double click to enlarge the screen
Event list, click twice to
play the triggered event
Stop, previous frame, pause, next frame and play.
Allow to playback or rewind frame by frame.
Search events by time, event type and camera.
Select the time for
system event search
Save, print, return to recording screen
14
post-recording).
4.2 Function Control Section
a) Click the
icon to show screen saver. Input username and password to exit the
screen saver mode.
b) Click the
icon to start up pan / tilt function.
c) Click the
icon to start playback mode and perform clips searching and playback
functions.
d) Click the
icon to setup configuration.
4.3 Screen Split Section
Full screen button
10 split button: Double click at the smaller split, the image will display at the upper big split
13 split button: Double click at the smaller split, the image will display at the central big split
17 split button: Double click at the smaller split, the image will display at the central big split
25 split button: Available for SZT-620 series only
Sequence button: Click to show different page in sequence (Please refer to the sequence
setting from setup function)
** Click right button of the mouse on the image display section to choose a different page.
Log out the system
Screen split button
15
5. Screen Saver
Screen saver shows when press
button. A valid user name and password are
required to re-login the system. Even in screen saver mode, Skyview system keeps working and
performing all the function.
6. Pan / Tilt / Zoom Mode
Press
button to start Pan / Tilt / Zoom function. (Works when the pan-tilt-zoom
devices or speed dome is connected.)
a) Direction buttons: Press the direction button to change direction of camera. Press "AUTO" to
pan the camera automatically.
b) Focus: Press + and to change focus, press "AUTO" to automatically focus the camera.
Click to set
preposition for PTZ
Direction Button
Electrical device control button
is disabled in TX application
16
c) Zoom: Press + and to zoom in and out.
d) How to set pre-position movement:
- Press icon
and adjust the camera to the position you want.
- Press "SET" and select "Position 1" to setup the 1
st
pre-position. When you press no.
.
camera will go to the pre-positioned automatically.
- Other cameras follow same rule as above.
17
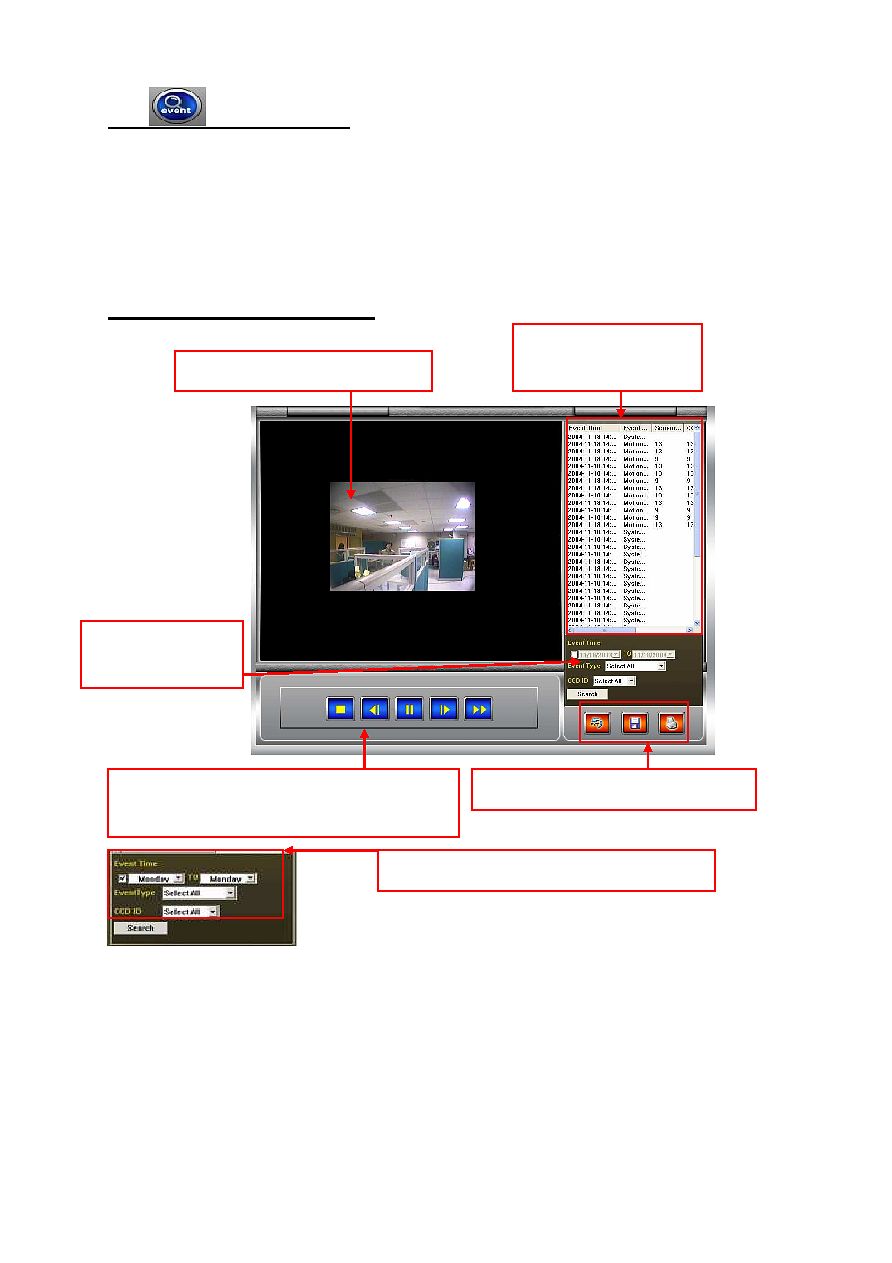
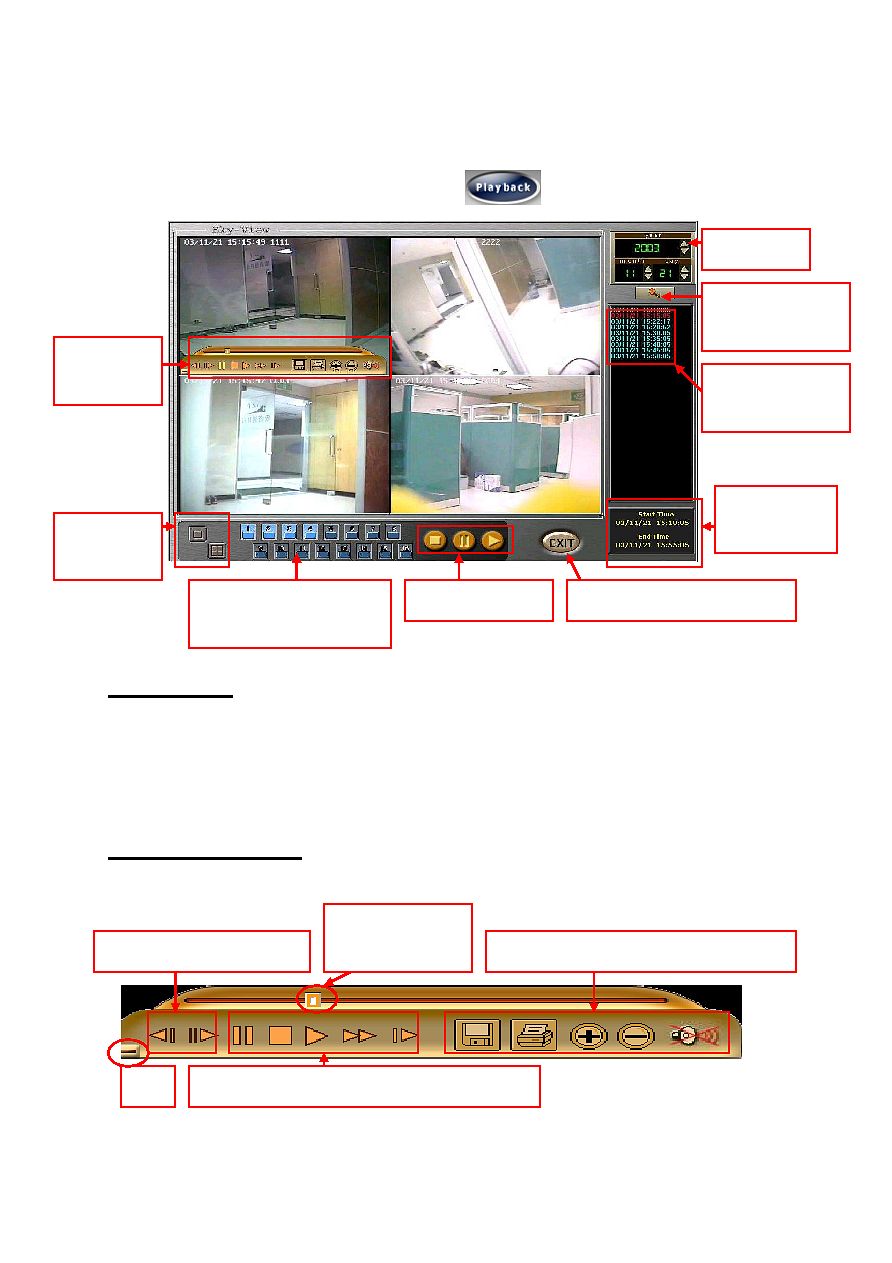
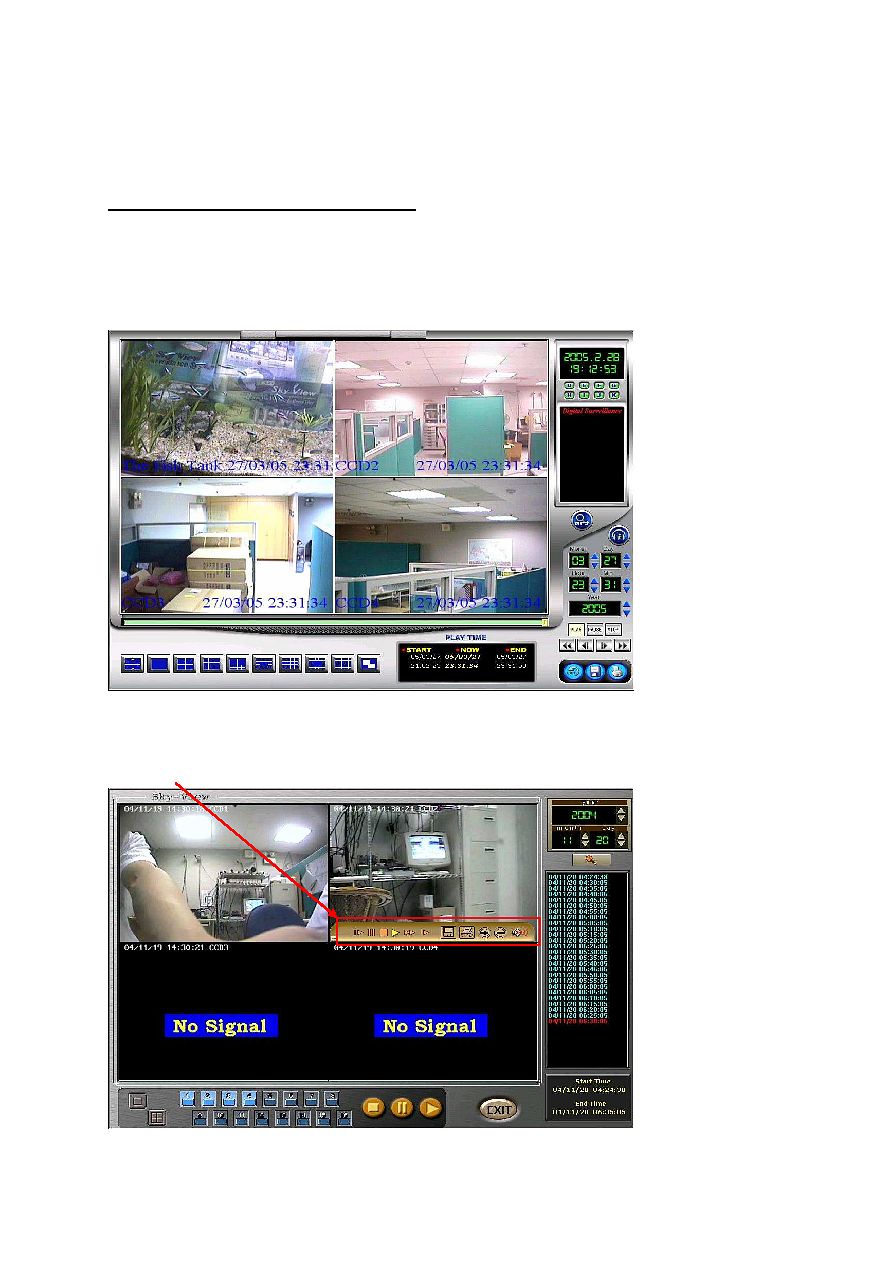
7. Playback Mode for SZT-Series
Press "Playback" button to enter the playback display
7.1 Playback Icons
The video player is designed to play recorded videos simultaneously, it means all videos from
cameras can be searched and displayed simultaneously, and the images can be enlarged and
printed.
Image Display Section
Right click on the image display
section to select a different page.
Search slide bar
Search by month / day / hour / minute or
year; use the arrow to change number
Play, pause, stop
Playback
smart search
Exit, save, print.
* To play the saved file in other
PC, please install Codec from
software CD first.
Playback icons
Next frame
Rewind:
Click to play the current video
backwards at 2X speed
Fast forward:
Click to fast forward the current
playing video at 2X speed
Previous frame
Click on to play the
voice recorded at a
past time.
18
7.2 Playback Slide Bar
Use the slide bar to search historical video. Click left mouse button on the search button and drag
the slide bar to the required date/ time for search, the corresponding video will showed on the
screen.
7.3 Searching & Playback by Date/Time
a) Input date and time into searching section to get the required image. And click on "play" icon to
play video.
b) If there is not recording data for the time required, below failure message will pop up. Please
input the correct date/time for search.
** Before input date/time, make sure the video player is not playing. Click "stop" or "pause" icon to
stop playing.
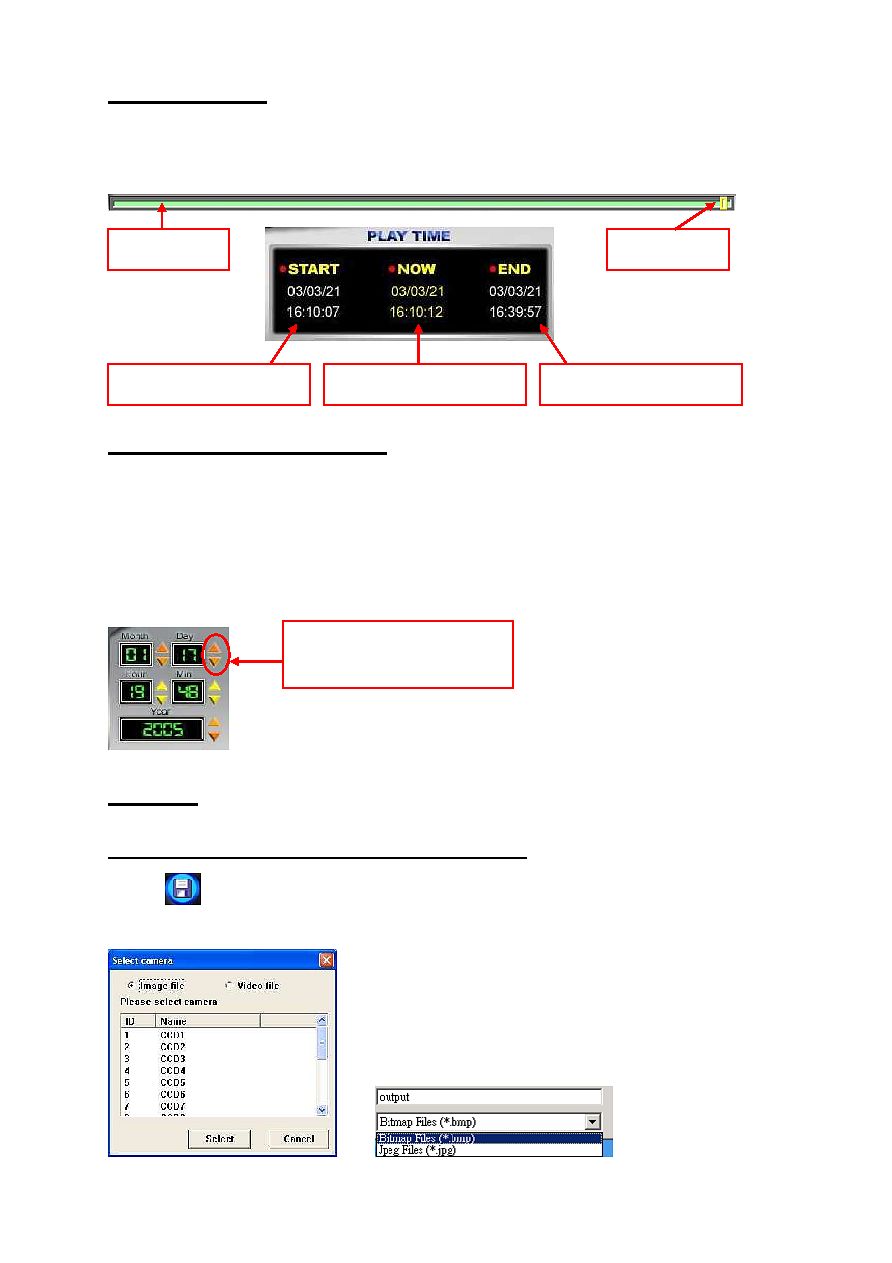
7.4 Save File
7.4.1 The video image can save as BMP, JPG or AVI file format
a) Click
button, "Select Camera" dialogue box will pop up
b) Select "Image file" if you like to save a picture image.
Start of playback date/time
End of playback date/time
Current playback date/time
Search button
Slide bar
Click to adjust the year, month,
day, hour and minute.
19
C) Select "Video File" to save the AVI files.
D) Select the date and time.
E) If went to play the AVI file on other PC, install "Codec" from software CD then able to play in the
Windows Media Player
7.4.2** How to Play Recorded File on other PC (recorded file which save in tape file.
Use
Cap Player
application (for playing continuous video file):
a) Exit Surveillance system to WINDOWS D:\ tape or E:\tape where recorded file is, for security
purposes, you need to burn into CD-R and copy the file to the folder in another PC.
b) Install below program to the PC where you want to play the recorded Video file
c) Install CapPlayer from software CD
d) Run DB Rebulider program in software CD.
**Use DBReBuilder to backup recorded file, when Windows2000/XP crash you don't have to worry
about the recorded file missing.
1) Go to a new database directory: c:\skyview\Bin
2) Click [Add] to the folder where the file is
Press [Start Transfer]
3) Click on [Add] to the folder where is
Go to a new database
20
4) Click [Start Transfer]
Check "Auto skip the corrupt file" to skip the corrupted file, if you wish to delete the corrupted
file, please select "Auto skip the corrupt file" and "Auto delete the corrupt file
"
5)To Start
Programs
select Skyview( there is Caplayer ), CapPlayer doesn't support audio.
6) Please enter "User name[Administrator]" key in "Password[
1234
]", click [Enter]
7) Click "RecordTape.mdb" file and "Open"
Click [Add]
21
8) Enter main screen to play recorded file
7.5 Playback Digital Zoom
To enter Zoom In, right click on the selected camera and select Zoom In.
Left click to zoom in,
right click to zoom
22
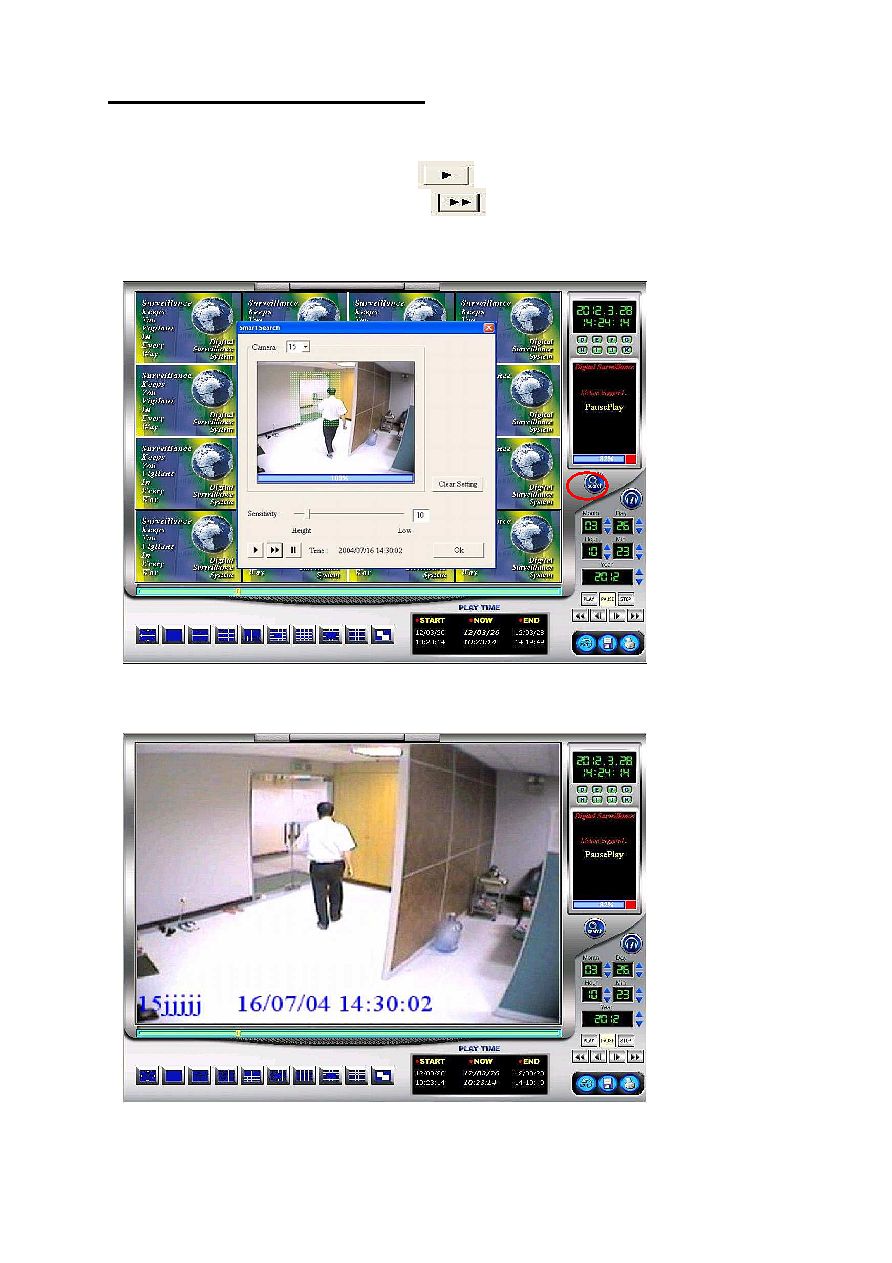
7.6 Playback Smart Search (Object Search)
a) In playback, play to find the video to perform smart search and press "PAUSE".
b) Click "Search" icon to enter Smart Search interface.
c) Select the camera number and click "Play" button.
d) Mask the search area and click "Fast forward" button
e) Video will stop spontaneously when an object movement has found. Click "fast forward"
for next search or "OK" to exit back to the playback mode.
f) Click "Play" to play back the searched video in playback mode.
23
8. Playback Mode for MP4
The Skyview hardware MP4 series offers real time display and recording, it also offers all channels
audio and video server and remote connection. Click
to enter this menu.
8.1 MP4 Playback
a) Select date
b) Click "search" icon
c) Select time from the time list
d) Select one or four split screen
8.2 MP4 Playback Slide Bar
Click once on the playback screen to show the below icons
**"Slide Bar" and "Previous Frame" icon are not available in RX playback.
Search icon for
searching time list
Select date
Select 1 or 4
split screen
Start and end
recording time
4 cameras maximum for
playback simultaneously
Exit and back to
main screen
Pause, stop, play
Select the time for
searching
Playback
slide bar
Drag slide bar
for video search
Save, print, zoom out, zoom in, play audio
Pause, stop, play, 2X speed playback, next frame
Previous frame, slow forward
Exit
24
8.3 M P4 Save File
a) Before save file please click pause icon, then select to save as image (bmp/ video format)
b) Save Picture: Click
, "Select File Type" will pop up for selection and click "OK" icon to
save as bmp file.
b) Save Image File: Click
, "Select File Type" dialogue box will pop up for selection.
Please select start/end time and click "OK" icon to save as mp4 file. (It is required to play with
Skyview software)
MP4 ** How to Play Recorded File (Video/Audio) In Any PC
Install "Tools/ MP4 player/ "MP4 Player (HC)_Setup.Exe"
which offeredfrom the MP4 software CD, this playing program
is for MP4 series only.After installation, you may play the AVI file
which saved in Tape file or in the playback mode with this player.
8.4 MP4 Print
a) Select the required picture then click "Pause" before printing
b) Print File: Click
, "Select File Type" dialogue box will pop up, please select "Image File"
and click OK to print.
25
9. Setting Mode
Click the
icon to enter setup interface for system, user, sequence, motion, sensor
and other settings.
9.1 System Settings
Click on "System Settings" and above interface will show.
9.1.1 Save password:
For auto login when restart the computer.
9.1.2 Recording surrounding settings:
Reserve C drive for DVR system software, Windows operating system and other peripheral drivers,
disable it for storage. And reserve other drive at least 1000MB buffer.
**The default recording mode is "regular recording mode", a separate process for detection will be
stared automatically to delete the oldest files, when all the selected hard drives' available space
is lower than the reserved space value.
Warning intervals
Press and input password: 1234 to delete recorded files
Follow the default; the better
quality you set, the better video
image recorded.
Schedule setting for event
Check for auto login with user name and password
26
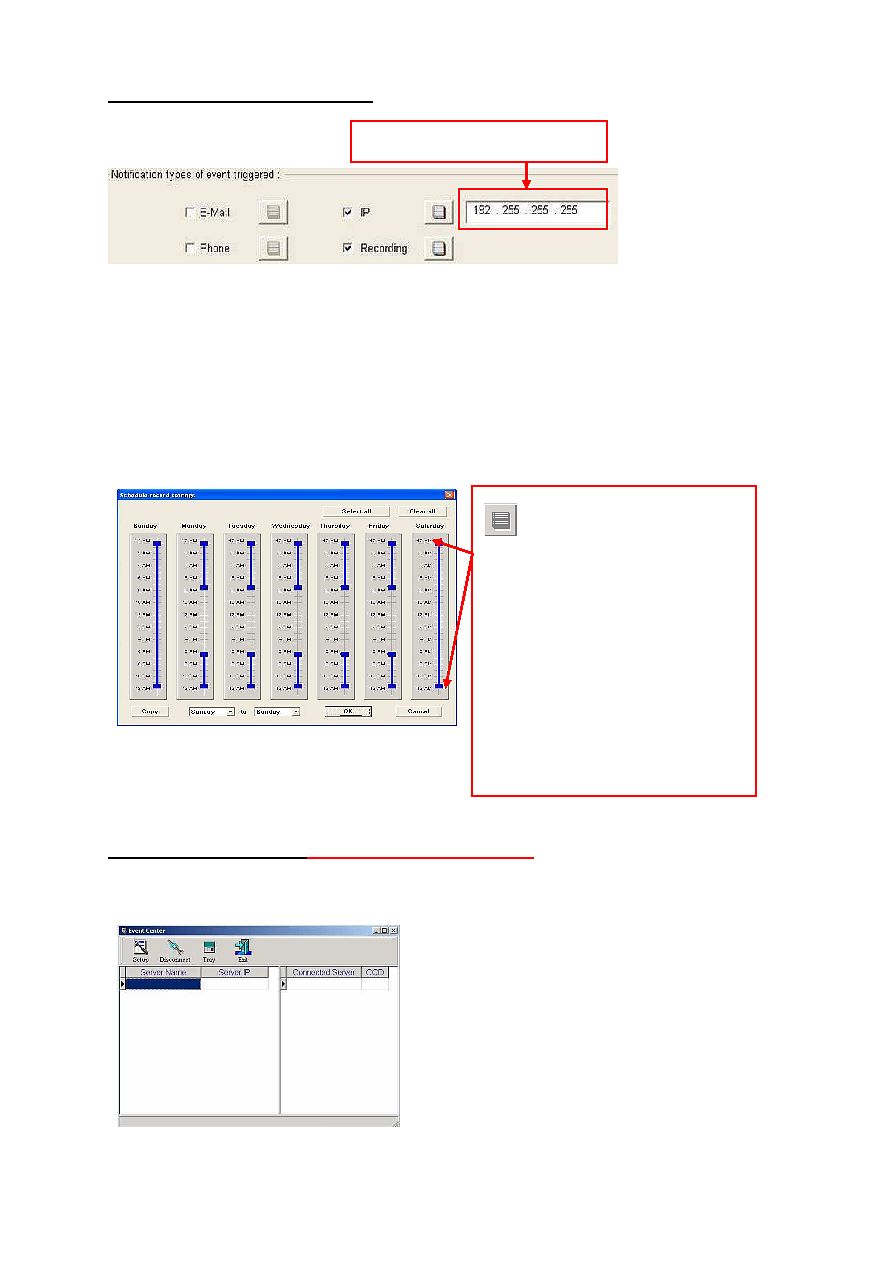
9.1.3 Notification type of event triggered:
a) phone: notification with voice message when event triggered
b) e-mail: set up mail server" in "Other settings" for notification (without image) when event
triggered. For e-mail with video images attached, please contact your local Skyview supplier
to set up.
c) IP: event center function, please refer to section 9.1.4
d) Schedule setting:
9.1.4 Event Center Function :
Public IP for both sides is required
When the event is triggered in the host computer (TX), remote computer will be connected and pop
up the image received from the host computer continuously.
a) You can determine to set up the
schedule to execute phone, email
and IP to IP notification by
adjusting the blue schedule bar
b) Move the mouse cursor on the blue
schedule bar. Left click and move
to right. Then, you can clear the
blue schedule bar and reset the
blue schedule bar.
Public IP is required for both sides.
27
a) In TX [set up] [system setup] [event triggered notification] [IP] to input the IP of remote
computer and click [OK].
b) In remote computer, install the program [Tools] [Event Center] and a [Setup] screen will pop
up, click [NO] and input IP, username and password of TX and click [OK].
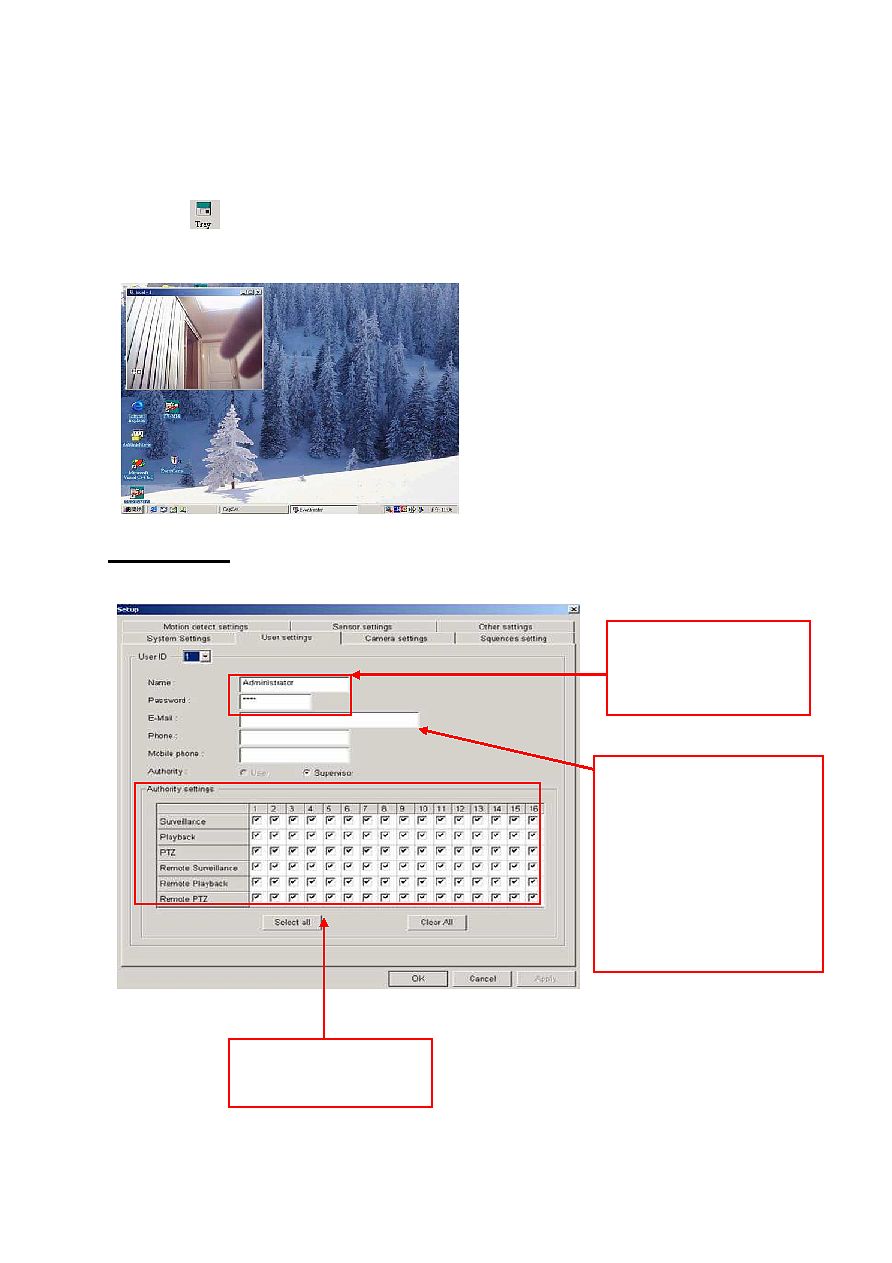
c) Click the
icon to put the [Event Center] into the status bar of windows desktop. When the
event is triggered, triggered image will keep popping up until user close the screen.
9.2 User Settings
Click on "User Settings" to enter below interface, set information for each user.
User Logon:
Allow to set up different
username and password.
User Profile:
Notification via telephone or
e-mail will be sent for triggered
event. Supervisor can perform
set up, monitor, searching
functions. Set up functions is
not available for other users.
Authority Settings:
Authority setting per user
28
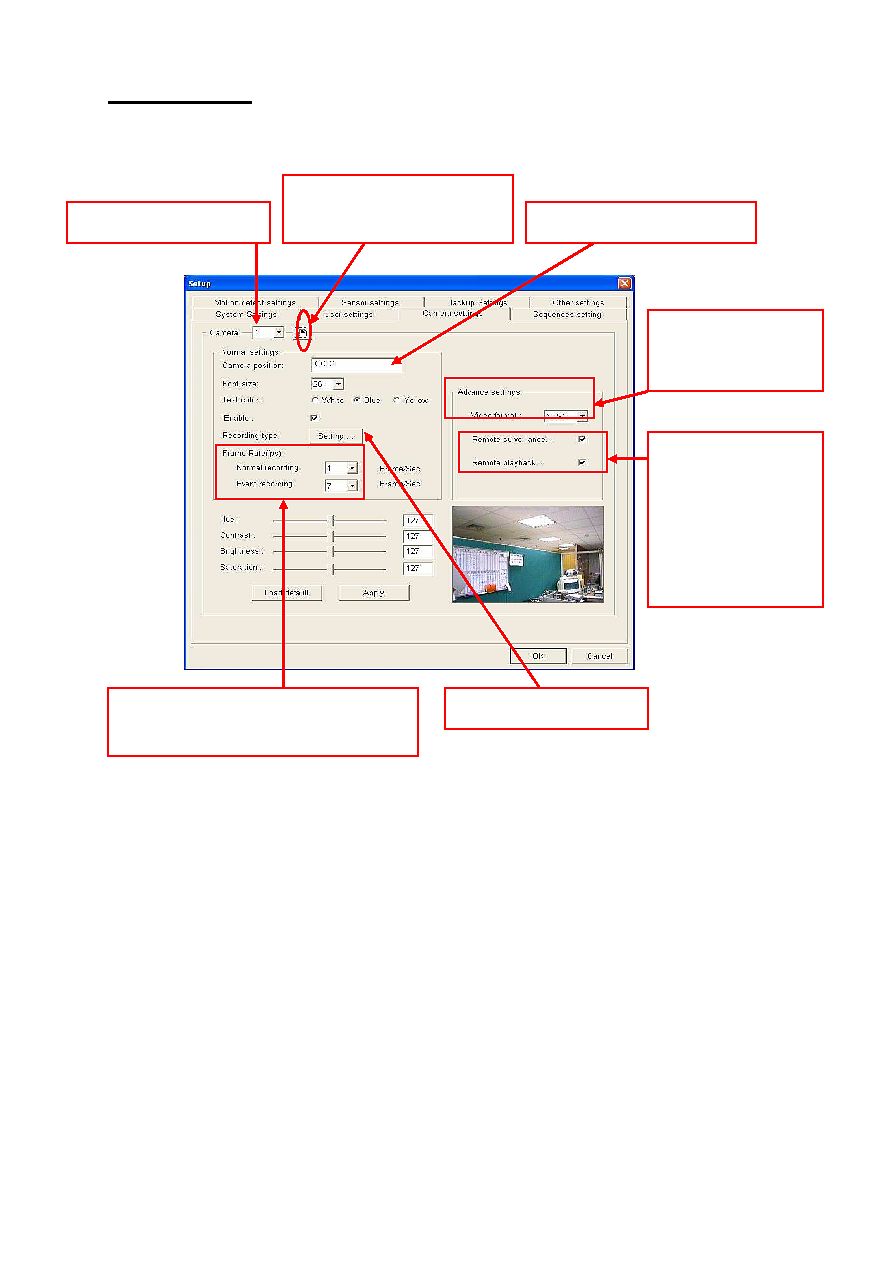
9.3 Camera Settings
Click on "Camera Settings" enter below interface.
**Mixed Recording Mode:
Normal and event recording simultaneously. We recommend this mode to save hard disk
space. You can set the frame rate of normal recording to lower frame (1 frame) and event
recording rate to higher frame to save the hard disk space and speed up in play back. And
please enable motion detection function.
Click this icon to duplicate the
setting for all the cameras.
Select camera for setting.
Check to enable
remote surveillance
and remote playback.
This function is
embedded for MP4
already.
Edit the camera location name
Normal Recording & Event Recording:
The frame is adjustable.
Schedule record setting
Select to meet your
country's video format.
29
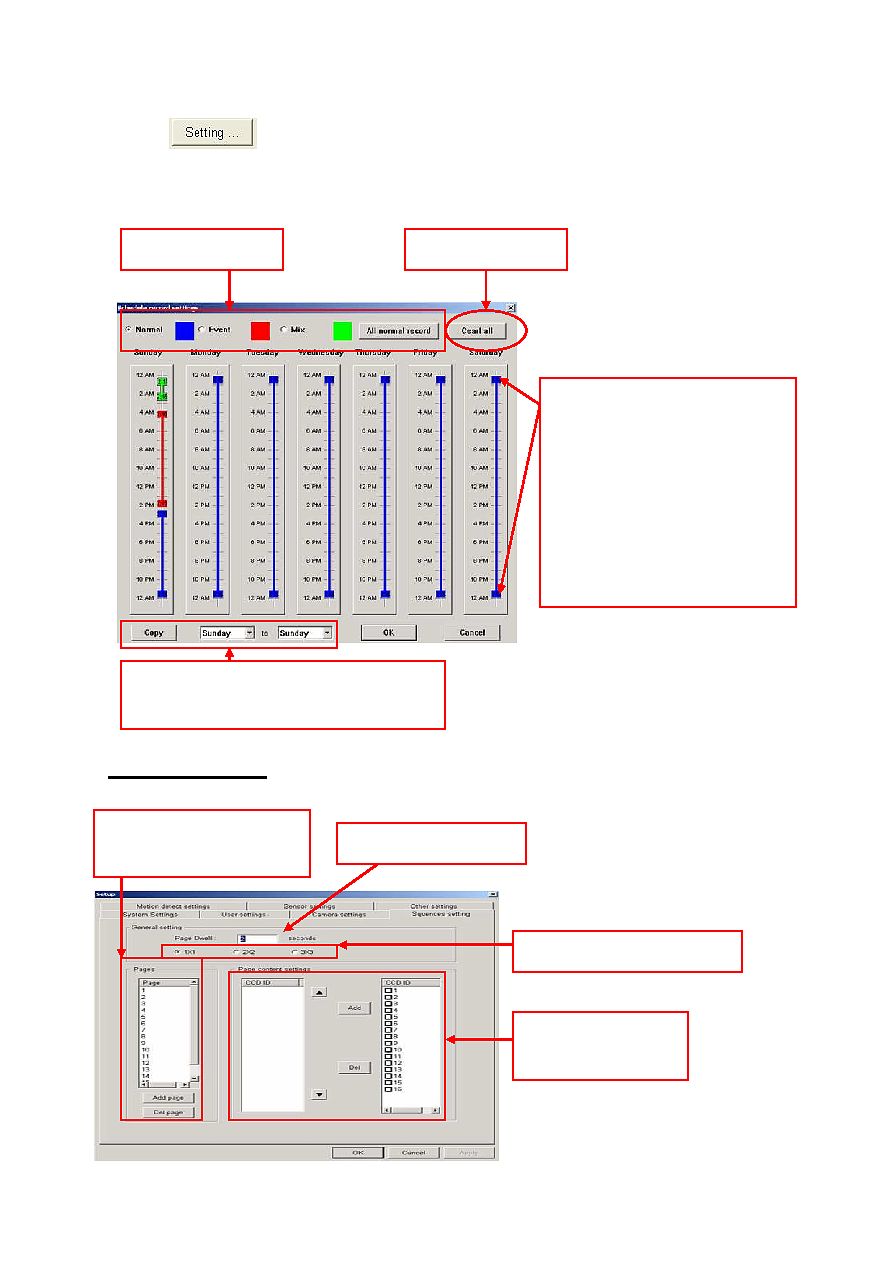
Schedule Recording:
Click on
to enter schedule recording interface for each recording type. A timer is
designed for schedule recording, it will start and stop scheduled recording automatically according
to the inputs. We strongly suggest following mixed recording mode as default.
9.4 Sequence Settings
Click on " Sequence Settings" to enter below interface.
Input the sequence time
Select the required split screen
Add or delete the sequence
page in each split.
Edit the required
camera in each page.
a) Click and move the end of blue
schedule bar by mouse to set
up the time table for event.
b)
To remove the schedule bar,
please move the mouse over
the schedule bar, right click
mouse and draw the schedule
bar out of the zone.
Select recording
Preset the schedule of a day and click on
"copy" to duplicate the setting for other day.
Clear all the
setting
30
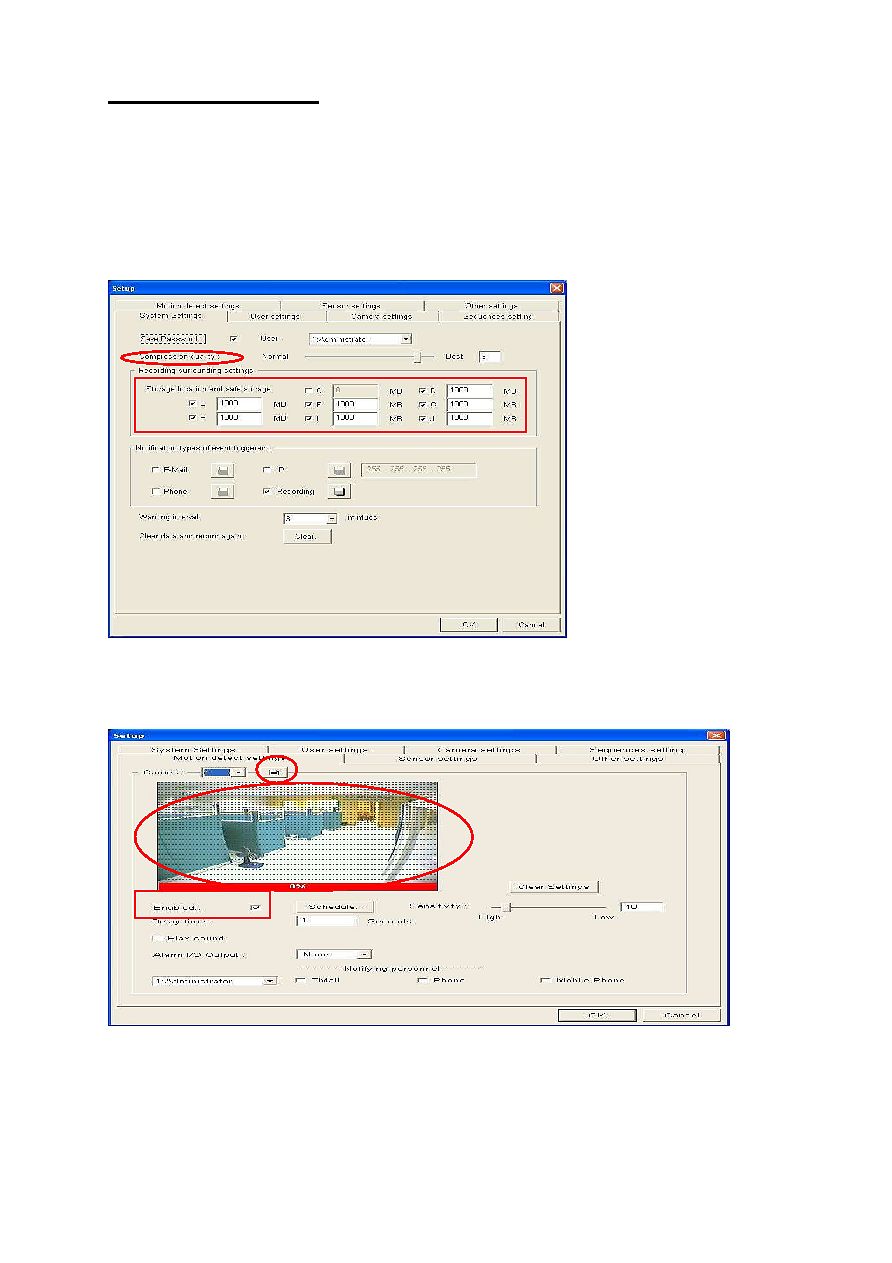
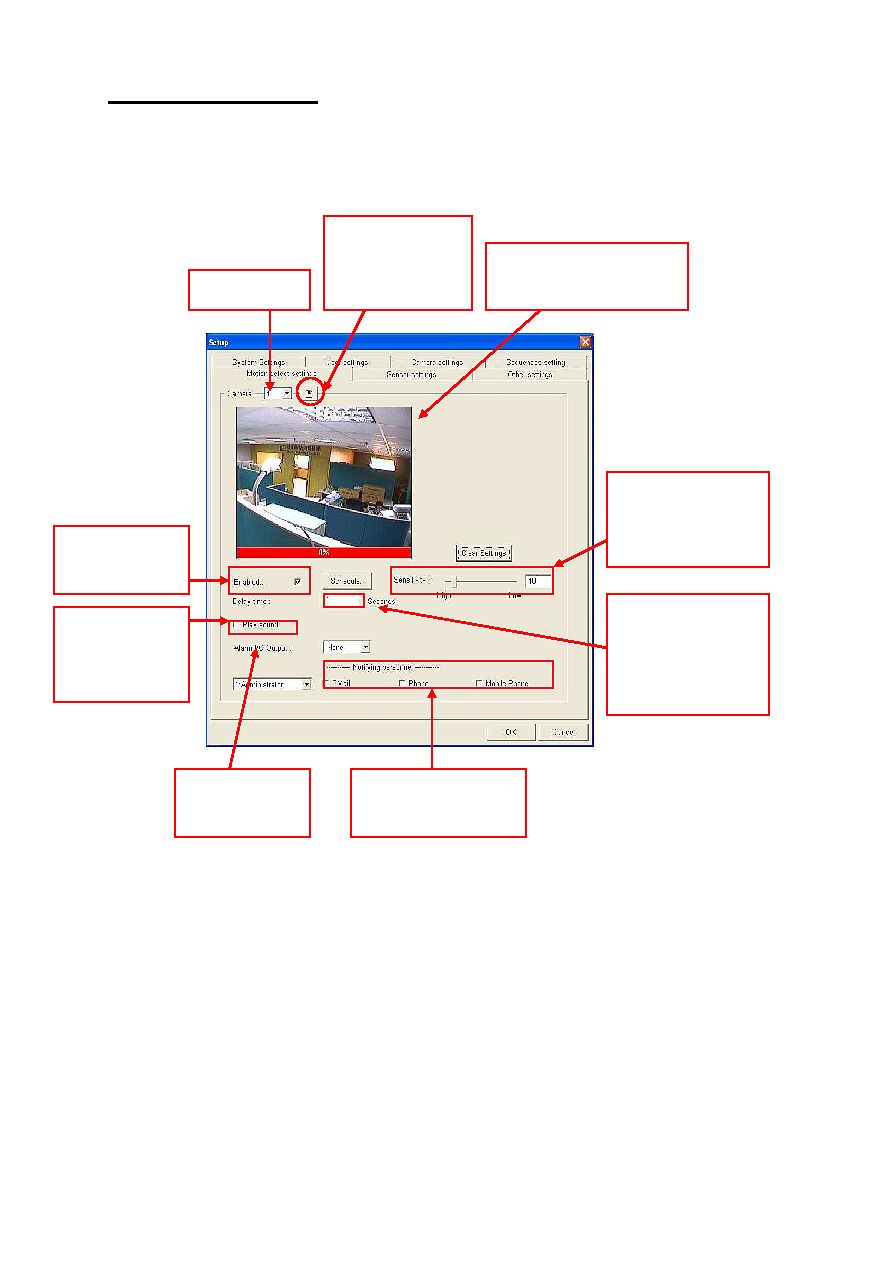
9.5 Motion Detection Settings
The motion detection is to detect automatically any activity within a selected detection area, and to
start recording of that camera when activity is detected inside the detection area. Click on "Motion
Detection" enter below interface.
a) User may record wave files at 8K forma and 16 bit mono. Save the wave files at
skyview/bin/sounds.
b) Please install [Codec] software for e-mail notification.
c) Please select [play sound] and click browser icon to select nofity Menu or Prompt.wave from
C:/skyview/bin/sounds for phone or cell phone notification.
d) The default wave file will be heard on phone notification, please press any button between 1~9
on the phone for the wave file made by yourself and press [#] to stop.
Click to duplicate
the setting for all
the cameras.
Select camera
Check to enable
motion detection
Select the wav.
file that will be
sent to the user.
Mask the detection area by
mouse for detection area.
The lower the
number the higher
detection sensitivity
The alarm will trigger
after the required
motion detection
length.
Notify user via e-mail,
phone or cell phone.
Select the digital
input and output
31
** Phone event notification, modem on board cannot be used. Please install an internal PCI
modem with only ESS or Motorola chipset modem. Remember to install driver from modem CD
provided.
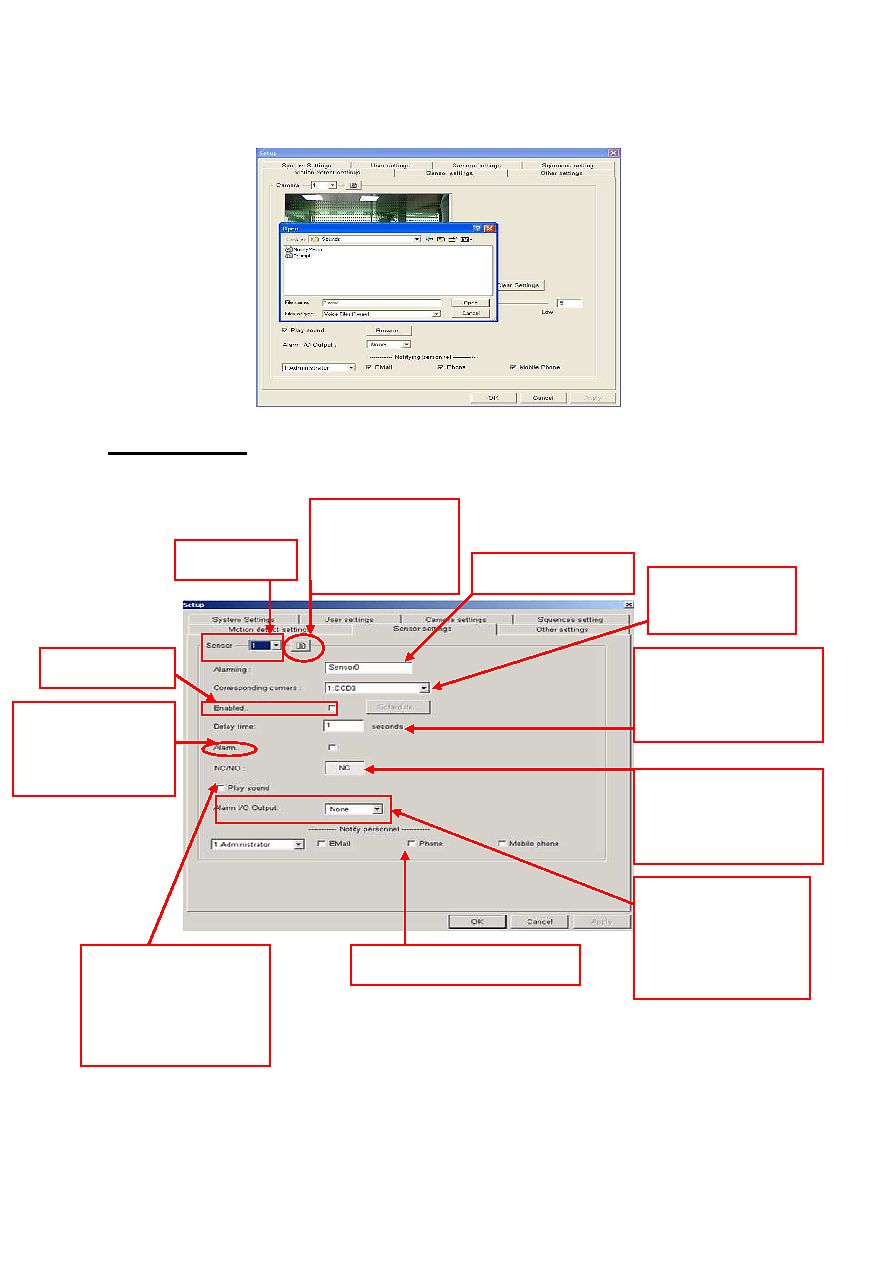
9.6 Sensor Settings
Click on "Sensor Settings" to enter below interface.
** Matching camera is required for each sensor. When something is detected by sensor,
corresponding camera is functioned to support the sensor.
Click to duplicate
the setting for all
the cameras.
Select camera
Check to enable
Check to enable the
buzzer after the
alarm is triggered
.
Select the wav.file that
will be sent to the user.
Able to select the
wav.file by yourself.
Select the digital input
and output. Work only
when I/O card and
sensor are installed.
Input the alarm title
Select the
required camera.
The alarm will be
triggered after the
required sensor length.
NC: normal close
NP: normal open
Used for I/O connection
Notified user for alarm trigger.
32
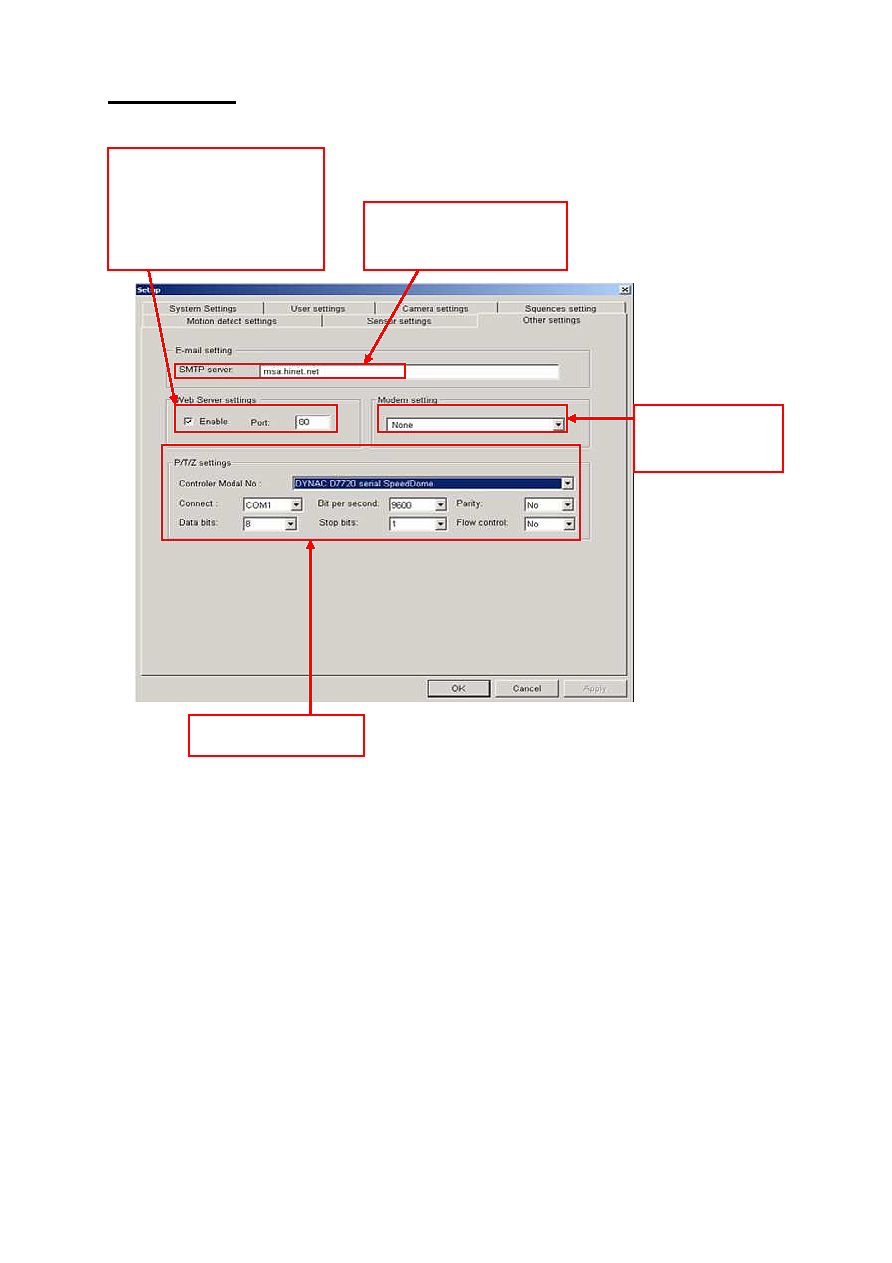
9.7 Other Settings
Click on "Other Settings" to enter below interface.
**A modem card, original driver of modem are required to install and modem on motherboard is not
workable. Please adopt internal PCI modem with ESS or Motorola chipset.
Input the outgoing e-mail
SMTP server
Select the modem
model
Check to enable the remote
surveillance by IE. User may
modify the port number if
port 80 is occupied.
Select the PTZ device
33
10. Remote Surveillance (IE Browser / PDA / RX Application)
Real time image can be seen by IE browser through the Internet, i.e. user can use see the
recording host's real time images via a remote computer connected to the web site.
Dynamic IP supported, please contact your local Skyview supplier for more information.
10.1 Recording Server Setting
a) Enable the web server function
b) Authority Setting: "Setting" "Camera Setting", enable remote surveillance and remote
playback function of each camera. "Setting" "User setting", select the remote authority of each
user for each camera.
** Network and IP Confirmation:
Make sure an IP address has been assigned to this computer, and the network function works
normally
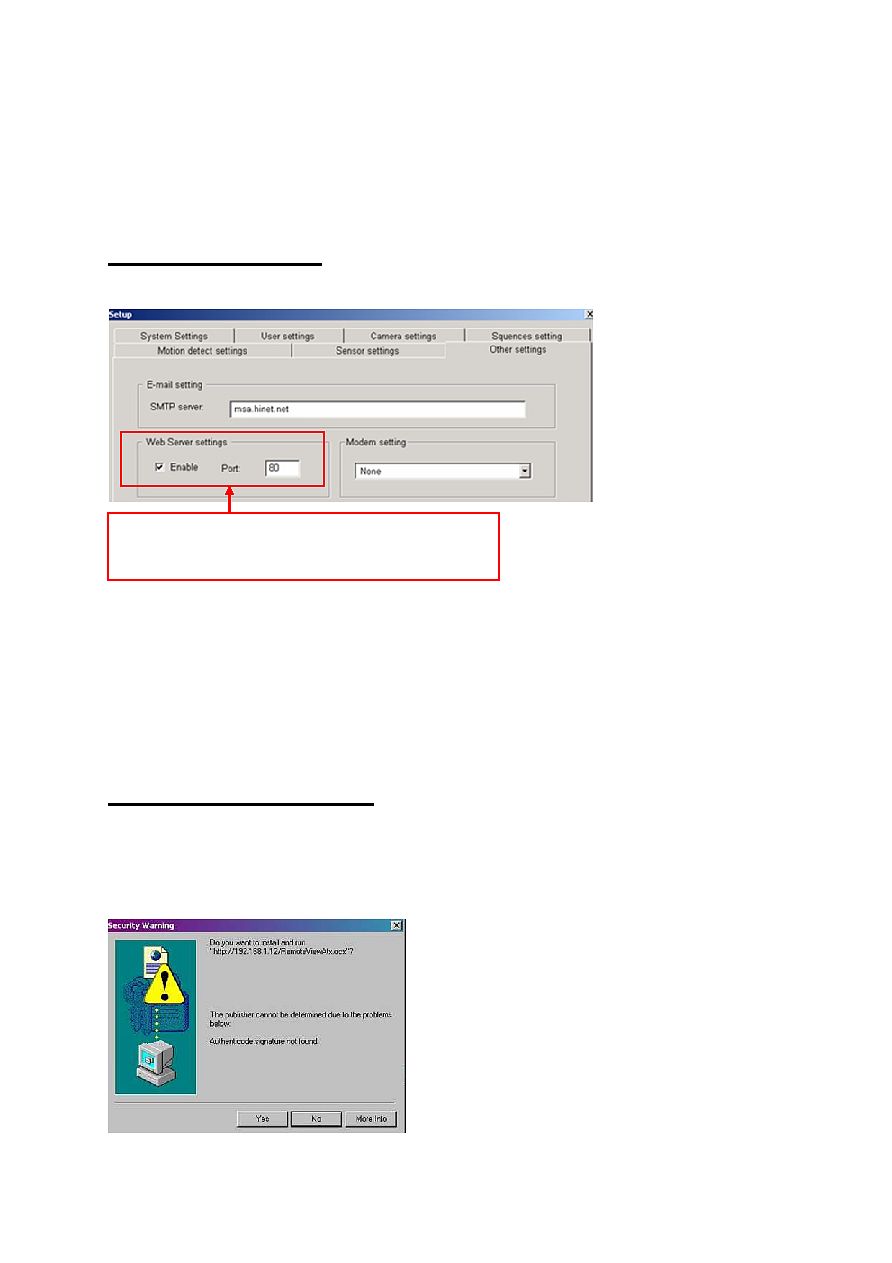
10.2 IE Browser Remote Connections
a) Before connection, open IE browser, select "Tools" > "Internet Option" > "Security", change the
"security level for this zone" to LOW.
b) Key in the IP address of the local recording server and connect.
c) The pop up box will ask you to install and run OCX, press "Yes" to download.
In the setting function of local recording server, click on
"Other Settings" to enable the "Web Server Setting".
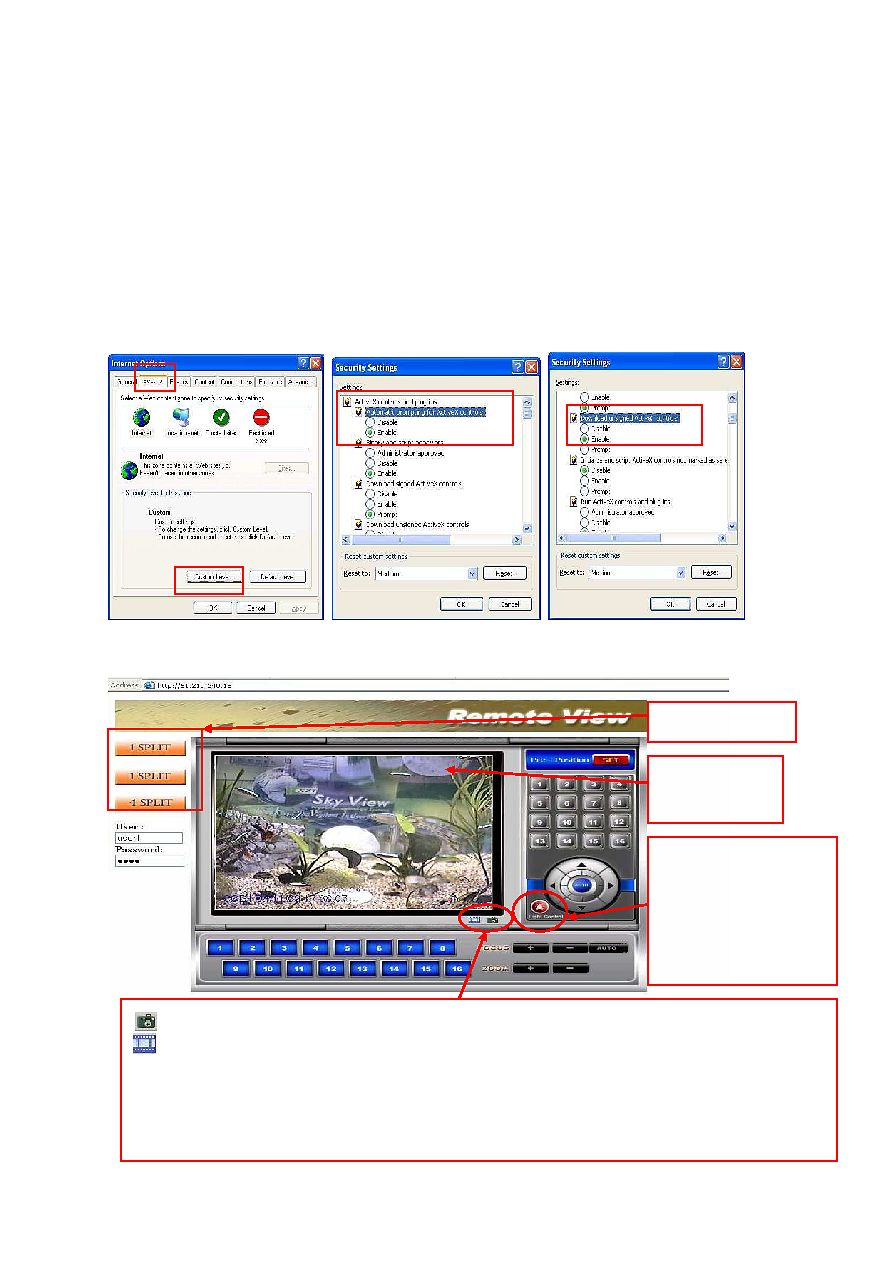
34
d) Input username and password set as the local system.
e) Select camera ID to connect.
f) Double click on the image to enlarge the screen in one screen mode
g) Able to do P/T/Z control in one screen mode.
h) MP4 series allows up to 16 channels audio on IE.
** If the OS of remote computer is Windows SP2, please follow below process before connection:
a) Open IE browser, select "Tools" > "Internet Options" > " Security", change the "Custom
Level" setting
b) Enable " Automatic prompting for ActiveX controls"
c) Enable "Download unsigned ActiveX controls".
SZT-816 series
Double click to
enlarge screen
Split screen option
: Snapshot : Save as JPG* files
: Save recording video files as AVI* files
PS. Press this icon and set up the saving file path to start recording, there will be "
REC
"
texture on upper left corner of the screen. Press again to stop recording.
Note: when recording proceeds, don't switch to other cameras. It will disable the recording.
Control light & other
electrical devices from
remote computer
[Optional], control box
needed.
35
SZT-620 series (only)
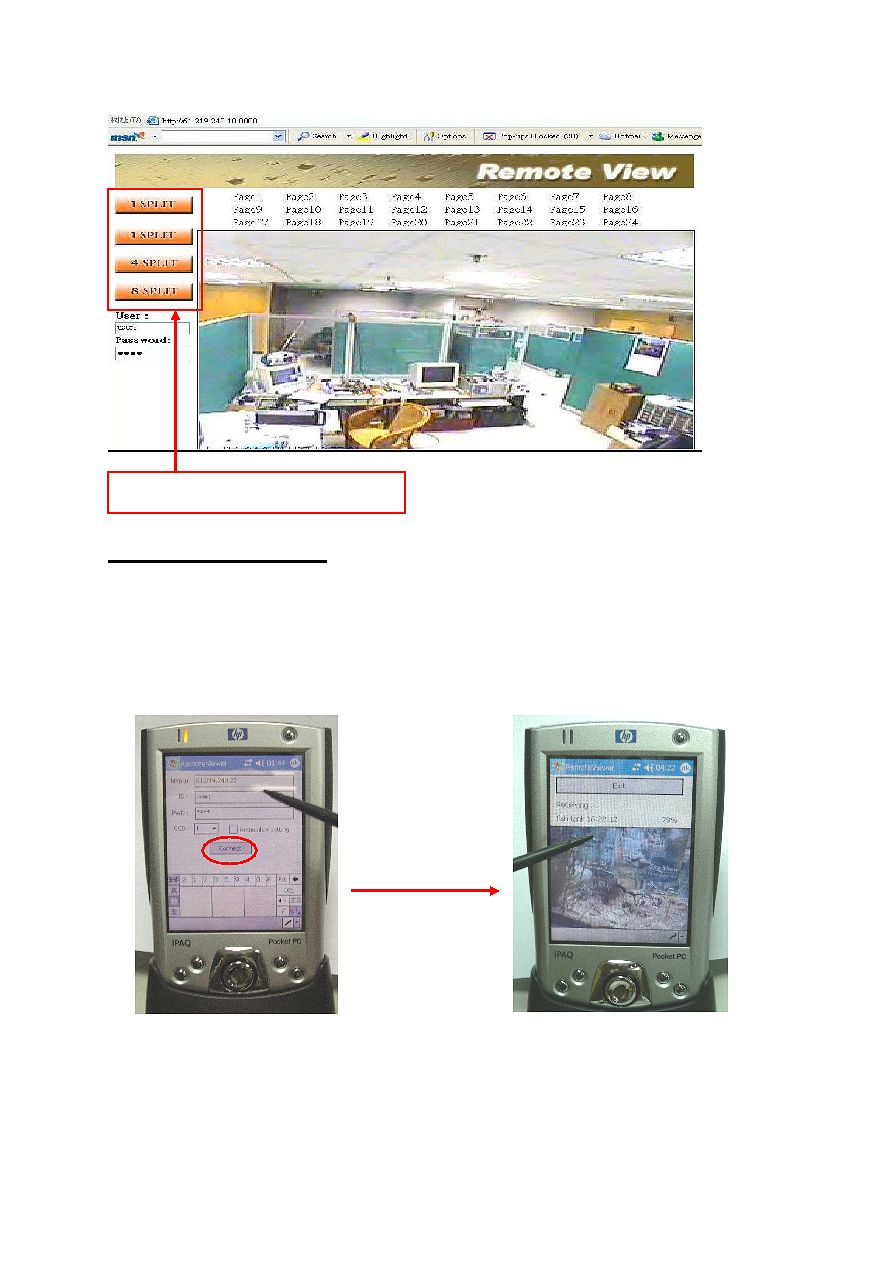
10.3 PDA Remote Connections
PDA Requirement: Intel processor / Windows Mobile 2003
a) Install the PDA file (from the software CD provided) on the PDA.
b) After installation, the SZT shortcut icon will appear on the start menu, double click on the icon
and execute the program.
c) Enter the IP address, user ID, passwords and select Camera number to connect.
d) To view other cameras, click "Exit" and select CCD ID.
** Note:
1. Is TX available for remote connection? (For example: connect by IE/RX); suggest using the
Fix IP for testing.
2. Is PDA available for remote connection? (For example: viewing Internet material)
Connecting
Split screen option, 8 split is available.
36
3. Is Web Server port number "80" enabled? (Must make sure the port number is same with TX
for PDA. To make sure this function working properly, you may test PDA on Skyview's web
site at
http://61.219.240.22
. Username: user1 Password: 1234
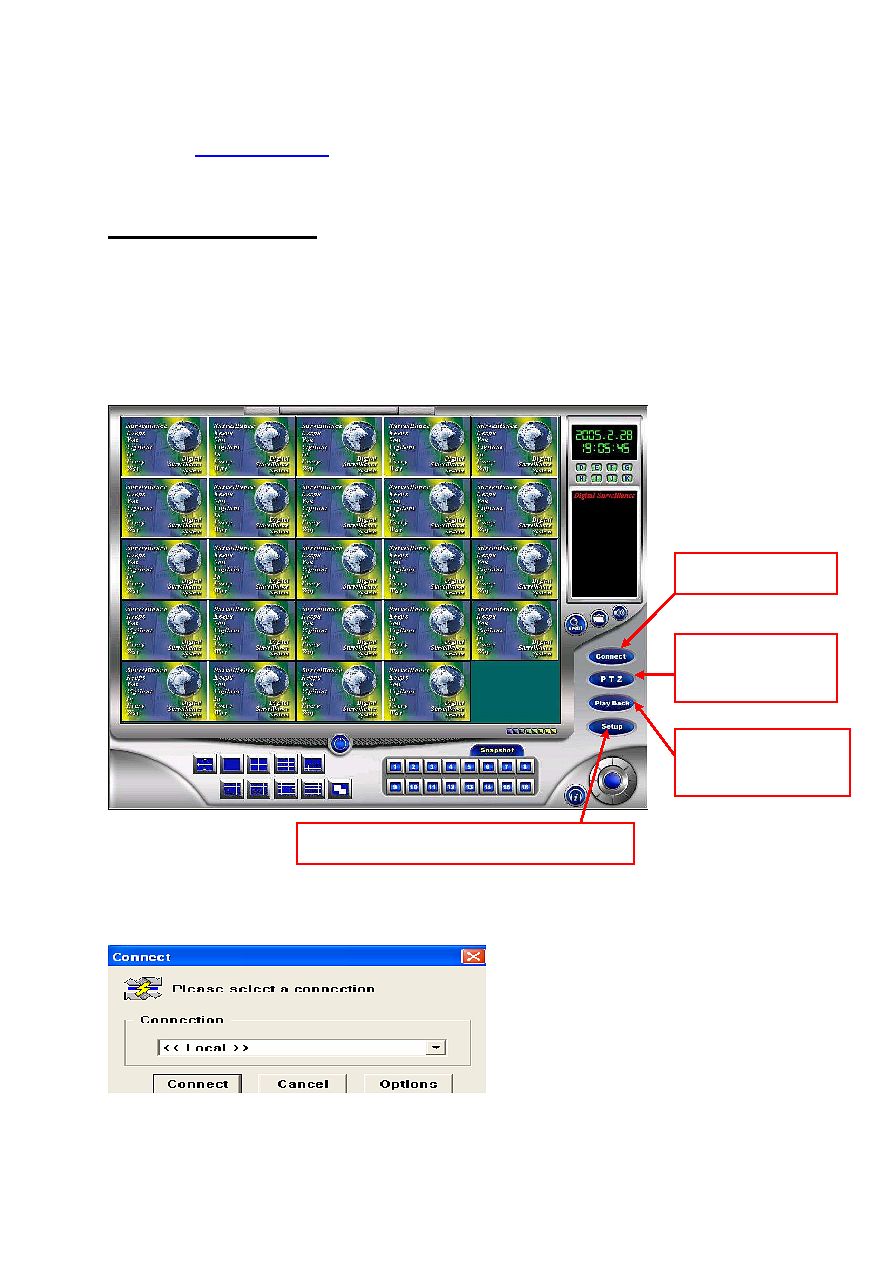
10.4 RX Remote Connections
For connecting the surveillance through Internet or LAN, please install RX application in the
remote computer. Before RX application installation, please install ADO & DirectX 8.1 for Windows
98SE / install Direct X 8.1 for Windows 2000 (RX application, ADO and DirectX 8.1 files are in the
software CD)
The remote main screen below will show after the start-up process (
default
username: administrator, password: 1234
)
a) Click "Setup" and connect to local.
Click to connect TX
Click to enable
remote P/T/Z
Search and playback
video from TX
Click to set up the user, network and sequence.
37
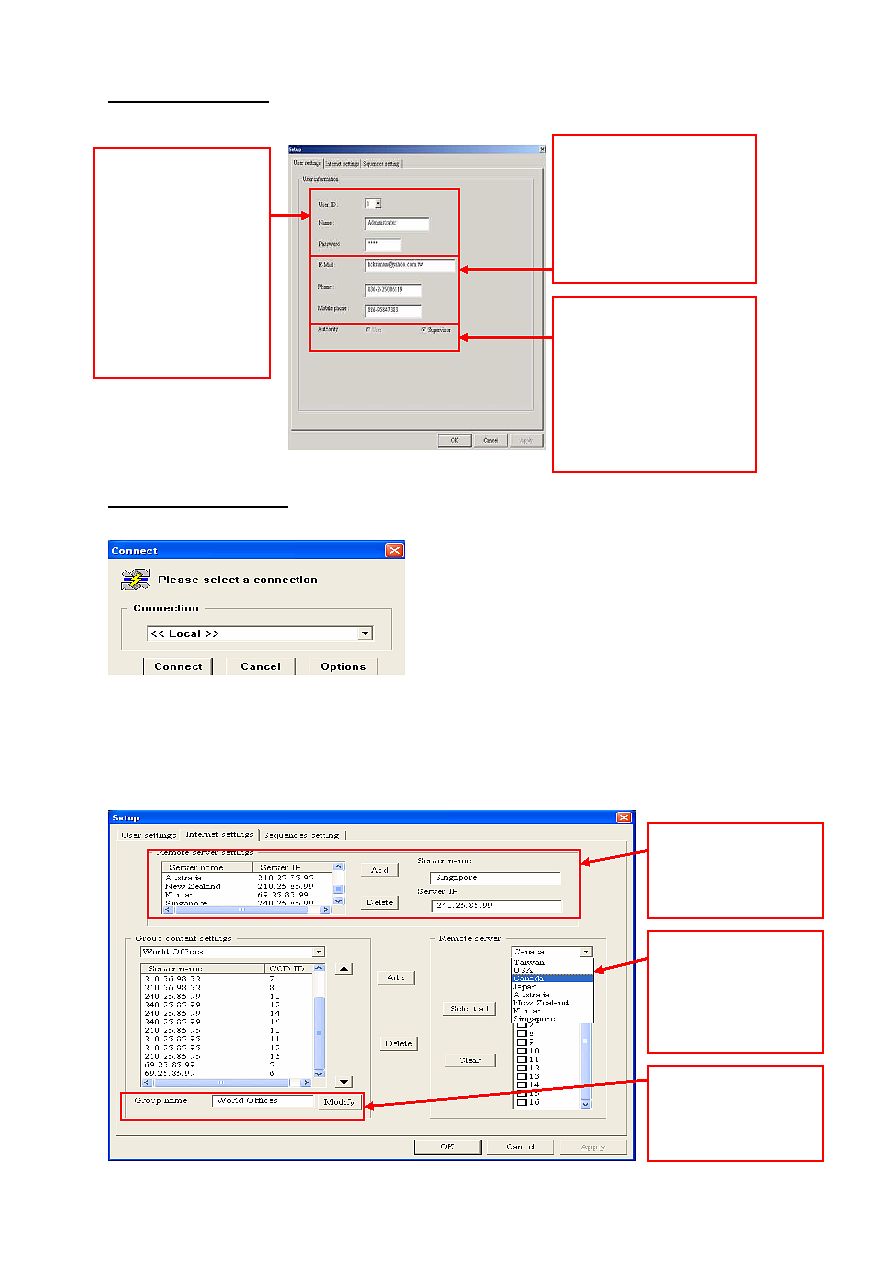
10.4.1 RX User Settings
"Setup""User Settings", enter blow interface to set up user profile.
10.4.2 RX Internet Settings
a) Click "Setup" and connect to local.
c) Click network settings to setup the IP address and group that you want to connect. You may
connect to different IP address simultaneously or connect different camera in a group and up
to 24 IP groups are allowed.
Input video server
name and IP address,
and press "Add"
Select the video server
and camera you like to
connect and press
"Add"
Input the group name
and press "Modify" to
change.
User Login:
a) Up to 5
usernames and
passwords is
allowed to set.
b) Enter username
and password.
User Profile:
Notification will be sent via
the telephone and e-mail
address set up here, when
event is triggered.
Authority Settings:
Supervisors can perform
set up, monitor and
searching function etc.
Others can't perform setup
function.
38
10.4.3 RX Surveillance
a) Click "Connect" on the RX main screen.
b) Select a group name and press "Connect" to connect.
d) Snapshot at remote can be performed; Click the camera number to take a snapshot, the
snapshot image can be found in C:\SkyviewRx\Snapshot.
10.4.4 RX Remote Setup of Server System
a) Click "Setup" on the RX main screen.
b) Select the recording server you like to setup, presses "Option" to input ID and password.
Click on the required camera for snapshot
39
c) Setup menu will show after successful connection, you are now ready to setup the server
system from remote (Motion detection masking function does not open to setup from remote due
to security intention).
10.4.5 RX Remote Playback of Server System
a) Use of remote playback is the same as the server system.
b) All channels will show playback when you first entered the remote playback.
SZT- 620/ 160/ 216/ 816 Series:
MP4 Series: 16 channels, audio available in playback and TX. Same way for set up and
connection as other series
**"Slide Bar" and "Previous Frame" icon are not available in MP4 RX playback
40
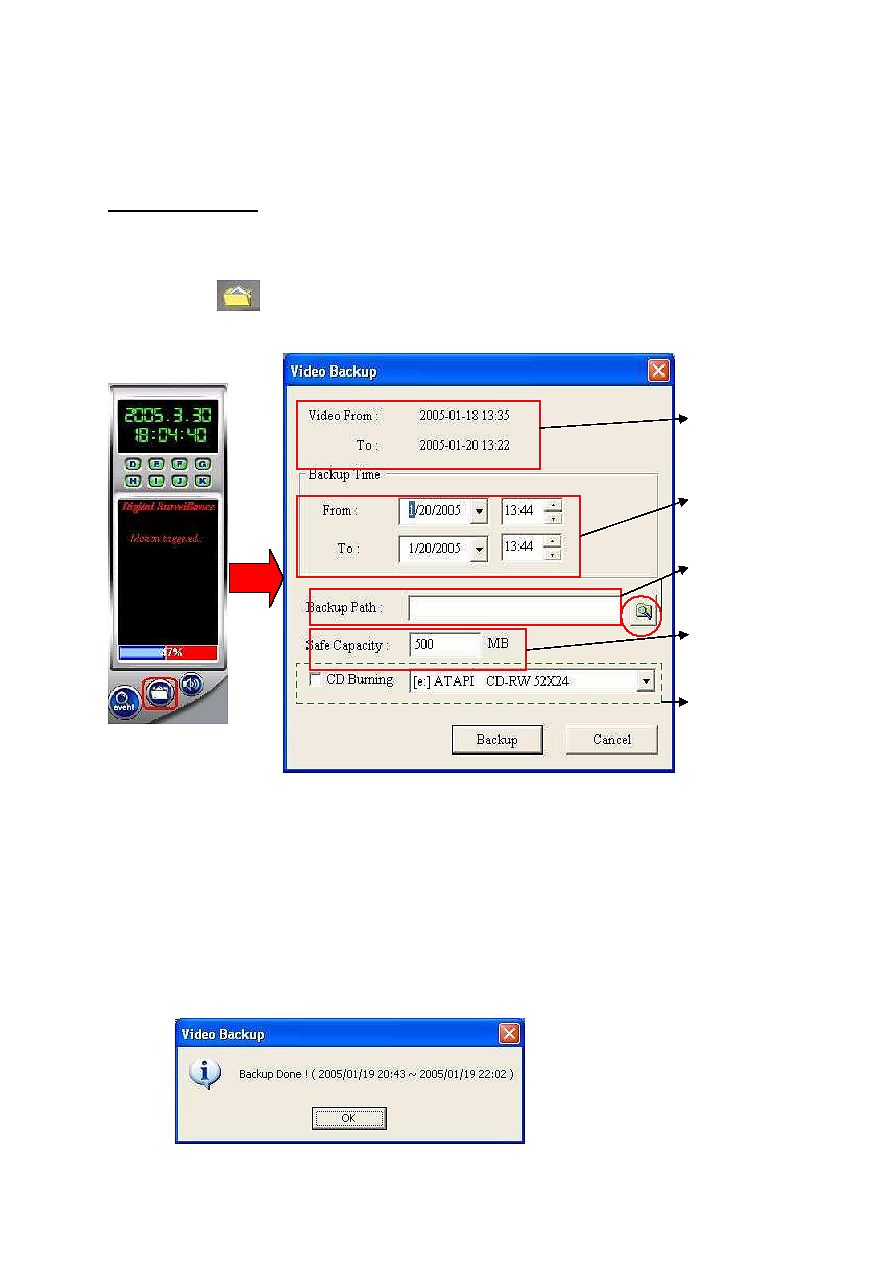
11.
Recorded Video Backup
New backup feature to simplify recording video backup process.
1. MANUAL BACKUP
:
to backup the recording video data immediately. (If you want to backup to
CD, please equip with CDRW Rom and install Nero 5.5.10.42 or above
software before in advance)
One click on
Video Backup icon in main interface, below screen will pop up
Please select the required video time for backup within the range of existing recording video
data, input or select the backup path then click on "Backup" icon to perform backup instruction.
(This method supports to backup in removable disk and network drive)
If you want to backup video data to CD, please follow above steps, check "CD Burning" and
click on "Backup" icon to perform backup instruction
(Note: Currently CD has capacity within
600 MB only, please watch out the capacity of required backed up data)
Existing recording
video data
Required video time
for backup
Set up backup path
for video data
H.D backup safe
capacity
CD burning
selection
Backup Done message
pops up for backing up
41
2. AUTOMATIC BACKUP
to backup automatically everyday by setting up the backup
performing time.
This method is to backup
24 hours recording data since the start of the required video
automatically by setting up the performing time in advance and support to backup
in host computer's hard disk drive only, network drive is not supported for backup.
Important Note:
A: Using ways1& 2 to play the backup video from
Backup or Tape folder
must
install Cap Player in the Skyview CD(CD
Tools
Cap Player).
B: Save in playback's video must use Codec in the Skyview CD.
Enable automatic backup
Backup performing
time
Select backup path
Set up the safe
capacity for backup
Select the start time of
backed up video
Notification for backup
done and need to

42
12. SKYVIEW Important Notes
1.
SkyView Co. request that
additional cooling fan for capture card
chipset
is needed for all series products to make sure system more
stable for the approaching of summer, especially for SZT816 series.
2.
SkyView all series are upgraded to
Versatile Mpeg4 Compression
.
3.
IE Browser
: SkyView all series have added the following 3 functions
including snapshot, recording, and light control. The file saving path for
snapshot & recording can be selected by end user.
A:
Snapshot
: Can be saved as
JPG
files
B:
Recording
: Can record the video files as
AVI
files
PS. Press this icon and set up the saving file path to start recording, and
there will be "
REC
" texture on the upper left of the screen. Press
again to stop recording.
Note
: Don't switch to other cameras during recording, or it will fail.
C:
Light Control
(Optional! Additional control box is needed.)
4. SkyView SZT series: 3TCP/IP Gates for remote connections:
25port: for E-Mail
80port
1350port: Remote Playback
1351port: Remote Setup
1352port: Event Center
1357port: Real time image
6001port: Light Control
43
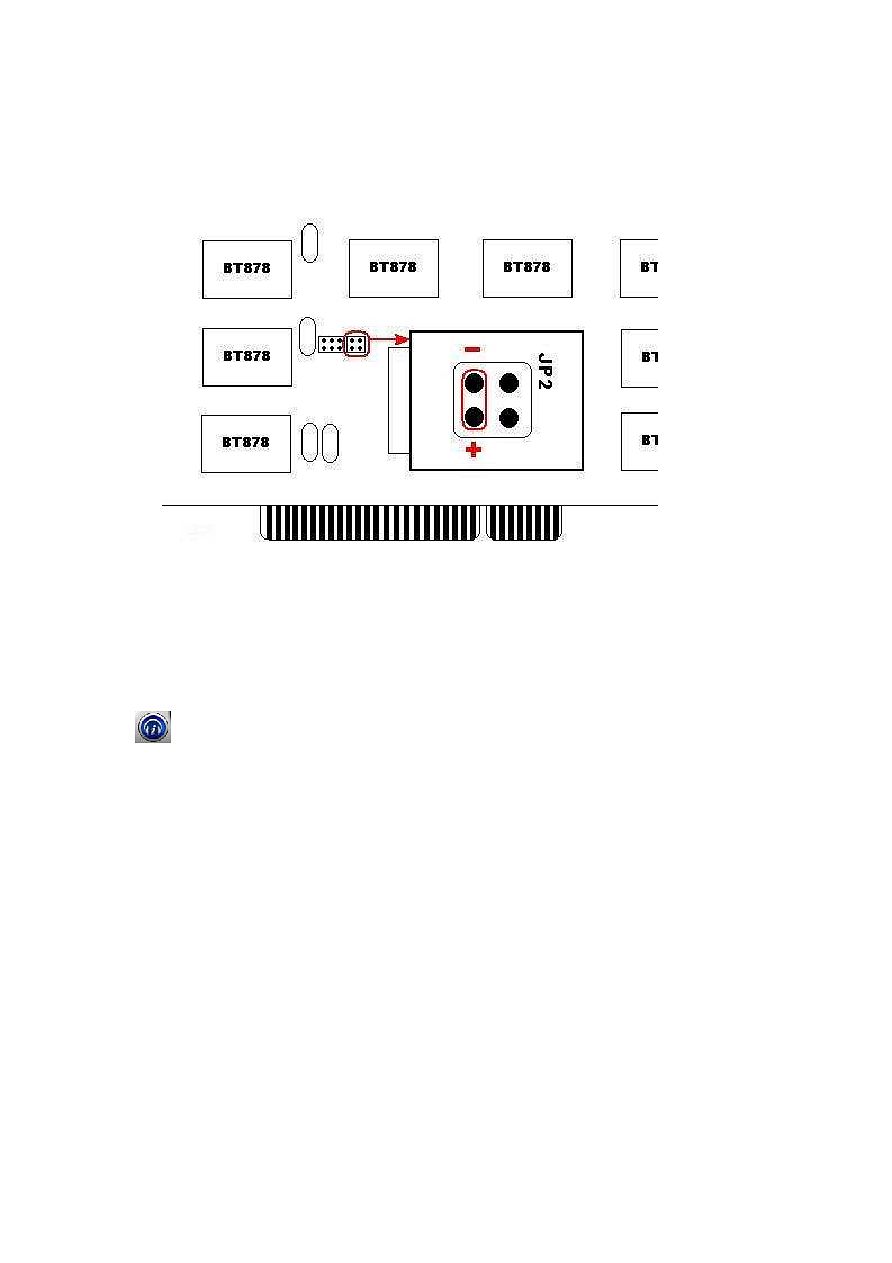
5.
Watchdog
: Add this function to meet the market requirement.
For SZT620 & SZT216 series Reset cable must be installed at first
card!!
Image card setup is as the following:
The other side of cable attaches on the M/B Reset, and please note the +/-
poles.
6.
Audio
: Support 1audio CD software. Press this icon you can choose
mute voice or not at Display or Playback screen.